- Lesson Details
- Transcript
- Instructor
- Steve Huston
- Subjects
- Painting
- Topics
- Head & Portrait, Human Figure
- Mediums
- Brush, Canvas, Oil Paints
- Duration
- 2h 24m 51s
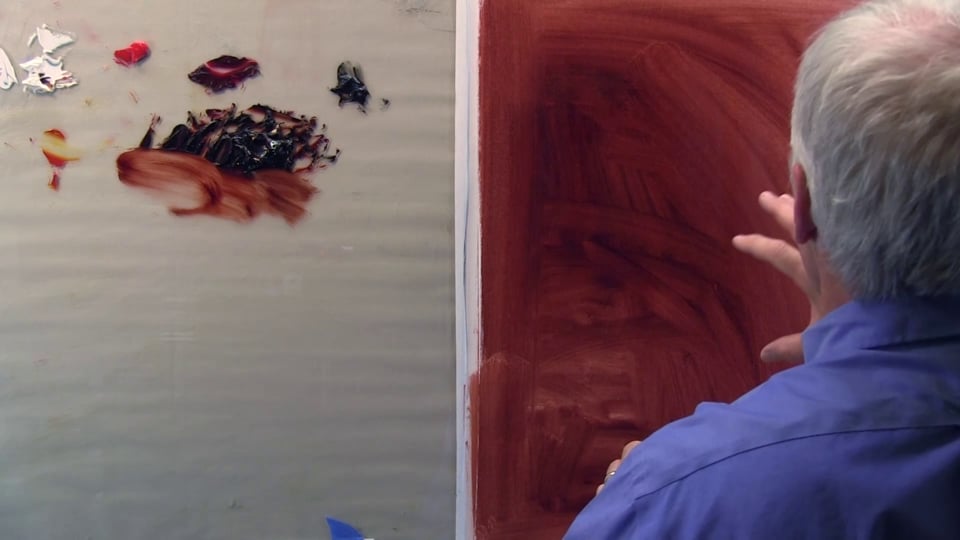
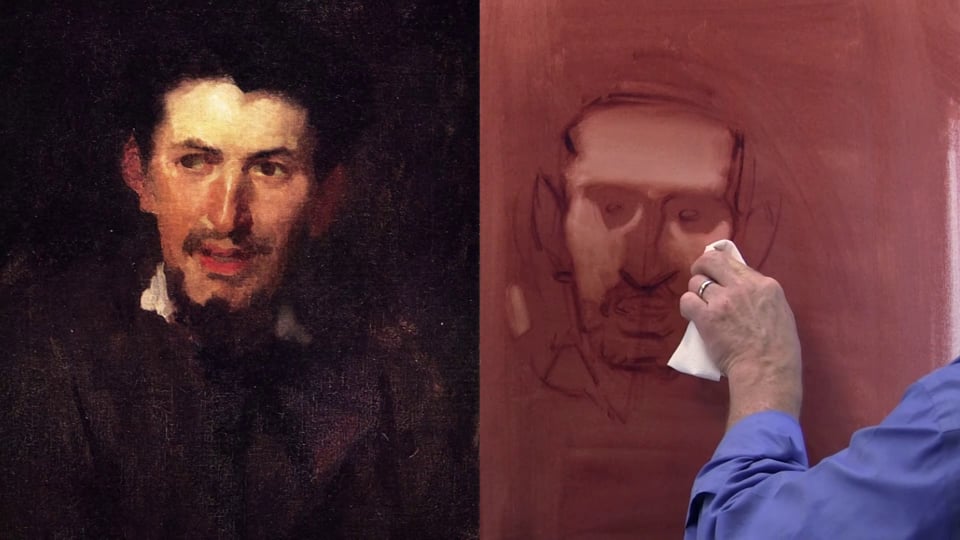
Steve Huston will cover the Rub out technique using a brown school palette from a painting by Frank Duveneck on white canvas. You will learn how light can affect the tone of the painting and how to add and subtract light within the Brown School palette by adding and taking away paint.
Materials
- Gamblin Artist Grade Oil Colors
- Simply Simmons Paintbrush
- Canvas Panel
10199 views
32 likes
Discuss this video in the forums!
DiscussChoose one video.
AUTO SCROLL
(intro music playing)
In this video lesson, world renowned painted Steve Huston will cover the rub out
technique using a Brown School pallet from a painter by Frank Duveneck on
white canvas. Steve will walk you step by step through this traditional
and useful painting technique. You will learn how life can
affect the tone of the painting and how to add and subtract light within the Brown School
pallet by adding and taking about paint.
AUTO SCROLL
Welcome to this lesson on rub out technique. We're gonna
learn a little bit about the way to start a painting by
laying down a tone and pulling out the lights
out of that so you get a very quick sense of light and shadow, foreground
background relationships, so almost immediately you get a sense of space and depth
and mood and atmosphere and all that good stuff.
So rub out technique we're gonna lay down a basic value,
a basic color, a brown color, and then we're gonna actually rub it out -
rub it back with a cloth or a paper towel. I'll show you exactly how to do that of course.
We're gonna look at a painting from Frank Duveneck,
terrific painter. He's one of my favorites of the period. He lived
around the time of Sargent, who's 1848 to
1919. He lived 70 years. He was well respected,
well known, and quite a famous artist by the time he was in his mid
to late 20s. Henry James called him the
unsuspected genius and there's a book out that came out several years ago
with the same title. Terrific stuff. He's actually a little uneven though. Some of his
portraits are better than others, but they're all interesting
and he had a somewhat wide range of techniques that he
used. Variations on the theme. He was most famous for his
series of young boys, street kids. Something you'd see out of Charles Dickens,
tough kid in trousers,
overalls, smoking a cigarette, that kinda thing, in the street. He
helped to overturn the Hudson River school with
this kind of new direct painting of art. You can see how it leads
pretty directly into the Ashcan School
of Robert Henri and George Bellows. The Hudson River
School was -
Thomas Cole really founded that and Frederick Church, all these
romantic, American, East Coast, landscape painters. It spread into the West later
with Bierstadt and others. Very romantic, very beautiful, somewhat
reactionary style even at the time it came it was
kind of a homage to the good old days, the romantic
period, America as a
paradise basically, painted as a paradise
and helped to create the idea of preservation. Eventually
what started the
national park system. It was helped to come through
that style. Yellowstone National Park was the first of that. So anyway
Church and Cole were in the vein, Duveneck
went in a very different way. Much more urban style, grittier style,
rougher style, and somewhat cruder style at times. But
beautiful stuff. The work we're gonna do right now is a
portrait of a fellow artist. We don't know who the artist is.
And he did several paintings that way where he worked from
fellow artists posing for him. So I'm gonna
mix up
black and - ivory black,
alizarin crimson, and transparent orange
all together in a big - you can see how
big this is - a big pot of burnt
sienna. Making my own burnt sienna. I wanna
color when I do a rub out that has no white in it. You can't have white in it,
it needs to be completely transparent. So one of the reasons I'm mixing my
own - the paint you buy, the earth tones you paint from
that come out of the tube that you get from Windsor Newton or
these happen to be Gamblin - are fine. But this is even
better. And I'll use a second pallet knife to scrape off
the first because that - as you're mixing that paint goes
up to the base of this and it gets hard to get
that so you can use a second one to rub it off.
And as I'm painting we will flash - or as I'm mixing here
we'll flash another painting of Frank Duveneck
and that is a portrait of an artist in costume. And you can see -
I suspect the whole painting is done this way, although
I haven't seen the original. You can see
in his chest area, his kinda thin
rubbed paint. And that's more or less what we're gonna do over the whole
canvas.
And then typically
the Brown School painters - and we know Sargent did this - we suspect
many of the other Brown School
Rubens and
Van Dyck and all that group, Rembrandt,
probably did this quite a bit. Many of them would have done this.
We're gonna rub this down and then we're gonna do the rub out technique
and that's gonna give us an underpainting. And it can even be used
as a finished painting. There's a whole school of
illustrators int he 80s, American Illustrators, that did this.
(painting)
There's Grove and
(painting)
I said a whole school and I'm forgetting the other names. That's all I have. But David Grove and
several others would do a rub out technique. Bernie
Fuchs was the king of it. Bernie Fuchs did a rub out technique.
And one of the advantages you have when you do a rub out
is you get this great sense of atmosphere and also this great sense of
soft edges. And quite often we realists
paint in hard edges everywhere.
And it was actually quite a
while in the history of painting, in the early
Renaissance and the later, it was quite a while before
soft edges were used really at all
and part of that was the color mixing issue. They had to mix
the colors for the day to paint like a fresco
painter does the same thing. They'll prepare the
plaster on the wall, the fresco, the painting, on the wall,
in the chapel or wherever it's gonna be. And
they can only paint into wet plaster. And so they
can only mix as much plaster up - and it was a different kinda plaster
than plaster in a hole in the wall, but same idea.
And do a thin layer of plaster over
the area to paint and they'd mix all the paint
for that area and then that master would only
do as much as he could do in a day. And he knew
how far he could get in a day. And so they would mix that much
plaster and so it'd be done in kinda jigsaw puzzle pieces. We'll do this today,
we'll do this tomorrow, this'll be the next day, and they'll piece it together.
And the early
oil painters ended up doing the same thing because they had to mix just enough paint
to last the day. It wouldn't really last - well they had ways of saving it,
they could stick it under water and it wouldn't dry
really quickly. They could wrap it up in little bladders and stuff,
but for the most part they couldn't store
paint like you could in tubes. The tube was a great invention for artists.
They couldn't do it in tubes so
they would paint a section here in oil paint and that would use up the paints
for the day, they'd paint a section of here and they'd piece it together. And you could see
those edges, those hard edges where they separated the gray
stormy clouds from the warm
costume of the figures, that kinda thing. You can see the
demarcations. So the actual technique
of our early painters was to piece together
section against section against section. And so the hard
edges were the natural place to do that. You would paint up to
the shoulder or the foreground, paint in the background, or vice versa
and that would be where you'd stop, at that hard edge. So feathering together
these edges became a technical issue
and kind of a psychological barrier since I've gotta paint
a section that's this section, I'll do the next section hard hedges.
Whereas everything else - another way of thinking would
be sfumato where everything's smoky and soft and blends together and
that's what the rub out technique encourages
is soft edges. You're slowly pulling out the forms
the forms are merging from this misting, murky,
brown environment. Okay so notice I scrubbed that
on with a big brush and now I'm rubbing
with paper towels. And you can see how it's taking off,
rubbing it back so it's not too wet. The trick with
rub out technique - and you can leave it nice
and smooth and clean or it can be painterly
like the chest of that Duveneck piece that
artist in a costume piece.
So either way we'll keep it fairly smooth.
And now we're gonna do - let me call back up my image here.
Let's move that over there. Alright so
here's my environment now. Think
of this as the mist and the forms are going to emerge out of this. So this
is gonna be the beginning of the background value
and typically in these rub out techniques there's not a lot of background.
It's a foreground based idea.
We're gonna have that face, in this case, emerge from the environment.
But it wouldn't have to be. But that's typically what we'll see.
And I'm gonna just take the tip, the very tip of my
brush goes into my solvent, just to thin that paint a little bit
and now I'm gonna sketch out my head.
In this
as you see the image
(painting)
on the screen at various points in the lecture, you will
notice how that
lighter face goes into the darker face, goes into the darkest face, goes into
the background and just fades away.
We're gonna work fairly
big so you can see it. Big is not all that
conducive for rub out. Smaller, more intimate
details would be
the easier way to go.
(painting)
Get this great nose coming down.
(painting)
So this value here -
we have here - and we can go much darker, wouldn't want to go much lighter,
we'll go a little lighter. It's gonna end up being our darker half tone.
But it could be our shadow.
You can see how as I lay in the mustache
for our gentleman here, that's gonna be
closer to the value, actually sketched in dark
closer to the value to what we want.
(painting)
And what we'll do I think on this is we'll
do it as a rub out and then we'll come back in and paint
opaquely over it. Which is what our Mr. Duveneck
has done.
He's got the goatee happening here.
Stylish
artist that he is.
When you lay in the bottom of the ear you can compare it to
the tip of the nose. It's a little bit higher than the tip of the nose
and he has this kinda funky, wild, funny ear coming way up
above the eyebrow line slightly.
This side you can barely see that ear.
But we can see it. It's very soft,
sfumato, which is Italian for smoke. I just like the sound
of sfumato.
It's smoky, soft
atmospheric idea.
Broad brow
and then the hair in the background go away.
Little chunk of a collar here.
Little bit of a collar here. And the rest is just smoke.
Just black.
AUTO SCROLL
Alright so there is our fellow.
Now I can rub out with a paper towel or a
cloth. This is actually terrycloth towel.
But it could be anything
really great surface is a cotton t-shirt works great.
This is a little -
a little furry so it'll be a little tough for the edges
so you can see how now I'm going to wipe out.
The other advantage this style has is it's
gonna have me work in a soft, middle range. Middle
lights to middle darks is gonna be typically
what it encourages you to do. You won't get all the way back
to the white canvas, although
but you'll get close to it by scrubbing down. And typically
your values that you've laid down aren't super, super dark
so it's not gonna be a real dark one, so the shadows are gonna be middle
dark and your lights will be middle light. And notice every
time I rub then the cloth gets dirty and I need
to find another spot. So you want a big cloth or you want several pieces
of cloth. And so you have your chunk of cloth,
scissors ready. And you can use a really big piece of cloth. I want to do something
small so it wasn't flapping around in front of you guys. But a bigger piece of
cloth is not a bad way to go. Now
typically - and
we're gonna leave the eye sockets darker
so that's kinda the shadowy socket in there.
And notice what happens, I wiped a bunch - let's do it again.
I wiped most of the value,
color away from the forehead here.
And now I'm gonna keep my same dirty spot here
and I'm gonna go right up the forehead. And notice how by
doing that, I get a natural gradation.
And that's that sfumato effect. That smoky, soft effect.
(rubbing)
Now we have
variations on how we can do this. I'll show you a couple here.
So it got dirty, switch to a new spot,
(rubbing)
and notice how that is
a thick tool. It's thicker than your finger. So it's not like working with a nice,
fine brush. It's gonna tend to be a much
cruder instrument. Like so. But you can do
quite a bit with it. And you can even take
a stick or the end of your brush or whatever, and wrap a little
bit of cloth around it and make more or less
what a charcoal draftsman would use, a stump.
Or a roll of paper, we'd use a rolled up bit of
cloth. So we can do that. Paper
towel is gonna have the same effect
and it's just preference. You can just take your pick.
(rubbing)
Okay. And again gradation
is typical of this kind of Brown School
painters, the light drops off as it goes. We get little flecks
of paper towel or a cloth on here which can be quite irritating.
And you can have a soft little feather brush to brush them off.
Or they'll come off when it dries if there's not too
intrusive.
And that's dirty, switch
to a new spot. Do it again.
There's a
French artist that was collected by I guess
Rodin.
And I'm not even completely sure how to pronounce the name. It's Carrière -
who his whole style, his whole [indistinct]
was rub out.
And his sfumato technique,
his smoky technique, everything merged out - and sometimes it'd be really painterly and just kind of
left like this. Other times it would be more realistic. He did a lot of
child paintings, little portrait paintings.
Really beautiful, soft edged, smoky,
lost and found kinda stuff. They had quite a bit of influence on
my work.
And he did all rub out.
And he didn't do any opacity. Typically the painter would do a rub out
technique like this to establish the basic
structures. And then come back over in thick paint. And we will do
just that.
So we've worked it out roughly. Now
here's the third way to do it.
We have the paper towel,
we have the rag but we wanna take a little bit of that ear back
here.
(rubbing)
We can also do it with a brush.
(painting)
And you can see how I can rub this. Also, if you can see it,
as I rub I'm creating a bit of a hard edge,
a border where I'm pushing the pigment up
into an area.
(painting)
Maybe you can see it a little bit better.
And everytime you get a little bit dirty you wipe it off. If you have to go into
the turpentine, the solvent, then you really dry
that off. You want your tool here, whether it's the rag
or the
brush, you want it to be very, very
dry. Now notice I
can also do a rub - I did a rub out
I can do a rub on. So now I'm gonna stroke,
basically
glazing in effect the darker shapes.
And by going back and forth, you might have to go back and forth several times
to get your shapes. It's delineated
but notice now I can
develop my drawing
and my design and stuff.
And so this is just a softer, slower
way of painting.
And at this point it starts to get a little closer to
a typical painting techniques. Rubbing on, rubbing off.
I'll show you a little bit different variation of that in a second.
And you're just laying in
shapes.
(painting)
And you can see how it's always a soft edge. See how soft
that is? That can be
brought into a harder edge, which is quite different than
most painting techniques and
quite different than most painting starts. Our next
lesson will be starting
by graphic shapes. Completely the opposite,
there won't be any soft edges.
It will all be hard edges. So we can lay it in
like that and we get this nice, soft, smoky sense
of what the finished painting would be. And as I said
for a few select artists, this would be the finished painting.
Now the other thing we could do is we could
say we rubbed out too much.
And so I'm going to bring back -
let's say I worked out this eye and it's more
or less true, this eye on the forehead and it just
didn't work. It was badly done or
it got too light and both is true here. Not such a great
eye and it got too light. So what I'm gonna do, I'm gonna scrub in with a dry,
just taking my paint without any solvent
and we'll rub it in.
And notice how I'm
not putting the brush this way, I'm laying it flat or close to flat
so I have this side. You can see, you know, half the brush
more or less is covered with pigment. And that whole
half section is laid onto the canvas
and scrubbed back and forth
and now I can reestablish
that dark area, the correct
value or everything was a little too light, which it really
was for the shadows when I started. Now I can come in and I can scrub this
down darker. So his forehead and hair area
and even this ear area need to be much darker.
And notice how I'm working pretty slow. This is not a quick
technique. We can get pretty good
results fairly fast but you can't
motor through it the way you would an alla
prima technique where you're doing opaque paint over opaque paint,
quickly covering, quickly blending,
creating that effect. Okay
so notice how I'm reestablishing
and I'm gonna scrub over the top here.
I'm glazing over the top here as I did here.
So the reverse technique
instead of rubbing lights out of the dark or rubbing darks onto the light.
But it's the same sfumato
rub out technique. Now the drop off of the cheek.
(painting)
The delineation
of the nose.
Scrubbing that
side of the brush, all the way through.
(painting)
And it's - you can see it's a very -
right off the bat it's a very pleasing technique. It's
romantic, it's soft, inviting, it's
quite a bit non committal.
You know we could leave it like this, it'd be pretty interesting. And so we can obscure
areas that are giving us trouble,
you know if you have trouble with that eye you can just let it be this smoky
cavity of an eye. And in a lot of ways
it feels just fine. And Carrière
would do just that.
So this is a good
way to go if you're not a really comfortable draftsman.
You're not comfortable drawing in paint. The Sargent
technique that we looked at in a bit of detail.
That kinda alla prima, Brown School technique that we've done, a lot
of the demos are all that same style. And it's really a draftsman -
draftsman's style. You need to be able to draw
well enough that you can lose your drawing
and
build your painting and then redraw with the paint.
Here I'm more working in shaped areas.
More of a design, those soft edges shapes.
And then I can scoop the eye this way - oh shoot that's not right.
I'm gonna scoop the eye
this way. Push it out.
So it's really more a designers way of working.
You can kinda design that eye. Oh that's too big,
scoot it back the other way. Back and forth, back and
forth. Now look at how I can glaze down that ear.
Make it even darker so it gets lost in the background.
Now one of the
great limitations of this rub out technique is
color. You can't do bright, rich,
multifaceted color on this.
It's just gonna be this kinda monotone. It's gonna be all in the brown.
But it could be anything. You could do bright green and make it crazy color.
But it would just be one color more or less. But what we can do
and we'll do this in a second step on this demo, is we can come in -
back in now and paint opaquely as we
would in a typical painting process. And so this could be the
foundation, the design stage, and I'm
brushing off some of those little goobers, those little bits of paper towel
and terrycloth that were on there. There's one there.
So I can come back on top of this and
build up color in the lights and or the shadows
but typically this is a Brown School
limited color technique that I could
build things up any way - where I want.
AUTO SCROLL
So let's get a little bit of this goatee, beard
in here. Everything just gets lost. The more
it gets lost, the more romantic it becomes. More
inviting it becomes and the easier, in some ways for us, it becomes. We're not
committing to exactly where that chin is. We're not having
to draw the hairs of the beard, it's just a block of
value that has some soft edges on it. The
limits of the face
fade into the background. So we don't have exactly where one thing
begins and another thing ends.
(painting)
Okay so always the side of the brush and
now flat.
As you can see now it's gotten
pretty cool looking. Nothing's really committed. I haven't done
much work really in any of the details, but it has this
soft kind of emerging from the gloom, coming out of the murky
waters kind of effect that's very inviting. You can create
a lot of emotion and melodrama
with this style.
And you can see how I work into my
hard edges. Now this has a hard edge here and I worked up
to that. Okay everything started first because the soft edge
solution. And then you end up at the very
end with a hard edge solution. That's
completely different than most painting processes. Most
processes you cut out one area
in light color, one area in dark color, one in warm, one in cool,
one in rich, one in gray. And then you render away
and towards the end of the painting you add some soft edges.
This is particularly attractive technique to me because it's a
tonalist technique. Think of
Rembrandt's - not Rembrandt's, Whistler's Nocturnes.
Carrière's I mentioned.
And also yes Rembrandt with
everything kind of moody, the Baroque
painters, most of the Baroque painters are in that
tonalist direction where the values kind of
grab and excite and show us and then fade away
to some extent or another dramatic or not. In this case it's
hyper dramatic. Rembrandt very dramatic, the tonalists
like Whistler, very dramatic.
So this is a little collar here. This
all goes down into black. Deep blacks and
for us browns. Now I can come back again.
I'm gonna go even thicker with the paint
and I'm gonna scrub again and now I'm gonna make this dark, shadowy
ear
separate
from the even darker background.
And here we have
a shadow of the collar here
showing up. That goes into the darker
goatee. I'm gonna switch
brushes here and get a clean, dry brush
and
reintegrate that
value here back into the surround values
here.
And there's gonna be a learning curve with how much paint
you put down. How dry is it? Sometimes when you squeeze out paint
right out of the tube it gets pretty wet and it's too wet for your rub out techniques. So you have
to let it dry, set it on some paper towels to soak out some linseed oil,
let it sit for a couple days,
put quite - especially with a new tube of paint, often times you'll get a puddle
of that linseed oil right at the tip when you squeeze it out.
Gets wet and that just goofs you up. You're in trouble then from
now on.
(painting)
Just scrubbing again ever more opaque but
just in thin glazes.
You can see just a little bit of detail here.
(painting)
It can be painterly. See how it's kind hatched in a ragged.
Now I can come
back and say well, right in here -
put down, got too many brushes in my hand. Let's
wipe this one off. Now right in here
it gets a little bit lighter to
show that ear.
(painting)
There's that soft edge. We can see how it can be kinda
hatched and painterly. Alright now
let's come back and
rub out this socket a little bit.
(painting)
And as you're - as I paint I squint at it to get the overall
effect. What's it really doing? When you open your eyes up you see all that
lovely little detail, all those great brush strokes that you so carefully
put down. And you're looking at your technique. Stroke by
stroke. The little things. When you squint you see the overall design of it.
The comprehensive design.
Okay we're gonna knock this down a little bit. Now what I'm
really doing with all this
stuff - let's take up in here a bit.
I'm setting up for highlights. When I'm choosing my half tone
value or color
I'm really keying it - as in keying
in a lock - keying it, comparing it, relating it
to what the highlight will be.
So I want
(painting)
this
to be dark enough that I can put a nice
highlight on it. So that's kinda what I'm looking for.
So back here though. Now I'm gonna take a
little bit of turpentine I'm gonna clean my brush off. Now it's soaking wet.
If I put something soaking wet on there
that's gonna take pigment away quickly so I'll think well shoot
that's gonna speed up my process, that's a good thing I can get done quicker.
See how I'm doing quicker but what's gonna slowly happen
is this creates a watermark which will show off
in your nice, soft tones which you may not want.
And also starting to drip. It's dripping down.
And so we need it to be dry.
Super dry. So that means you really, really
(painting)
need to clean your brush. And a little tip - this is the hog's hair bristle
brush, this is a synthetic sable brush. I use synthetic
ones rather than the real sable. They're a lot cheaper and I'm scrubbing around
a lot and I wear these things out. They end up getting splayed
and worn and everything so there's not sense buying a really expensive sable brush.
For pen and ink, brush and ink work I use a
series 7 Windsor Newton which is a very expensive brush. But this is a cheaper
As long as the hairs - synthetic hairs -
go up and don't splay out. If one or two splay out you can nip them off with an x-acto knife
or something but they should all group together as this does. At least
in the beginning until you abuse it.
So now I'm gonna come
down here and adjust
my brow ridge. And I
eyebrow area. And I can scrub up this way and you can
see when I scrub up I'm pushing that kind of that watermark edge.
up and I have to be careful to feather it
into the environment. But it mucks up my gradation a little bit
doesn't it? Okay. Now
I did a series of lectures on all the features. And one
of the foundational lessons in those lessons
was to set up the structure, the architecture
for the feature. So I'm working the brow ridge,
now I'm working the nose, and I'll work the cheek to set up
for the eye.
I need to set up the structure to set the eye in there. So take a look at those
lessons. They're good ones I think on giving you the
basic formulas for success
(painting)
for
getting your features well placed.
Features are little architectural shapes. And now I'm gonna use my paper towel.
I'm gonna rub this relatively big area out. For the really little area
I use my brush. For the big areas I'm using
my rag.
If you have a rag or a paper towel I wanna use.
There we go. So it fades off that way.
(painting)
I'm rubbing now the upper lid out.
Here is the
cheekbone.
(painting)
I'm gonna rub that lower
lid.
We get a little pigment. What you'll find is you start rubbing that
pigment away and then after a while it doesn't rub away any more because the pigment
loaded up your brush and you have so much pigment on the
brush that it's adding pigment back or canceling
it out. The friction of rubbing away and the load of the brush
can't go anywhere. You're spinning your wheels in the snow kind of
idea. So then you need to clean your brush again. So now I've got
that solvent on there. I'm gonna squeeze and squeeze, go to a different section
of the rag, squeeze, squeeze again
and even check over here and make sure it's not too wet. Still a little wet, squeeze again.
(painting)
Wiping it off. No matter how much you squeeze
it's not gonna be as nice as that totally dry
brush. And so you can even have several brushes
on hand and switch to a new brush, leaving
this wiped down, cleaned up brush to dry
and the solvent evaporate. It'll go away pretty darn quick.
And you can see how I've
slowly - as I slowly ease into this solution
for the eye, now I'm getting some of the whites of the eye -
it's subtly lighter.
And when we began subtly darker
(painting)
And so you get this nice,
slow easing from a subtle painting to a more
contrasting painting.
Really simple and even kinda crude shapes in the beginning
to really lovely, maybe sophisticated
shapes. Maybe complex, multi
layered, mini shapes at the end.
Okay now I'm pulling that inner eye socket
on each side of the nose back out as it almost always
does, onto the cheek.
You know I'm just hatching, lightly
brushing over the top, feathering
whatever word you want to use. That side of the nose
back into cheekbone.
And see how quickly we get this lovely rendering.
AUTO SCROLL
And then I can come in
(painting)
and
push that nose shadow
(painting)
down into
the mustache so we're getting that nice - that key,
ever important underplane of the nose. If we don't establish that
underplane of the nose strongly, the nose has no chance of
coming off the surface of the face, coming off the cheekbones, coming
at us. The great problem in a front view is
symmetry. Getting this eye to look like that eye.
Its placement. And there's always
a bit of asymmetry to figures but we need the general
symmetry to be working. And to get that flat,
perspective nose to come towards us. If it were
a profile it's no problem at all. The contour describes
the nose separating from the rest of the face. But in a front view
that nose is coming right at us
and it's contained inside the planes. The silhouette of
the cheek. It has no linear expression. It doesn't
separate in a linear way from the
nose and stuff. So what we must do
is separate it in a tonal way. Get the
values to be different. And we're gonna do that in a couple
different ways. We're going to make
the bottom plane of the nose quite dark like a
typical portrait. And that brings it
off. You can see now we've got this stair step coming off. And of course you guys all
know a lot about noses as the audience. Whether
you've painted or drawn or not. So you will get the idea that
noses do come off. On some level you'll understand that. So you're gonna be
helping me out.
But the real trick is to create a different value.
Whenever we're painting we're depending on that old formula that I've talked
about in the early lessons. Laws of light,
early tonal composition, all that kinda stuff. Different value, different plane. If I
can get the side of the cheek to be a different value than the front of the cheek
we'll feel that box logic. If I make them the same
value they'll go flat. So right now
the front of the cheek, the side of the cheek, and the ear are
very close in value.
And I'm gonna make them the same. I now
added some tone to my rag
just to bring this right across.
Now the side
of the cheek, the front of the cheek, side of the nose, front of the nose are all the same
value. So that flattens out. We lose its structure.
But when the front of the cheek is a different value than the side of the cheek, it pops off.
And so the bottom plane of the nose is a different value
than the top and side planes of the nose.
Different value, different plane. It helps to bring it off. The other thing we're gonna
tend to do in these kind of portraits - not always but quite often -
we will make the overall half tone of the nose
overall darker than the cheek.
Half tone of the cheeks around it. So I'm
gonna make the cheeks at least slightly lighter
than the nose. And we have an excuse
for that. The little parts of the body, like fingers, nose,
ears, tend to have more blood at the surface of them.
So they get a little redder and a little darker often times. The big areas
forehead, chest and torso especially
the blood's down inside, in the chest the blood goes down to protect those
organs and help those function, it's not at the surface.
And so they get lighter - those areas get lighter and more
pale. And you can track down on your own hand - look at the fingers,
hand, wrist, forearm, shoulder, chest, and you'll notice
a general gradation usually. Lighter in value as you go down.
And so we can use that
as a means of separating
the nose from the cheeks by making
it both darker - deep, dark shadow here,
darker
half tone around it. Both darker and lighter. Now I
just clean off my brush with turpentine and I didn't do a very good
job cleaning it.
(painting)
And what I'm gonna do is I'm gonna rub out a little highlight
so now that's wetter.
(painting)
I'm gonna patiently
move that value around.
Rub it out and lift it off.
Wiping it off on your brush - on your rag
each time.
See how that's rubbing?
And by having to go slow like this
you're being more
careful. You're observing.
Now I'm gonna wet it again
(painting)
and we can dab it and make sure it's not
drippy wet.
(painting)
Take a little bit
of those water mark - by water mark I mean there's a darker edge
ringing - look carefully at a wet stain.
You pour wine or grape fruit juice or something like that,
you'll see that the stain
gets darker at the edge. Pour it on a little piece of paper and take a look at it.
Typically it's darker at the edge. That's that watermark effect.
And then I'll let that
dry for just a bit.
And you come back and muck with it but I want that turpentine
to evaporate.
(painting)
Okay. There's that setting up.
I'm gonna come in now and pick up the darker
side planes of that nose. There's a nasal bone
coming down like a
forked tongue of a snake - actually it comes down both sides.
You see it here. Now I'm using a lighter touch. I'm pressing harder to get
more pigment here. I'm doing this first because I have more pigment
loaded up on my brush. I'm doing this
second because now there's less pigment on the brush and I'm using a
lighter touch. I'm not pressing in.
(painting)
Just in those tones. I'm gonna wipe most of this
off now.
Dust over that.
Soften that.
And then that
needs to be a little bit stronger
in value. Pushing out that
paint down away from the highlight. I don't want it at the highlight.
(painting)
You'll get a feel for how much paint is on the surface
how much is on your brush, how wet or dry it is,
and how you can move it around. And you'll dab it a little -
oops that's too wet, or that's not enough paint on the brush
and you'll come back
and do it again.
(painting)
And then I'll stroke in those shadows. Often times
the shadows will have little wobbly strokes in there because I've
pushed paint into it or I quickly laid it in
and I wanna come back and
organize that whole painted shadow into a
darker, little smoother
transition. And now I'm gonna
come in and adjust this shape. I'm gonna push it back up
and that watermark effect can have
can be working for you to create a nice dark, lined edge.
(painting)
And you can see I've gotten almost back to white. Just kind of a yellow
white. I'm gonna stroke it this way. Now I'm gonna - it's
pretty wet in there so I'm gonna dry it off
and drag it back into the values
so it softens there.
And I'm gonna
modify it a little bit and make it
just subtly
darker. Not quite so strong.
Now this side is the weaker side
and if you rub things too light - because this is gonna be a little too light,
let it set for three, four, five, ten minutes. That
turpentine will evaporate and you come in and you can scrub in a darker value
as we did earlier in this series.
But the trick is to pull out or add in the value and then
smear it, rub it back
into the surrounding environment.
Let me get in front of you for just a second
here. Just to rub that around.
(painting)
And you'll spend - you're doing a careful
more rendered, you'll spend quite a bit of time kind of blending those
nicely. Like this wobbles a little bit. It gets lighter, darker, lighter
so I can spend quite a bit of time adjusting that. Which we won't
for this.
(painting)
There's that apple of the cheek coming around. Let's get a -
he's smiling at us a bit, he's got this jovial expression.
So we're gonna force that barrel
of the mouth out to the dimple area.
In the next section on this I'll show you
how to add some color. How to take it into an opaque painting. But for now
we're just gonna keep it as is.
And again
that lovely softness. We don't
really have exactly where that mustache
ends. But we feel it. We feel
the mass of it. So it's important in this style
to work in mass. Don't work in line. Don't get the
wisps of hair. Get the
mass of the hair. Later you can add
little wisps and stuff but in the beginning
you would want it to be
(painting)
designed shapes. And that's why I say it's a little bit easier
on you if you're not a real competent, confident,
natural, any
of those, draftsman.
(painting)
So I'm just rubbing in
the darker values. Rub in the darker, rub away
the lighter. Additive and subtractive.
Those are your two tools. We can add paint
or pigment and you can subtract it. You do the same thing with a pencil
and an eraser. Additive and subtractive. So this is a
eraser way of working.
(painting)
(painting)
and
push that nose shadow
(painting)
down into
the mustache so we're getting that nice - that key,
ever important underplane of the nose. If we don't establish that
underplane of the nose strongly, the nose has no chance of
coming off the surface of the face, coming off the cheekbones, coming
at us. The great problem in a front view is
symmetry. Getting this eye to look like that eye.
Its placement. And there's always
a bit of asymmetry to figures but we need the general
symmetry to be working. And to get that flat,
perspective nose to come towards us. If it were
a profile it's no problem at all. The contour describes
the nose separating from the rest of the face. But in a front view
that nose is coming right at us
and it's contained inside the planes. The silhouette of
the cheek. It has no linear expression. It doesn't
separate in a linear way from the
nose and stuff. So what we must do
is separate it in a tonal way. Get the
values to be different. And we're gonna do that in a couple
different ways. We're going to make
the bottom plane of the nose quite dark like a
typical portrait. And that brings it
off. You can see now we've got this stair step coming off. And of course you guys all
know a lot about noses as the audience. Whether
you've painted or drawn or not. So you will get the idea that
noses do come off. On some level you'll understand that. So you're gonna be
helping me out.
But the real trick is to create a different value.
Whenever we're painting we're depending on that old formula that I've talked
about in the early lessons. Laws of light,
early tonal composition, all that kinda stuff. Different value, different plane. If I
can get the side of the cheek to be a different value than the front of the cheek
we'll feel that box logic. If I make them the same
value they'll go flat. So right now
the front of the cheek, the side of the cheek, and the ear are
very close in value.
And I'm gonna make them the same. I now
added some tone to my rag
just to bring this right across.
Now the side
of the cheek, the front of the cheek, side of the nose, front of the nose are all the same
value. So that flattens out. We lose its structure.
But when the front of the cheek is a different value than the side of the cheek, it pops off.
And so the bottom plane of the nose is a different value
than the top and side planes of the nose.
Different value, different plane. It helps to bring it off. The other thing we're gonna
tend to do in these kind of portraits - not always but quite often -
we will make the overall half tone of the nose
overall darker than the cheek.
Half tone of the cheeks around it. So I'm
gonna make the cheeks at least slightly lighter
than the nose. And we have an excuse
for that. The little parts of the body, like fingers, nose,
ears, tend to have more blood at the surface of them.
So they get a little redder and a little darker often times. The big areas
forehead, chest and torso especially
the blood's down inside, in the chest the blood goes down to protect those
organs and help those function, it's not at the surface.
And so they get lighter - those areas get lighter and more
pale. And you can track down on your own hand - look at the fingers,
hand, wrist, forearm, shoulder, chest, and you'll notice
a general gradation usually. Lighter in value as you go down.
And so we can use that
as a means of separating
the nose from the cheeks by making
it both darker - deep, dark shadow here,
darker
half tone around it. Both darker and lighter. Now I
just clean off my brush with turpentine and I didn't do a very good
job cleaning it.
(painting)
And what I'm gonna do is I'm gonna rub out a little highlight
so now that's wetter.
(painting)
I'm gonna patiently
move that value around.
Rub it out and lift it off.
Wiping it off on your brush - on your rag
each time.
See how that's rubbing?
And by having to go slow like this
you're being more
careful. You're observing.
Now I'm gonna wet it again
(painting)
and we can dab it and make sure it's not
drippy wet.
(painting)
Take a little bit
of those water mark - by water mark I mean there's a darker edge
ringing - look carefully at a wet stain.
You pour wine or grape fruit juice or something like that,
you'll see that the stain
gets darker at the edge. Pour it on a little piece of paper and take a look at it.
Typically it's darker at the edge. That's that watermark effect.
And then I'll let that
dry for just a bit.
And you come back and muck with it but I want that turpentine
to evaporate.
(painting)
Okay. There's that setting up.
I'm gonna come in now and pick up the darker
side planes of that nose. There's a nasal bone
coming down like a
forked tongue of a snake - actually it comes down both sides.
You see it here. Now I'm using a lighter touch. I'm pressing harder to get
more pigment here. I'm doing this first because I have more pigment
loaded up on my brush. I'm doing this
second because now there's less pigment on the brush and I'm using a
lighter touch. I'm not pressing in.
(painting)
Just in those tones. I'm gonna wipe most of this
off now.
Dust over that.
Soften that.
And then that
needs to be a little bit stronger
in value. Pushing out that
paint down away from the highlight. I don't want it at the highlight.
(painting)
You'll get a feel for how much paint is on the surface
how much is on your brush, how wet or dry it is,
and how you can move it around. And you'll dab it a little -
oops that's too wet, or that's not enough paint on the brush
and you'll come back
and do it again.
(painting)
And then I'll stroke in those shadows. Often times
the shadows will have little wobbly strokes in there because I've
pushed paint into it or I quickly laid it in
and I wanna come back and
organize that whole painted shadow into a
darker, little smoother
transition. And now I'm gonna
come in and adjust this shape. I'm gonna push it back up
and that watermark effect can have
can be working for you to create a nice dark, lined edge.
(painting)
And you can see I've gotten almost back to white. Just kind of a yellow
white. I'm gonna stroke it this way. Now I'm gonna - it's
pretty wet in there so I'm gonna dry it off
and drag it back into the values
so it softens there.
And I'm gonna
modify it a little bit and make it
just subtly
darker. Not quite so strong.
Now this side is the weaker side
and if you rub things too light - because this is gonna be a little too light,
let it set for three, four, five, ten minutes. That
turpentine will evaporate and you come in and you can scrub in a darker value
as we did earlier in this series.
But the trick is to pull out or add in the value and then
smear it, rub it back
into the surrounding environment.
Let me get in front of you for just a second
here. Just to rub that around.
(painting)
And you'll spend - you're doing a careful
more rendered, you'll spend quite a bit of time kind of blending those
nicely. Like this wobbles a little bit. It gets lighter, darker, lighter
so I can spend quite a bit of time adjusting that. Which we won't
for this.
(painting)
There's that apple of the cheek coming around. Let's get a -
he's smiling at us a bit, he's got this jovial expression.
So we're gonna force that barrel
of the mouth out to the dimple area.
In the next section on this I'll show you
how to add some color. How to take it into an opaque painting. But for now
we're just gonna keep it as is.
And again
that lovely softness. We don't
really have exactly where that mustache
ends. But we feel it. We feel
the mass of it. So it's important in this style
to work in mass. Don't work in line. Don't get the
wisps of hair. Get the
mass of the hair. Later you can add
little wisps and stuff but in the beginning
you would want it to be
(painting)
designed shapes. And that's why I say it's a little bit easier
on you if you're not a real competent, confident,
natural, any
of those, draftsman.
(painting)
So I'm just rubbing in
the darker values. Rub in the darker, rub away
the lighter. Additive and subtractive.
Those are your two tools. We can add paint
or pigment and you can subtract it. You do the same thing with a pencil
and an eraser. Additive and subtractive. So this is a
eraser way of working.
(painting)
AUTO SCROLL
You'll see how easily I can drag
some of that mustache - that mustache tone into
the lip tones or the mouth tones,
the center of the mouth tones, and integrate
and just gradate. So it's always gradations
first whether it's just a soft
edge gradation or a full gradation like down the cheek.
Gradations first and then settling into the more graphic
hard edged lines, sharp, delineated
silhouettes, borders.
That type of thing.
And you'll see under the chin. We can see
how easily I can separate the little
forms. The little chin from bigger jaw.
The lower lip
from the chin, mouth and such. And you start to get those
little forms
working out.
Soften the edges.
(painting)
Soften the edges.
(painting)
And just keep working away, working away.
So now we have a pretty good set up here.
And we've got more to do around it
you know, finishing it all - let's see we did that kinda stuff.
This would be a real nice beginning stage for
a painting. Now we can keep going just as
we would here. We're not going to do that, we're basically
gonna stop here in just a moment because our point at this point is not to show
the careful rendering processes. It gets kinda boring
frankly to watch me fudge around for that last
20 percent that makes it look finished. 80 percent of the painting
is done if we assumed all this background is knocked in.
80 percent is done. We get to that last 20 percent,
it's gonna take 80 percent of your time. So the first 20 percent of your painting
is getting 80 percent of the effect. And then the last
80 percent of your time - that next 20 hours let's say -
you spent two to four hours at the beginning
or half hour to two hours, whatever technique and speed
you worked and whatever the subject matter is, you do the first
bit of it. Let's say you do the first two hours to get
this, which is the overall effect, the general
drawing, the general tonal composition, all that kinda stuff. And now
I'd spend another eight hours to get the
perfect little highlight, delineate all the details
and the eyes. You know work out this, blast
this up a little lighter as it is. Let this drop down, get
the redder lips, the collars, all that kinda stuff. I'd spend
all that extra time to get that finality
on there but it wouldn't have done near as much as the first few minutes of it.
So the beginning of the painting, the first section
and the least amount of time
is by far the most important. Everything else on top of that
is gravy, it's decoration, it's nuance,
it's a little more style maybe,
you know flamboyant brush strokes like a Sargent might,
a thicker paint and glazes like a Rembrandt might.
But all that kinda stuff
isn't all that important. The first
effect will be what we're seeing here.
And those subtle things, a lot of your audience will never notice that.
They won't see the difference between that. A lot of
your audience will just see this affect. And whether you took
it farther or not, this is all they ever get out of it, which is a lot.
They wouldn't have the eye to see those subtle details, the
thickening of the paint, the subtle warm and cool, this flesh meets
beard and that kinda thing. They wouldn't - they don't have
the muscle developed, that visual
muscle developed to be able to see those nuances.
They wouldn't care about it and so in the beginning we shouldn't care about
it. We should worry about the big ideas.
The big ideas not the subtle ideas.
So the first 20 percent of your painting, 80 percent
of your success, is wrapped up in that. Doesn't matter how well we render
the rest of this. If this beginning stage
wasn't working beautifully, correctly, dynamically,
whatever your goal in it - for it was - then the whole thing's
lost. So we will stop there. We will come
back and I will show you how to finish this off a little bit farther, make it
a little sketch or a big sketch, big head, and
show you how to add opacity and color into the rub out technique to take
it towards a finish or even to a full
Brown School traditional painting technique. So we will see
you next time.
AUTO SCROLL
Alright we're back, we're gonna take this
a little bit farther now. As you remember we have our Frank Duveneck portrait of a
fellow artist right here that we did in our rub out technique. We're gonna do a little bit more
on the rub out technique and then we're gonna take this into a
little oil sketch that's opaque. And I think what I'm
gonna do - I was thinking between lessons here - I'm gonna do a
third, probably shorter lesson, and just show you the
rendering technique of the rub out just on an egg or some simple shape, just so you
get the point and we'll get this same opacity technique on top
of that. So they'll be a little lesson that kinda slips in around here
that helps you really focus on how to get the gradations.
If you'll remember - hopefully you've look at my earlier oil painting lessons -
if you remember the premise I have in oil paint
or any medium - if you can control any medium, that means
that you can do hard edges, soft edges, gradations,
and you can do a little bit of textural differences.
There's a third one you can add in that's really optional. You can do lovely,
wonderful paintings just with hard edges and gradations. You can
also make leather look leather, metal look like metal,
that's great and that can be a technical difference. You can actually use different strokes,
different amount of paint, different processes to get those effects
but someone like a Sargent or most
alla prima painters -
there's the word I was looking for - they work directly and there's not
a lot of difference between satin, flesh, hair,
brick wall. There can be some difference. And Sargent there's almost none
there's actually a knock against him
in his day. So let's look at this.
Sargent I should say also worked this way,
it's reported in at least one instance,
he would tone his canvas, do a rub out -
I would guess more like this down here
rather than - well, maybe none
of this is real carefully rendered out
it's more of a lay in. So he did something like this let's say. I don't know
for example - for exactly - but somewhere in this ballpark.
And then he would begin again. he would work with a rag they said, so he wouldn't
be working in these fine areas, but more of the broad brush where he could take
the rag. And you can roll this up and
get a little point there. Or as I said before you can wrap it over
a smaller or a bigger brush to get a
point and you can see I can still - yesterday
I did a lecture, this part of the lecture for you folks - and I
can still rub away, it's still not dry,
it's just starting to set up and in some ways it's easier to work with.
So anyway, that's what we've got. Let's get going. I'm gonna take this a
touch farther with my rub out technique. I'm
gonna glaze this down a little bit. Here's what's left of that big pot of color I
mixed up yesterday that we worked from. I used the rest of it
in another painting. Never waste oil paint if you can help it.
You can't always help it but that's the goal. And I'm going to
glaze over this and then I'll stop
as soon as I do that and I'll go over our color pallet one more time
just so we're clear on what we have.
But notice how I'm just scrubbing. Side of the brush
just light. Notice how - well let's do it right here.
Notice how I'm not getting anything on the forehead right now.
I've gotta push darker. See when I put
pressure I get the pigment rubbing off. When I'm lighter
I do not. That's gonna give you the ultimate control. That'll
give you the greatest control. When you have that little amount on your brush
and that amount of dry paint. And this paint here that we mixed yesterday
is a little dryer than it was
when we used it yesterday. And so it's gonna be a little
conducive for our rub out technique. The fact that it's drier
paint means it's gonna grab paint
more firmly, it's gonna
slop around less, it's not gonna float on us. And I've got
to work a little hard, as I said, to get it to do what
I want it to do. And that's good. With the rub out technique we wanna have a
to work at it to get that mark down.
Meaning that little scrubbing action. If it goes down too
fastly like an alla prima painting, then we're gonna tend
to get out of control like this. So we want this to be a slow,
relaxing, hopefully it's relaxing, sometimes
it can be hair pulling as we know in art. But relaxing process.
So I'm just refining
my shapes a little bit.
(painting)
And you can see again this sfumato -
let me spit that out. It's a little early in the morning, my tongue's not working
as well as it should be. There we go.
(painting)
And
this sat overnight. I did the lecture for you folks yesterday
morning and now it's today morning.
And having let it sit overnight, let's the paint
set up a little bit. Makes the paint a little firmer to work with.
Excuse me. But also it let's me come in with a
fresh eye and I can see oh I missed a little gradation here, that shape's
not so good. Now we're not gonna take this
all that far as a painting, we're just working out some
techniques, some issues here, some ideas I should say.
So I would come back and say oh
the shape of the eye should do this or that, you know this is overly dark,
this is overly light, we'll adjust that
right there.
We do work on a little bit of this but
for the most part we're gonna let this be
(painting)
just a
description of the process. So it ends up being
a little sketch for us. You can see how
I've got the ability to
more finely tune this stuff,
all the stuff here pretty easily. I'm gonna
fix this ear, it's a little low compared to the other.
(painting)
And now I'm just stroking like a
cross hatch it with a pen and ink,
croquil technique.
Okay now I've got too much
pigment on my brush so I'm gonna scrub it off here,
wipe it off here.
If I turn
the strokes this way it's gonna get shiny on me.
I'm not sure you can see that on camera but it shines to my eye. The light comes down
and every stroke this way - it's like little grooves.
You've got where the bristles push down towards the canvas and between
the bristles the paint piles up and you have these mounds that catch a highlight
these values that go into shadow, mound that catches the highlight,
it's like little stair steps, or a little mountain range. And it gets shiny and it gets hard to see
the detail that you put in and the value.
And sometimes even the color that you put in. So I'm gonna turn these strokes
vertically and then I can see
them better. They're not gonna have quite that sheen, near as much
of that sheen. So when you're working on
the go
you can turn those strokes into vertical strokes
just by just feathering down.
(painting)
He's a happy guy here so we're
bringing that out.
(painting)
Alright. So that's good enough
for now. We're gonna bring a little more of this side burn down here.
This is super
thin, thinly laid in so that those horizontal
strokes don't make a
difference. But on the thicker paint
it does. It depends on your lighting situation but
more often than not it seems to happen where that overhead lighting
is gonna create a sheen for your
paint. So turning it vertically gives you
a nice solution.
I'm gonna mitigate that effect.
(painting)
Okay there we go. Now
let's start working
opaquely. So our Sargent or our Chase
or whoever it was, our Duveneck,
did the rub out
and now we're gonna add paint in there. Now I can come right over it like
a Sargent - and quite a few of my other demos,
my Brown School and even some of the fuller color demos
have that effect and you can refer to those to see that painterly
technique. So you put that painterly technique right over the top. So now we have
really three basic ways to start a painting.
We have just toning the canvas, and I've done that
again in several of my demos. It's a way of getting rid
of the light as soon as you make a dark mark
it pops right out, it looks like deeper shadow against the murky half tone,
as soon as you make a light mark with whiter paint, that pops off, it looks like hot
light jumping out of that midrange environment. And so getting
rid of the tone canvas
or getting rid of the white canvas for tone canvas gives you
really immediate gratification. Look up here. If we did
a - and I was gonna say
transparent orange, here's our mix of burnt sienna that we made
ourselves last lesson, transparent orange. That's a Gamblin color.
If you go to Sennelier or Windsor Newton you can get Indian yellow
as well and Gamblin has Indian yellow. Indian yellow's just a little bit
of alizarin crimson mixed in with -
transparent orange is just a little bit of alizarin crimson mixed in with
Indian yellow. And that's transparent orange. And then I have two chunks of white. This is my
dirty white from yesterday. You can see, I hope, little flakes of color
in there gets pink here and a purplish over here, a yellow
up there. That's dirty white. So if I want a nice, pure highlight I'm not gonna go to that.
I'm gonna go to a pot of pure white. So once I get painting on my pallet
I'll have - any colors will start to get dirty.
There's a little dab of black from this
in the edge of here. So if I need a clean
transparent orange I come to this side. So after a while that pot of
color is gonna get dirtied up. Don't just scrape it out and
get rid of it. Put a new fresh pot of color right next to it. And that's
a good argument to keep your colors somewhat separate
from each other so you have room to put those new, fresh
piles of color in there. And so that's titanium white.
Dirty and clean. As I said alizarin crimson. This is
naphthol red, a fire engine red, and this is just ivory black.
It could have been a blue black but we're working in a real brown world here
so we don't need that to be any bluer. But if I wanted that to be blue black
like a truer Zoran pallet - and you can refer to my
painting lessons on Zoran pallets - then I'd add ultramarine
blue into that ivory black. Ivory black's already a cool
blue, the ultramarine would make it a very blue gray - not as
blue as my tape holding my canvas on here
but bluer to get our nice, cool colors. But this is a brown world
we're painting in. So what I could do
is, with a toned canvas,
I could put in a little bit
or a lot of
white...
AUTO SCROLL
Or any lighter color.
(painting)
And a
little bit more -
a lot of dark.
And you can see how
immediately I start to get that - even at a crude stage here - that's a
crude stage - I'm starting to get that pop of form, it's starting to look like an egg shape.
Who knows what it is. It could be a punch on the forehead
or it could be an egg or volume
for the hip or something. But immediately you get that
information read. So that's what toned canvas does for you.
You can work on white canvas. And you can tone this any color
by the way. You could work on white canvas
and then you've got that rich, white
you lay down your darker values, the white of the canvas
substitutes for the lightest possible value, so you usually put
those in last. And the idea is, although it really doesn't
make much difference at the end of the painting, that this
white is gonna come through the paint and make this
richer. With this rub out technique I want
to tone over a white canvas. Now Sargent would oftentimes work
over a gray canvas. He'd paint in grays and a lot of artists did.
When he did panels - or I'm sorry
when Rembrandt did panels, he would work more or less
like this color. Wood panels. But when he worked on canvas he worked in
gray and that was just the fashion of the time. They'd learn from
Italy, there's a lot of travel back and forth.
That's what Italians did, they worked over gray so that's what
the folks in the Netherlands did.
So anyway those are our choices. White canvas, toned canvas or
the third is rubbing it out. Doing a super toned canvas
so you have lots of tones there. Rubbing it out. And now we've got this tonal
map to lay in our nice, rich colors or
subtler colors or no colors and we're just gonna pop the
forms and refine them in opaque paint.
And the Brown School folks would tend to leave these shadowy
dark values transparent and then just
do opacity in the light and that's what we're gonna do. Now we're gonna start
adding color. And we don't need it to be -
yeah we do that's pretty darn dirty actually. We'll go to
our white. I'm gonna
clean off my brush, really wipe it down. It doesn't have to be
perfectly clean but it needs to be pretty clean.
And we're gonna do a yellow
and usually the yellows in these had a little bit of black in them. And they used a yellow
ochre, I'm using this transparent orange as a shortcut so we don't have to
mix it up.
And
now you can see how I'm just scrubbing this in.
Now in this technique, this is a little different than that alla prima. Alla
prima you're using thick, juicy strokes so those strokes
can blend together and you can create soft edges. So you're working
with a big lather of toothpaste on your brush
more or less. Something like that. So you're covering now
just enough to cover the canvas or whatever colors on the canvas,
below, but you're doing enough so that that thick, juicy paint
will blend together and create soft, buttery
edges. Which is a hallmark of that style and one of the
kind of romantic attractions of that. That rich, lovely,
buttery strokes suggest this rich, lush world.
Either of wealth, if you are painting the Edwardian Age and Sargent
did or of lush
life, a la Sorolla on the beach.
The little boys and peasants that
went down to the beach on the weekend to cool off
and have fun. For us though
we're just gonna stroke in - notice I'm just stroking
just enough paint to cover.
And I'm going to - as I look at my
reference, the painting in this case is very bright up here,
very light, quite light on the
our left, his right. The left side of the canvas we'll call it.
And it tracks subtler and end up over here about where we have it
with this toned canvas. So we're gonna add a little bit more
yellow and we're going to take this
and now I'm gonna use a zigzag technique,
scrubbing in, working hard to get that
pigment down. I don't want it to come off too easily or I'll tend to lose
control. There's a little bit of flake of
paper towel from rubbing it. Just take those off.
This area gets a little
darker. It's the corrugator muscles. It's the muscles that give you those
frown, those zigzag frown lines, in here.
When you draw your brow together.
And you can -
see how I can do a soft edge there?
I'm feathering it in just little zigzag strokes.
And
the painting I'm working from, he worked much thicker. He worked
much more in that Sargent, alla prima
style which was of the time. And he lived at the time
of Sargent, he was right in there. 1848 to
1919. Sargent I think was born
in 56 until
late 20s or 30s or something like
that. I forget. See if I got a note down here.
1856 to 1925 so yeah they were
absolute contemporaries. Real close together.
(painting)
It's funny I always considered Duveneck the younger
artist, but he was actually born - oh he was
I said 48 - he was.
He was the older artists. I'll be darned I learned something this time, isn't that nice.
So 56 for Sargent,
48 for Duveneck. Thank you very much for teaching me
that. It's one of the fun things about teaching is you get to learn too.
So I'll look up some of the notes here. I'm terrible on dates and stuff.
All this kinda detail that's -
I have no head for that so I've gotta reference that. If I say
it enough times then I remember it. Like Sargent I've
said it several times and so I had a vague sense of what was up with that.
But generally not so good on that.
Alright so there is my subtle gradation. I'm gonna make this
a little stronger gradation. So I'm coming into
my burnt sienna and I'm gonna make it a little
bit more intense.
So I'm adding a little bit of red and yellow to it. And I'm going to
stroke this over. Now it can be painterly too.
He was more of -
more painterly. It's not the lush
strokes of Sargent or Chase.
It's more scrubbed
strokes. And not quite as thick
as a Sargent or a Chase.
(painting)
Now we have a little secondary form in here.
The skull cap's coming down against the brow ridge.
And you can feel it - let me make it a little stronger here.
You can feel it come in here. And I did a
pretty solid lecture from
Van Dyck and Zoran about the forehead structure and around
the eye. And you can refer to that
to get more specific details on these
structures. But we're just gonna hint at them. And you can see
how it's getting that smoky, sfumato. I love that word, sfumato.
We use that - I use that in lessons even when I don't need to use
it. It's a fun word. And
(painting)
pick up there. So there's our
basic lay in. And if you squint at this now, that forehead
really grabs your attention and this drops off. So we're gonna wanna bring
these lighter tones down around the nose and eyes as they do
in our original.
Our source material.
This painting was painted in 1870.
So he was a fairly young man.
Quite a young man really.
22. Alright so we've
got that laid out pretty well. And we could go on and
probably at this point I would go on and I'd establish that same
kind of light to mid tone range all
through the lights. The shadows we wouldn't do too much more. We might darken things.
Obviously this hair would go up and fade into the
dark black background. He's using dead black rather than - or
close to it. It's hard to tell. It could be a Van Dyck
brown which is almost a black brown.
But we could go on here. Take this
tone and start to bring it down. You can see how I've established fairly
crudely here the side plane, front plane of the
forehead, other side of the forehead. So these two are tracking
together. These two corner planes. And then this drops off
in value. So we know the light source is over here to this side and also we know that that
forehead is slightly rounded, it's not truly flat.
But we'll treat it as more of a flat plane in the beginning, round it off as we go
and you can see that here. And again refer to my featured
lectures in painting
and in drawing. I've got - in the drawing I'll be more comprehensive
as I do this lecture I have not done those yet but they will be
up soon. I'm trying to get as many basic
painting classes, kinda basic and intermediate painting classes
for all you folks before I jump back to the drawing.
And then I'll do a bunch of that level
in the drawing and then jump back to the painting. So
they'll all be there eventually. So that pulls down into here.
(painting)
And you can see
with not a lot of effort what I just did there
wasn't too painful, wasn't too difficult. And it would be easy
to change. I could rub this back and it would rub it down
lighter. If I rub some of that white off
it would rub a little bit of this off too. And more than this
because this is wet paint and so that wet - that solvent that's
in the paint, the medium that's in the paint would
corrupt this, would start to dilute that again and what is setting up
would get wetter. So I could rub that back. It would never get back to this
perfect area, it would be some area between
this and this. But I could rub that
back and correct. And so you can go back and forth. Or what you could do is you could let
this dry and say gosh it's just too white yellow
but for whatever reason I can't or don't want to change it.
Let it dry thoroughly, and it might take a week or so to dry,
just depends on how hot and
dry your climate is, and then you could glaze back over it with this color.
and get pretty darn close to the original state.
Because this went over the white canvas
this new glaze would go over the yellow white paint
and so it would be similar.
AUTO SCROLL
Alright so let's
pull this.
I'm gonna give a subtle little tone here
and this is that skull meeting the ridge here. You can see
the brow ridge bumps out and the skull
comes down. That big kinda egg shape of the skull in the front
comes all the way down towards this central
area. That expression. The corrugator
muscles.
Okay.
So we get this rather nice, lovely, soft
focus bit of accent. Now I'm really
scrubbing my brush off. Now I can certainly get a new brush but now I'm gonna
go into my white paint
and I'm gonna go up here
and I'm gonna scrub in. And since it's a flare of
highlight I'm gonna do kinda circular strokes so it spirals
out and blends into the bigger environment.
And you might have to do this several times, keep adding white.
And loading up on white and then
feathering it out. And now I'm kinda hatching back and forth
tilting the brush so I can hatch that way, hatch that way, dragging it down
so I don't have to turn it upside down to hatch that way
and I can slowly build.
(painting)
And I've got a little too much paint on my brush
and I'm gonna wipe it off. And you'll get a feel for that as you work with this rub out technique.
How much is too much. Remember you wanna work a little bit to get that
stroke on there and to
blend it around. If it's too gobbed on
then it's too easily moved along, it'll get sloppy,
it'll slip and slide all over the place and you won't get that nice, soft
edge control.
That soft edge gradation that's the hallmark of the
style.
So there we've got now the flare of it. And we'll just -
maybe at the end we will do a little
alla prima highlight on there. And that would
certainly be acceptable to do.
Now the other nice thing about this style is since it's
very thin paint, there's gonna be very little thick paint and even what's considered
thick on this would be not near as thick as you'd get for a highlight
on a alla prima painting. But this is gonna dry very quickly
now. And that can be bad if you're still in the rendering process
of trying to move that paint around but if you wanna do more work over this, having it
dry and then putting new wet paint on top
has great value. You can build up the shapes,
refine the shapes over several stages. You can build up the paint quality so it
gets thicker and thicker, more alla prima,
more imposto, like a Rembrandt might do. And you can
glaze. We can let this dry and then we can glaze
color into it. Which is what a Giorgione, a Titian,
a Rubens, Van Dyck, all those folks -
Rembrandt. They would do painting and
it would be thicker than this usually, but they'd do painting and let that dry
and then they'd glaze into it. For example, the source material,
the Duveneck piece, is much yellower
in areas than I have it. And so I could let that dry and glaze yellow
into it. In this case I'm gonna kinda scrub since this
such thin paint that it's not - I do that
and it's not - well it's barely coloring my
finger. So it's embedded in the fibers because I
put so little on, I scrubbed it down deep into the
valleys of the canvas, the weaves of the canvas. So I can
actually scrub, again that side of the
brush, light touch. I can scrub yellow
and basically glaze over the top
of the existing color and not do
much damage to it. It's not gonna move it around too much. It might move it a
little bit. You can see I can drag
that off, move that color around. And now I'm just kinda weaving back
and forth to create a soft edge between the hair line
and that crown of the
skull.
And so now that's prettier isn't it. We get
a little bit yellow in there, it's a more lovely color, a little closer to
our source material.
Let's do a little bit more here.
We're going to - I'm gonna take most, I'm always loading it off
loading it up, and then taking most of it off.
Now this has more
paint on the surface.
(painting)
And so
it's gonna mix a little bit more.
What I put down, what's there is gonna mix together. And now I can
fine-tune that bridge,
beginning bridge of the nose.
Let this flare out.
(painting)
Then I'll add a little bit more white.
Take some of it off.
Now there's a little too much so I'll take a little bit of that
off.
(painting)
And then bring that little
crease between the bridge of the
eyebrows. Bringing it down.
(painting)
Now
I've got close to the value I want, roughly in the
shape I want but it's a pale color. It's not as
rich so I'm gonna - in this case I'll get a separate
brush so I don't have to clean this one off because I'm
gonna use it again. And I'm going to get some orange -
alizarin crimson
and transparent orange. A little bit of the
burnt sienna I already had.
Wipe most of it off and now I'm gonna scrub it.
Glaze it. You can see how that's
turning that back into a richer
orange brown, which is our base color.
Now it brought it back to life in effect.
(painting)
Here's
a little darker version of this same brown. And we've got this
nice little accent here that takes
us into the brow ridge. Now I'm gonna start getting our
(painting)
eye brow. Because he has black hair and he lives in a black world.
We've got even this soft brown world but in
the painting he exists in it's a black
world. And we won't do much towards that I don't think.
(painting)
But there we go.
And again I'm
making it work
to get that tone down.
I don't want it to be too easily done.
(painting)
Alright now back
to our nose here.
This is just a dry
brush. And I'm just kinda moving these tones around that are already on
the canvas. Pulling those in and around so
that the tones
set where they should.
And now I'm
gonna add
my white highlight.
(painting)
And as I do that I can
adjust it a little bit. In this case,
typically on highlights like this since the bottom of the nose,
the ball of the nose sticks out, it's closest to you. It's coming - this is coming out towards
you like this. So if I tip down, now you see the nose in flat perspective.
Now you see the nose in foreshortened perspective. So when you're
talking to someone, the face is in flat perspective on your
picture plane we say. The nose is slightly
foreshortened. Like so. So typically to get that
to come out farther the highlight - the artist will put the brightest highlight
down here. And that really bright highlight will pop
forward and give the illusion that the tip of the nose is coming forward.
He let it - since this is all kinda dropping off into this dim half light
down here, he let it fade off. So there's a highlight down here but
it's not as strong as the one up here. It's strongest up here. So that's where we're putting it. So I'm
loading that up, my brush with white.
And I'm taking off
down this way.
And as it's kind of wandering
it's not quite a broken nose but
it wobbled around a little bit.
And I can -
see that I made it wobble too much. So we're gonna correct.
So here's how you correct. You get
this tone in here pretty
well. It looks like it needs to be a little redder
and bump it up just
a little bit.
(painting)
Now I'm gonna kinda push - push it this way a bit.
And at the same time I'm
softening that edge so it kinda settles into its environment.
(painting)
Here we go there. And then we'll let that
trail over the
edge there. Now where that highlight
stop, we'll put a little dot there for a second.
(painting)
Where that highlight stops,
there's a plane change. Now this is the top
of the nose coming out and then the highlight stops. And now
this little brown section, half tone section, is a front plane.
And then this section, where the
mustache - the nose ends and the mustache begins - is the bottom
of the nose that you can
see just a little bit with the edge of darkness but basically.
So what I'm saying is this little mark
here is actually a
bottom plane, a little bottom corner, it won't let me blow it up.
It's
like that so we get a little corner of
darkness going in. And actually let me correct again
Nose, highlight ends,
right there. Front
plane to our darker half tone,
bottom plane, bottom corner then it goes back and you can't see it.
So
this would be my dark edge there. The dark border.
Darken that up for you so you can see it. We can see it
over here nicely on that other side. That's that little bottom corner we can
catch, bottom plane. Okay
so there we have it.
AUTO SCROLL
This is in here. Like so.
And you can see now I can start
giving a little energy to the paint.
Accents - strong accents that
pop out the forms and
little more painterly moments with the paint that give accent to it.
Alright so let's do a little bit on the
eyes. Let's work on this eye. So
what I'm gonna do now is I'm gonna mix pretty carefully - I don't have to -
one of the other advantages with the rub out technique
I don't have to mix very carefully. It's oftentimes monochrome, which means it's all
one color. It's all orange brown in this case. Now we're
starting to add yellow white and we can add some blue
grays to the hair line, stuff like that. But you can just work in that monotone
area.
And so you don't have to - and even when we
shift it into a slightly different temperature from dirty
orange to pale yellow, let's say
you don't have to be too careful about it. There's not a lot of
stress. Whereas an impressionist painting, outdoor painting,
that turquoise, that orange, that gray, has to be very, very
close to accurate. And so it's tricky. So
here we have a lot of room for error in color
because it's kind of a non color world that we're
creating. Everything just kinda fades to brown. And that's Brown School
unless - Madonna has a bright blue cloak or
bright red lips. There's not a lot of color in here.
This is the only place we have a lot of color as in a color
change and so I just need to have a
lighter brown than that shadow
area. So I'm just gonna mix a brown
for this lid that's catching light. And
as I did here if it wasn't quite right I can glaze over it now
or later. So he has this
flare
of an eyelid.
And if that eyelid wasn't well designed -
I'll show you what I mean in a second.
I'm gonna easily correct that.
I'm gonna correct it the way all painters correct
designed strokes.
I'm gonna clean my brush off.
Load up with my burnt sienna. And it's actually
black eyelashes are there too, I'm gonna add a little bit of black.
And now I'm gonna come underneath that lid that I just
delineated and I'm gonna correct it from below in this
case with a negative shape.
And that's the way painters always correct. They don't correct
with the edge, that's what a draftsman does
or oftentimes does. The painter
will correct with the adjacent silhouette.
And that keeps you en masse. This mass
of color against this mass of color, this mass of value against that mass of value.
That
silhouette idea is crucial. Otherwise you're always dealing with
the edges of things like a drawer would.
And you're gonna screw it up. You're gonna screw up your color, screw up your big
relationships for that little tiny edge relationship.
Okay you can see
there's a little white on that brush because I didn't clean it correctly and that's okay.
So there's our
eye.
(painting)
And now I'll go back to my burnt sienna and I'm gonna make this
outside corner a little stronger
in value.
Using my image here, I'm just painting off a computer screen.
It's the easiest way to go. We used to use
printed out photos in the olden days,
the stone age, and that got very expensive to print.
Sometimes I'd shoot thousands of shots for a particular
painting, image. My record
currently is about 5000 shots
I shot for a figure composition. So you shoot a lot
of pictures. And over a summer or a season
you know even 20, 30 pictures, 40, 50 pictures,
can really add up over several photo shoots and you get several
hundred pictures all being developed got expensive.
So that - years ago I switched to digital,
now digital's really the only choice
for anybody. So I'm just working - I don't print it out
I just work right off the computer screen.
Trying to get out there. Okay.
You can see now the blacks, the darks, and the lights are starting to
give us the accent and that's yet a
another valuable aspect
of rub out. You start out in a mid range,
middle dark to middle light, and then you
push the lights lighter and you push the darks darker and you get ever greater
contrast. And that's one of the tricks that I
like to use, especially when I'm teaching. But I do use it myself. If you're
painting works in the mid ranges
and you have a process that support your idea,
half tones are light ideas, shadows are dark ideas,
my structural idea about this world that I'm painting.
When I start adding my detail in the shadows
I render darker. And in the half tones I render
lighter up to those highlights. And so as
I add more paint, my painting becomes more
real or more true to the environment.
Whereas a lot of people they'll make the shadows nice and dark and
the lights nice and light and then they start rendering those lights down
in value into the darker half tones with maybe a little dot highlight and
they render the dark shadows up in tone to get the reflected lights
and you end up in a mid range that can look
kind of murky, muddy or just doesn't have that pop, that kick of
form that you would hope for.
So I want a process that supports my thinking. Always
a process that supports your ideas. An artist is just someone
who has an idea about the world. What's you idea?
You're not copying the world. We don't need artists for that, we have technology for that.
You are translating the world. What
are the rules of your world? In your world
little boys might be lizards - uh lizards, let me try that again -
little boys might be wizards. Or pigs
can talk. Hollywood does that kind of stuff all the time where they
create a set of very specific, and often times
a lot of fun rules, but they can also be horrifying rules
in some of their
horror fare.
And then once you have the rules you stick to them. So in our world here
shadows are very, very dark ideas
and lights are very, very light ideas.
And never the two
shall compete.
Okay so you can see how your catching
our details
in ever greater
contrast.
(painting)
And you get - you get media gratification from it really.
When you make a mark, now the mark sometimes
are wrong, gotta change the mark - but when you make a mark
that's correct, it's just building
naturally and easily on whatever you've done before.
Okay now the blue eye - or the whites of the eyes I should say
are kinda bluish.
I'm gonna slowly stroke on that blue
and it's gonna go over the top and if I were to push
harder it'll start to rub into that
brown and actually take it away. And the tip of the
brush - you can't see it but I can - is slightly
brown now. That blue gray
has gotten polluted
and when it does
you wipe it off. Now
this is a little bit darker in here.
(painting)
Okay and I'm just kinda hatching that in. This is pretty
wet white that I have on my brush. And again you get a feel -
you start to get a real feel for how wet
and how much pigment is on and what you need to do
accordingly. Take some off, wipe it off on your paper towel. Sometimes I'll even come
over here and test it. And
just
make adjustments for it.
So if it's a little too wet you dry it out
or you do what I'm doing to kinda cross hatch. And then you can take a
drier brush and
feather that together if you needed to but you don't really need to.
There's the apple of the
cheek
again. And it gets slightly pinker here
I'd say it gets quick a bit pinker. So now I'm gonna
take some of my rosy red,
wipe a lot of it off and I'm gonna stroke some
color into his cheeks.
(painting)
So now that's shifting a little redder.
(painting)
So you can see pretty quickly getting things going.
(painting)
Okay. And
let's say
over here
(painting)
we're gonna get a little gray here. Over here -
that's about right. I need to wipe most
of that off my brush again.
Now it's getting a little grayer here
so I'm just kinda wiggling down
taking some more paint, going down into that mark of gray
drawing it up. And this goes grayer here.
I'm gonna wipe off even more.
Go this way
and now I'm smearing it more and since I wiped off more
I've taken a little bit off. So I'm lightening it up. I'm gonna take off
a little bit more so I wipe my brush and I want this now to
come down, rubbing
back in again. This is gonna get up here.
Gonna wipe off more.
(painting)
You see how
slowly, methodically
we're working.
these areas.
(painting)
And I'm gonna come back and rub back
there, a little bit of that dimple
line. We've got a slight, kinda inviting smile like
he's thrilled to be painted by
a great artist he knows, that this is
a little bit of immortality for him. And so he's got
this nice
subtle smile. There's a
thrill for him here is what it feels like.
And who the heck knows. He may have
been having to go to the bathroom, couldn't wait for the session to be over
but we project onto this and or the
artist projects
onto this.
AUTO SCROLL
And we read what we read,
it may have nothing to do with the artist's intention. In other words the really good art
is open enough that we can get out of it what we need,
not what the artist needs. The artist did it for
whatever reasons he or she did it. Now it's all
ours. This artist happens to be dead but even
we artists that are lucky enough to still be around,
once we paint that
painting and put it out in the world, it's not our painting anymore.
It's - the world can do with it as it wishes
and read into it exactly what it wants to read into it
and that is exactly as it should be.
Alright so I'm just restructuring
the mouth.
And so we can go on and on and on with this
and we shall not but I'm gonna do a little bit on the lips so you can see
a relatively big color change. We had quite a big
value change here, a little bit of color, now we're gonna bring in some brighter color. So I'm gonna stroke
right into my red paint,
bring it down here. I'm gonna make it a little bit darker
and a little bit grayer. Notice how that dark
pollutes that light color and that gray
pollutes that intense color
and so you don't wanna do too much. So I got too much
black in here. I dragged a little bit more red over here and dabbed into this
to get what I needed.
Now we're going to just stroke in
and if I scrub like this
you might be able to see - I'm never quite sure what you can see on your camera
and what you can't. But if you scrub you're actually replacing
a lot of the brown. You're rubbing some of that brown
off, quite a bit of it. And you're replacing it
with the red. So I'm gonna use my edge and I'm gonna use it like a
shovel, like I'm scraping ice off the sidewalk. Which you know the kinda
place I live. And I'm gonna push
all that brown or some of that brown, as much as comes off,
in front of the
brush and get
a brighter red. This pulls off
this way and gets lost into the brown.
(painting)
And we're keeping this soft edges.
(painting)
Okay and then you rub your eye
that's part of the technique.
(painting)
Okay and I'm just gonna stroke
over this and push that back a little bit more.
Notice it's always in stages, or almost always. You do it
two or three times, you kinda worry over the paint. And again that's different than
the alla prima. Alla prima and traditional academy paintings
too, you don't worry over the paint. You put it down once
correctly is the ideal. And then
you move on. You don't touch that paint anymore.
But in this you're doing it in stages.
You're glazing it in, you're taking it a little darker. And then
you come back, a little darker,
a little redder, you come back, a little redder, you might do that
two or three times or six or eight times
until it's just where it needs to be.
And you can go back and forth as we've said too.
That's a little too red, that's not red enough. Back and forth and back and forth
until it's just right. You just kinda play with it and push it around.
So it's a patient style. And it's a
style that is you're not real confident with your drawing
you can leave the drawing - a very careful drawing, you could even project the drawing up,
and do a very careful
drawing and then you could more
so than other techniques fill in, that's always a
dangerous thing. Art teachers hate that talk of
filling in a drawing with paint because that paint by
numbers is gonna really ruin the life of your painting if you're not careful. But this
is close to that. It gives you a sense
that you can keep that drawing alive
in the underpainting and not
(painting)
not have it obscured. In the alla prima style, impressionists style
you're painting thickly, generally,
and so you're losing
that drawing and I'm arguing in my
paintings, my demos, that you should lose the drawing. You get too
attached to that drawing and the possibilities
of the paint start to die. Loses that freshness
of the paint. So I'm putting a little bit lighter tones to accent
the base of the nose, the little dimple line here.
hatching over. Look how slow I'm going.
(painting)
So I'm rubbing some of that
lighter paint onto the darker paint, it's polluting my brush
with the darker paint. I'll bring that .
(painting)
Okay so I've gone over that - that
side of the lip, our right his left, what four or five
times to get it down there. And I could have mixed that exactly
if I was good enough and just wamo, just got it,
but easing into it, when you're not sure how to do it,
when you're not confident of you're drawing as I've
said. Or if you just want to create a certain
effect with the paint
is a great way to go - a great
way to practice
and train your eye. Part of the learning curve here
is not to make the paint do what it needs to do exactly,
that's certainly part of it, but it's training you
eye to see exactly the relationships. At first
there's too many to hold. Your cup overflows with all this stuff
and you look at this and you can't look at that. And you look at this and you can't
look at that. And you miss those big relationships, those -
or even some subtle relationships. You start to lose those
things and it just becomes one little detail
after another and every once in a while those details line up and
it looks pretty good. Oftentimes those details don't line up and it
looks pretty bad. So part of
the learning curve as an artist is to be able to
juggle all those details
and to really see them. To see them clearly, what they really are.
Just how dark is it, just how
curved is it, just how big is it
in relationship to everything else.
(drawing)
And now I'm rubbing away some
of that brown again, I'm also dragging some of that brown over to this
corner of the lip so that lip doesn't look too bright.
Now
he's got a little border, that's where the
membrane, the membrane of the lip
meets the skin of the face. The lips are red and rougher
in texture, more wrinkly because they're not skin. It's a membrane
and that has
a certain structure to it
that separates from the skin.
(drawing)
I'm gonna clean off my brush. And for this real fine
work again I'm working my fake sable. I'm using a flat - I like the flats
in a rub out because you can take out a broad swath
of value,
brush that has some solvent on it or you can place
a broad swatch of value and then you can slowly
feather that into the environment.
AUTO SCROLL
Okay so now I've got a lighter
and slightly grayer...
(painting)
And here's the lower mouth
structure that's holding his lips
as they should be.
The big structure of the face.
(painting)
And the thing I can't do in this kind of situation
but what you absolutely should do is you make
a few marks and then you get away from your painting. Walk ten feet away
if you're in a little bedroom, climb on top of your bed
and put your back against the wall and get as far away as you can
(painting)
so you can see those big relationships and not these little
feathery strokes that you've so carefully put in. I do
that - go oh that's just great, look at that little stroke.
Seduced by that little detail and you miss
the fact that the stroke was in the wrong place, it was the wrong color,
it was the wrong value, it didn't set on
the bigger structure correctly, it overwhelmed the bigger structure
or whatever it is.
(painting)
We're gonna stop here pretty quickly.
Just get a little bit up here, you can see I'm
putting in a grayer
color
on that upper mouth structure.
I'm laying it over the pinker, rosier,
sienna color
that was already there. I'm moving that shape of the nose a little bit.
(painting)
And we get a little bit of red here.
Just stroke that in.
(painting)
And fade
that out and there's a bunch of other stuff
that we're just not gonna take the time to do
but we'll
do a bit.
(painting)
Okay so easing into that
to get it...So anyway we'll stop there
but you get the idea. We can just keep working on this, playing with
these shapes, tinting the areas, pushing the values
lighter and then darker to turn the form. All those
possibilities. Integrating one shape,
feathering it into the next, rubbing away the pigment to replace it
with new pigment or laying new pigment over the top to hide the
old pigment. There's so many possibilities to this.
We can come in and go right into a
(painting)
typical
alla prima
technique.
(painting)
Like so.
(painting)
Okay so it can be the ground work for
our lush, painterly
method.
(painting)
As it is here.
Let's do this
over here.
So you can see how
that careful ground work not only places -
if I spent the amount of time - I spent a couple hours
talking and painting on this now, somewhere around that.
And that time would have been fantastic
well spent if it was
the lay in, just the working out, design
of my painterly I'm doing now.
Because not
only have I placed everything where it needs to be in
shape, in drawn shape, I've placed a tonal
composition down very carefully. Not as extreme as it
will be at the finish, but I know everything's that's dark that should be
dark, everything that's light should be light, where exactly it's sitting, although
I might adjust little shapes and such
as I go but all the basic drawn shapes.
And that getting to know period. I've kinda
really get a feel for all of the
shapes. The character of this
fellow, the character of this character, or what my
painting needs, getting to know the painting itself
and so all that time
that work done in then makes this
final process
much more enjoyable and much more successful.
And much quicker.
(painting)
You can see how we can now,
fairly quickly, work this
out
into a
finish.
(painting)
Alright so we will
stop. I can't stop. I
just have trouble stopping when the painting's not finished. But we will stop
there. We will I promise.
Stop there. Alright. We will see you next time, I'm gonna do a
just a real simple form for you next time, an egg or something like that
just to show you more clearly the techniques involved.
It'll be a short, maybe 20 minute lecture and then
you'll be up and going in your rub out technique. We'll do other
variations of this demo in later times so you can stay tuned for those, but I hope
you enjoy it and you go have a lot of fun with it.
Free to try
-
1. Lesson Overview
43sNow playing... -
1. Intro to rub out technique
14m 14sNow playing... -
1. Applying rub out technique Part 1
15m 28sNow playing...
Watch the whole lesson with a subscription
-
2. Applying rub out technique Part 2
14m 37s -
3. Adding tone & value
14m 49s -
4. Developing form via rub out technique
6m 23s -
5. Continuing to add color and tone
14m 39s -
6. Adding color
13m 54s -
7. Continuing to add color and value
14m 55s -
8. Adding energy to your paint
16m 0s -
9. Continuing to add detail
10m 53s -
10. Finalizing your painting
8m 16s
CONNECT
New Masters Academy
16182 Gothard St
Huntington Beach, CA 92647
Contact US