- Lesson Details
- Transcript
- References
- Instructor
- Mark Westermoe
- Subjects
- Art Theory, Drawing, Entertainment Arts
- Topics
- Anatomy, Head & Portrait
- Mediums
- Colored Pencil
- Duration
- 5h 13m 15s
- Series
- Reilly Method Head Drawing
As the protegé to the famous Fred Fixler, who worked directly under the legendary Frank Reilly, Mark has an unrivaled knowledge of the Reilly Method for drawing the head. In the 1980’s, his artistic prominence gave way to an illustrious career in Hollywood movie poster design. He later founded Associate’s in Art in Southern California, a top school for illustrators, from which many alumni became the “who’s who” in the fields of figurative art.
In this series, Mark introduces you to the Reilly Method, a way of understanding the structure of the head through the use of rhythms, to help project accurate proportions of your subject from any angle.
In this first lesson, Marks precise knowledge and nomenclature of the elements that make up the head will give you a foundational understanding of its anatomy, preparing you to learn the Reilly Method later in this series.
Discuss this video in the forums!
DiscussMark Westermoe has unrivaled knowledge of the Reilly Method for drawing the head.
His artistic prominence gave way to an illustrious career in Hollywood movie poster design.
He later founded Associates in Art in Southern California, a top school for illustrators
from which many alumni became the who’s who in the fields of figurative art.
In this series, Mark introduces you to the Reilly Method, a way of understanding the
structure of the head through the use of rhythms to help project accurate proportions of your
subject from any angle.
In this first lesson, Mark’s precise knowledge of nomenclature of the elements that make
up the head will give you a foundational understanding of its anatomy,
preparing you to learn the Reilly Method later in this series.
We’re going to be covering different approaches to head drawing.
All of them rely as a core on the structure
of the head and the artistic anatomy of the head.
In this case, employing Frank Reilly and his abstraction of the head, which he developed
at the Art Students League in the 30s, 40s, 50s and early 60s.
He was my teacher’s teacher, and in a way I’m a grand-student of his.
I hope that it benefits you as it benefited me.
on the anatomy of the head and neck. We'll be drawing
exercise in three different angles: the front view, the profile, and the
three quarter. We'll be drawing the deep muscles,
the superficial muscles, and those will overlay the bony
structure of the skull and the neck.
Finally, we'll work on the features:
the eyes, nose, mouth, and ears. And
we'll learn how these anatomical structures
affect the surface of the form of the head.
Particularly the cranium, the facial mass,
and the jaw. It's not just important,
but necessary, to understand anatomy if
you're gonna do your most effective work, particularly
if it's a portrait or an illustration involving heads
or really any kind of figurative art. Anatomy is
not synonymous with head drawing any more than perspective
is not synonymous with doing a very nice landscape,
but, you'll find that the most important tool
perhaps in your mental tool kit, when you're trying to do
those types of subjects. We're going to then,
after that point, after you've seen how I draw
the skeletal structure and then traced a layer of
muscle, and finally a layer of
flesh, hair, facial features, surface
forms. Then you can do
homework lesson based on this, and I'll describe
exactly how you want to approach that. Okay, in this
lesson we're gonna analyze the skull and try
to draw a simplification of the skull. The main thing to get across
in drawing it effectively, understanding it effectively, is
to understand the three volumes of the skull. You have the
cranium and the facial mass and the jaw beneath that.
The features, teeth, the eyes, which will be placed within
the eye socket once we flesh out the skull, those
are less important. If you don't have those big structures, those big
volumes, they can't possibly be placed in
a successful way. So here we're gonna use
a black Prismacolor pencil, that's a wax
pencil, and this is PC-935.
And it's made by Prismacolor Premier.
So to start off with, we want to draw
a shape similar to an egg
but not identical. In the living model
it is much more like the shape of the an egg.
So it would be three units
from the top to the bottom of the chin.
That's called our vertical axis
and we use it to bisect the shape.
Each side should be the same, a mirror image of the other.
We're also gonna place a horizontal axis halfway from
the apex to the chin
and that is gonna run right through the eye socket.
Add a little distance above
it for the brow overlapping
the socket. This line is within the socket, this line overlaps it.
Next you want to place
the temple, you can see it on the photograph.
and that divides the front plane of the
cranium to the side plane of the temple. The head is a box:
it has a front plane, it has two sides planes, a top plane
barely visible here, and an underplane above the neck
which not shown in the photograph. We take this line
where the brow overlaps the eye, divide that
distance, divide this distance in half
it gives you halfway is the point where the septum attaches to the
facial mass. From here to the chin
gives you the bottom of the lower teeth, and that's the bottom
of the facial mass, even though it is literally anatomically
part of the third volume, which is the mandible,
or jaw. So these basic divisions are gonna help us.
In the living model you would have one
eye, the width of one eye separating both eyes.
In total you would have five eyes running across the head,
but here we have a little
less width from left to right on the skull.
Alright, at this point
we'll start to develop the forms. Here
we see a rounded volume that
echoes the frontal prominence, which is made up of the
frontal bone and the frontalis muscle. We'll get to that.
And then there's the brow ridge
and beneath that
I'm drawing this with no reference at this
point to the light and dark pattern, although I will refer to it
as we finish up.
Let's find the width between the eye sockets.
Within that by the way, we find the root of
the nasal bone.
Okay, so here's the outside of the eye socket. It has to fit
within the temple because our eyes are situated on the front plane
and not the side plane of the head.
Here's the angle of the overlapping brow.
Alright,
halfway from here, which we call the keystone shape
where the two axis come together
to the base of the nose, gives us the
bottom, the end, of the nasal bone, which
ends here in a diagonal manner,
coming down above the maxilla,
or barrel of the mouth, sometimes called the tooth cylinder.
Okay, then we draw up
on both sides of the tooth
cylinder. And now we want to
bring the eye socket
down toward the base of the head, remembering
that it's halfway approximately from the base of the nose
to the brow ridge.
And it is not horizontal, but there's a
decided diagonal here
above the zygomatic process.
And then we finish
out the eye socket next to the zygomatic process
which turns, in a moment I'll show you, back toward the ear
and surrounds
the entire eye socket. It's named
zygomatic process because
it is basically the
zygoma, or cheek bone, but that turns back again
to the side plane. The nose is actually a bridge
between the cranium and the facial
mass. So
it's an interesting and important set of forms.
I'm just drawing the cavity, from where the nasal bone ends
to the septum. Zygomatic
process, as we can see here, runs
out and back in the direction of the ear.
Now we're gonna find the turning
from light to shadow. I did say I'm not gonna
emphasize that, but I will bring it up when it's instructive.
So here's where the front plane of the
zygoma, or face, turns back.
Now we're gonna find the canine teeth
on the tooth cylinder because that's the point at which
the teeth turn from the front plane back toward the
side plane. Here's that point
and here is the outside of
the maxilla
and we can see that
where
the cranium has a
horizontal thrust to it, I'm sorry I should say a vertical
thrust, going from here up
instead the facial mass now has a
diagonal thrust, like that.
At this point, the
underplane
of
the maxilla tooth cylinder
turns under
overlapping the jaw beneath it.
So, from where the upper teeth
overlap the lower teeth, here and here,
from that point
we get the underplane.
of the face.
I'll fill it in with a light gray
to set it off from the planes that are within the light
at the front. So this is an underplane here. The
bottom of the head is
the chin and that's the front plane of the mandible.
The mandible
has the narrowest front plane of any
of the three volumes, and relative to it, and that's the chin
and relative to it, it has the broadest side plane.
This area is a cavity between the
mandible
and the facial plane.
The
teeth, or the side plane of the mouth or
tooth cylinder, is actually the turning back
of the molars from the front
six teeth.
I'll just apply that same light gray
to the other side planes, under planes, and
cavities
between the bones, so that you can see it more
graphically.
And just because I'm using
a wax pencil, doesn't mean you have to use that
at all.
You could use a graphite pencil. or
a pastel pencil, or Conté.
Really almost anything
that allows you to put down more than a line
but also can put down a tone.
So I'm just charting, mapping out
the borders, of the front plane of the
skull and the side plane.
We're gonna
do more exotic, even difficult,
angles of the head during this section
but it's important to start out with the basic angle so that you
understand it.
There's the angle of the jaw, where it turns from primarily a
vertical thrust into a
diagonal thrust.
And here's the
very outside of the mandible.
We'll do the same thing on the other side. It's obviously symmetrical anyway.
Once we find the turning of the jaw
we can connect that to
the chin.
Okay, back to the cranium and facial mass.
This is the position
of the zygomatic process
as it moves along the side plane of the head.
Alright, let's go back to the
front plane of the cranium, turn it to the side plane,
find the apex here, at the top of the cranium,
and let's look
for the volume of the
cranium
at the side plane
to the right and to the left of the temple.
These will be the widest points, across
the skull.
Just see a slight bit of the top
plane of the cranium. The head is not literally a 100%
accurately at a eye level, it's slightly,
seen slightly from above. So we do
see the top here of the cranium.
And the cranium is made up of
six interlocking bones: the frontal bone,
the temples, and at the top the parietal bones
and at the back the occipital bone
We don't see that view of course
because the occipital bone, like I said, is at the back.
We will be doing drawings and explanations
of the back view of the skull as well.
But for now, we'll start with these three
basic angles of the skull:
front view, three quarter view,
and profile.
If you don't understand the
volumes and how they interlock and overlap from these
three: front, three quarter, profile,
eye level views, then you're gonna have a real difficult time
breaking them down in order to draw
upshots, which are known as worm's eye views and
downshots, which are known as bird's eye view.
And yet, in most of whatever you do
as fine artists or
professional artists, illustrator, animator, what have you,
you're gonna depend on your ability to draw those angles
too. If you like you can just go back now with the tip
of the pencil and emphasize,
strengthen these shapes, so that...
That's the other thing you can read
them better, they're more legible. If you apply a scratchy tone
or a
value for your darks that is more than one value,
and that should not be black, at this point,
but if you do that then you're gonna make the drawing
illegible. So I'm just using
two values: one for the gray and
one is the white of the paper.
It helps to put
several sheets of paper between the pencil,
forgive me, between the sheet that you're drawing on and
the surface, whether it's a desk, a
masonite board, could be
drafting table with a velcro surface, anything
You'd be surprised how much texture your surface
will pick up, so you want to kinda minimize that and
that's why you put some cushioning behind your drawing.
That's gonna be pretty much true for all
instances, unless you're looking for a certain look, or even a certain
texture.
You wanna keep your pencil
sharp but you don't have to use a razor and a blade for this. With
Prismacolor pencils it's fine just to use, preferably, an electric
pencil sharpener, but a manual pencil sharpener
keep it simple.
Of course, the skull you draw should be symmetrical,
one side being a mirror image of the other.
If it doesn't turn
out that way, go back in and correct it.
It's as simple as this:
if you're not set up
with anything more than a desk and a desk lamp, put the desk
lamp behind your arm that does not
do the drawing. Since I'm right handed I have my
light, I used to when I was setting on desktop
I kept the light to my left side so that it doesn't cast
a shadow over the drawing.
So if you're left handed you want to put your lamp on the right side.
And then get a pillow, rest a
skull, a model skull, on it. The model skulls are about $30 at a hobby
shop. They glow in the dark at Halloween
so you probably gonna be just in time.
But that's not good for you, what you'd want is a simple form light,
one source of light on the skull. It'll show off these volumes
much more effectively than ambient light, which is the light from the ceiling
or sky.
Notice I mapped out
the geometry of the
skull before I applied any tone to the shadows.
This is very
important. If you try to do the light and dark as you go,
getting the shapes as you go, you're likely to be far
less precise.
And what you're trying to do is learn from this and
if you're clear and legible, like I'm trying to make this
drawing, you'll understand the structures.
So start with shape
and then value.
Finally, if you were to do a really detailed study of the skull,
the third dimension, after shape
and value,
the final dimension would be edges, edges between the light
and the shadow. If you don't understand the skull's
structure, you can't hope to do those.
Where you have a rounded form you would get a softer edge. Where you have an angular form
you would get a harder edge.
Where you get an overlap you'd get a harder edge and where you get a cast shadow,
which we really don't have in this and that's for the best, then you would get
a hard edge. Okay so, there are many more shapes
particularly along here, certainly in here, half tone
shapes and even small variations on your
main light and dark pattern, but that's not important.
At this point to understand the skull, it's the three volumes:
and how they overlap each other and the proportions
of them and how they dovetail into each other.
If you can understand that then we'll get to the nice, fun
details a little later in this term.
I just use a plastic eraser, I can clean up my early construction
lines and there we have it:
the front view head. If you're gonna wipe off the eraser
leftovers, use a tissue or something. Don't
use your hand because your hand has oil and that will -
could smear or degrade the drawing.
This is a standard skull with standard proportions.
You have to remember, everybody has these same volumes and forms, but they can be arranged
in different sizes, scale relative to each other, even position.
When we get to a certain point, we’re going to take the photographs of living models,
and I will draw from those with emphasis of the bony skull beneath the tissue and the skin.
We will see then a fair amount of individual variation from model to model just as it is
from person to person in your everyday life.
The first thing I want to point out about the three-quarter view is now you notice that
the size of the, the volume of the cranium has increased.
You’ll notice that now we see in the photograph more of the side plane, obviously, and more
of the beginning of the back plane of the cranium.
I’ll show you exactly how to do it.
Let me just express it with a pencil, and then I’ll explain it as I go.
Alright, we’re going to line up the top of the skull the same height
as the first drawing.
The mandible, the same basically as the first drawing.
If a front view had, as I noted earlier, you would start with a line through the center
of your egg shape, dividing it in half, each side being equal.
In our case now, because we don’t have—darken that—we don’t have a front view.
Now your axis shifts.
Now it’s about if this were my egg shape it would shift over to this point about halfway
between the original axis and the silhouette or the outside edges of the subject.
That being the case, we would take the distance between the two.
I’m going to slide this all over.
Let’s imagine this were your front axis and then the outside would be here and here.
In our case, this is three-quarters so I’m going to shift this halfway between the silhouette
and the front axis.
That will become our new axis of the head.
Since I’ve done that, the cranium now as seen in this view is wider as it is in the
front view.
What you do is you take the distance between your front axis and your three-quarter axis
here and here, and you add it to the back here.
Okay, so it’s no longer a 3 x 2 ratio.
It’s now getting close to a 3 x 3 ratio.
What’s the next step?
Well, for starters, think about that front axis.
From the brow to the chin it’s almost perfectly straight.
Yes, the nasal bone extends forward and so does the tooth cylinder.
Then again, just about the chin mount the silhouette dives back to fall almost again
on this horizontal axis.
From the halfway position, which is the same as what we drew on the front view head, then
we’re going to add a little bit of difference, same as in the previous one, for the overlapping
brow ridge, the front of the, top of the eye socket.
Next, from the cranium, rather from the point between the eye sockets to the top of the
cranium there is a curved axis.
This will change depending on the angle of the head.
Most of the profile, least in the front view.
In fact, in the front view that curved axis will look like a straight.
The whole axis will be the same from top to bottom.
Now that we’re moving into three-quarters and profile that changes.
We want to show where the cranium turns back at the temporal bone here and here, all the
way back to the silhouette of the cranium.
We want to then take a line halfway from the point here to the chin and put that in place
so we can establish where the base of the nose, or the nasal cavity is, what we’re
looking at on the skull, where that overlaps the maxilla or barrel of the mouth.
We want to also show where the bottom of the lower lip would fall above the chin.
You’ll notice here where the horizontal axis at the brow ridge joins the vertical
axis at the cranium or at the—I should say—the frontal prominence.
We’ve got—let’s put the nasal bone just about centered on that vertical axis.
And then we’re going to draw up from it and then out.
The find the distance here across to the opposite eye socket and draw out and slightly down
to the temple or actually to the zygoma.
The socket will extend about to the point where the nasal bone turns under,
halfway from here to here.
From the septum to the very front of the tooth cylinder, first we would line up the tooth cylinder
visa-vie this end of the nasal bone, and it is slightly to the left.
Then we want to extend to the canine teeth the farthest point forward, and here on the
opposite side let’s place the zygomatic process running off to the ear.
There is a cavity here between the zygoma and the cranium behind it.
Into that cavity run a couple of muscles, the temporalis muscle.
That’s the primary one.
Here is the outside silhouette of the zygoma.
Notice that the brow comes forward off the cranium.
Here is the front plane of the zygoma.
It’s not a shadow.
It’s in half-tone.
That overlaps the maxilla or tooth cylinder.
Here the zygomatic overlaps the mandible or jaw.
Very diagonal still.
You can see here the turning back of the zygomatic arch or zygomatic process.
At this point, we’re picking up the turning back of the teeth at the tooth cylinder.
We’re lining up directly under this cavity.
We find the canine tooth, and turning back here we find that the teeth and the molars
turn back and away.
Notice how much farther forward the teeth extend from the front plane of the facial
mask and the axis.
Here is a cavity again between the tooth cylinder or maxilla and the mandible.
This is filled out by the most powerful muscle of the head, which is the masseter muscle.
This is the line of the teeth themselves, although I’m not going to draw the independently
of anything.
I’m just going to put this in so I can better understand the structure as I move on.
And the chin takes us back once again to our center vertical axis.
Here’s a cavity known as a fossa, and here is that same fossa beneath
the zygomatic process there.
We find a fossa or cavity here and here.
You’ll never see this on the living head, but another here.
Then, of course, the nasal bone itself or the nasal opening.
I use my pencil like a plumb line, and if I don’t—I actually have done this
so much I can mentally do it but it’s best because you can compare for instance here,
the front plane of the mandible with the turning back of the zygoma.
If you’re just looking at it trying to eyeball it, you may find it difficult.
Use your pencil because if you do you’ve got to keep it perfectly vertical.
If it’s off a little bit, it can only hurt you so be careful of that.
It’s the same thing here.
Where does the turning of the mandible occur?
Well, if I line it up here as a horizontal parallel to the floor it turns here just at
the bottom or slightly above the bottom teeth.
This should be parallel to the floor, the front plane of the jaw.
Alright, the front of the cranium goes back here is relatively vertical.
Having said that, let me just duck back to the construction of the jaw
and the zygomatic process.
This is the mastoid process of the occipital bone.
The occipital bone is very thick.
The temple is thin.
The occipital bone, when a person falls they don’t break the skull because of the thickness.
This is the frontal bone.
There are two bones here and here, the parietal bones forming the top of the skull and then
you have the temporal bone.
At the back you have the occipital bone.
The highest point on the cranium if I use my plumb line again I can identify it.
It lines up here just where the mandible overlaps the occipital bone.
Now you can see the drawing on the right, which is our front-view skull and the drawing
I’m working on now, three-quarters, and they’re similar in scale, but don’t take
them to be absolutely 100% in scale to each other.
Just close.
Just imagine if you were doing a silk screen shirt or anything.
You were just using, as is common, a red fabric and black ink.
Just those two.
Every time it works graphically and what we see in just those two values and the light
and dark pattern we recognize whoever’s image that is, whether it’s Jimi Hendrix
or it’s somebody more contemporary.
Just somebody, you know, any celebrity.
It could be a politician, whatever.
Or it could be your little sister, whatever.
It always works in just two values.
Okay, so I’m just trying to simplify here the underplane of the tooth cylinder.
Notice I’m not really concerned too much with separations between the teeth.
Think of them as basically a simple shape which actually is based on a very good example.
If you bite into a piece of bread, you’re going to get a leftover which will be a hold
in the bread shaped like a U-shape or a semi-circle.
That’s all we’re talking about here when we’re describing the tooth cylinder itself,
which corresponds to the arrangement of the teeth.
The four teeth at the very front, or the six teeth including the canine tooth, they represent
the front plane of the maxilla or tooth cylinder.
After that when the teeth turn back ultimately to the molars, that’s the side plane of
the tooth cylinder, although it’s overlapped by the orbicularis oris muscle which goes
entirely around the mouth.
Other muscles as well coming down from the zygoma to the mouth.
So I’m just going to clean this up one more time with the eraser, and there is the completed
three-quarter view of the skull.
Next I’ll move on to the profile view where we’re seeing the side plane.
Here we’re seeing the front plane and the side plane.
In this case, we’re seeing the front plane.
In the profile view we’re going to be seeing the side plane.
Front plane, side plane, and this is split between the front plane and side plane.
by portrait painters because we’re seeing exactly how the front plane integrates into
the side plane, whereas the front view is just one plane.
It’s less three-dimensional and the side view is more or less one plane.
It’s less three-dimensional.
We’ll talk more about that concept as the class goes on.
Okay, next the three-quarter view.
Three-quarter views are always the most descriptive and generally preferred by portrait painters
because we’re seeing exactly how the front plane integrates into the side plane, whereas
the front view is just one plane.
It’s less three-dimensional and the side view or more or less one plane.
It’s less three-dimensional.
We’ll talk more about that concept as the class goes on.
Okay, next the three quarter view.
A couple things to think about in the three-quarter view.
First of all, the width of the cranium from front to back is equal to the height of the
skull from top to bottom.
Instead of our old 3:2 ratio we’re going to have a 3:3.
In other words, the head will fit into a square.
Let’s decide now how we’re going to design that.
Okay, you can see the photograph.
I think you can very well see that the cranium takes up two-thirds of the volume of the skull.
In the side view the jaw and the side view of the cranium prevail.
In our front view, it’s really the cranium and facial mask that dominate.
That’s the front plane.
The front plane gives the front view.
In the three-quarter view, again, we get the front view and the side.
Here we get the side view.
Alright, so let’s start off about the same height as the last couple of examples.
There is the top of the cranium here.
This is the base of the jaw.
This will be approximately the same scale as the other two.
Now, if this were our regular front-view head then you would have your center line here
and you would have your widest points here and here.
Now our front axis is instead going to be here along the silhouette
of the old egg shape, vertical.
Then our axis is actually shifting this much.
Let me just move it over a little bit so it’ll fit nicely.
This is our old front axis but now the axis has shifted entirely to the silhouette.
So I take that distance, the difference, and I add it to the back.
That gives us pretty much the shape.
Maybe a little deeper, like that.
Then we’re just going to draw through like this.
Don’t curve it because the jaw is not curved.
Then we find the center line through the eyes, and we add a subjective amount of distance
here for the overlap over the eyes, the bottom of the brow ridge.
Then from that point we divide in half.
That would be over here now.
Halfway from that point to the chin is the base of the nasal bone or actually the septum.
And then here, halfway from there, to the bottom of the lower teeth and halfway from
here to the base of the nose is the extent of the entire eye socket.
Notice again from our main axis up and back we have a curved silhouette for the cranium.
Then we reach up to the highest point which we’ll generalize now
but we’ll pin it down later.
Then the front axis along which the eye socket, nasal bone, the teeth, and the chin find themselves,
that’s going to be straight from the brow downwards.
We’ll see, yes, that the eye socket comes back in from that.
We’ll see that the nasal bone extends slightly forward from that.
We’ll see that the tooth cylinder extends quite a bit farther forward and then comes
back above the chin.
Okay, so now we’re going to start building the forms of the head.
First, where does the temple turn?
Much closer to the silhouette because now, as I said, we’re dominated by the side plane
of the head, and that would mean side plane of the cranium.
Here let’s draw how it is at the zygoma.
It overlaps the eye socket here, and then here the cheekbone.
I lined it up like this, what I’m looking at—the skull photograph.
That overlaps the facial mask which we’re seeing at its smallest scale because of the
angle of the skull.
This is called the root of the nose or sometimes just above it, the keystone shape.
We’re going to draw back along this curved axis, which at one point turns back up and
approximately reaches the apex of the skull here.
Okay, here we have the front of the tooth cylinder.
Actually, we have the nasal bone overlapping it.
Let’s find how far forward that nasal bone goes.
A fair amount.
Make some small adjustments when needed.
There is the front plane of the facial mask.
Here again is the zygomatic process overlapping it.
Nice, clean shapes.
I’m only using C-curves, S-curves and rarely straights.
I don’t want shapes that are any more complicated than those.
Here is the top of the maxilla.
Here is the back of the zygomatic process
just beneath the temple here.
Here is the front plane of the cranium.
Here on a straight axis actually we find the zygomatic process at the ear.
Here is the fossa between the cranium and the zygomatic arch.
That’s the soft turning of the form.
This is approximately the narrowest part of the zygomatic arch.
This is the broadest.
There is the front of the jaw overlapping the tooth cylinder.
Again, you can place it by putting a vertical here.
In my case, I think I want to bring it back a little bit.
So, easily done.
I figured that out by, instead of eyeballing it, by doing an actual test with a plumb line,
what I just showed you.
From here at the septum we come forward.
Not that far but about that far for the front of the tooth cylinder.
Here are the overlapping upper teeth, and here the tooth overlapped at the bottom just above
that is, the chin, which brings us back to a straight center axis
and then protrudes just a little bit in front of it.
Not that far.
Maybe almost on it.
Again, take notice of the full volume of the tooth cylinder so when you’re drawing a
head seen from the front view, you don’t want to just draw the front of the tooth cylinder
as a straight.
It’s on a straight axis, but it has to project forward.
It certainly does in the profile.
This is minimized, of course, by muscle and tissue in the living model,
but that’s the essence of it.
This, again, is the mandible, overlapped by the zygoma.
You see how I compared the height of this angle with the overlapping teeth?
I could have compared it with other forms too, but that’s certainly a very good one,
and I can use my pencil as a horizontal.
This and this line up.
Another cavity here.
That’s where the temporal muscle will run from the temple
under the zygoma and to the jaw.
Here is the occipital bone.
This is the mastoid process on the occipital bone.
That angles off the occipital bone, the mastoid process, and we find just to the left of this
point the highest point on the cranium.
The deepest point is lining up with just about here, the underplane of the brow.
If I can draw that, that gives me my deepest point, and this will get me to it.
This is the back of the occipital bone.
Then we draw and arc from the highest to the deepest point of the cranium.
Okay, so going to clean it up a little so you can all see it better.
You will want to refer back to the construction stage in each of these views.
All that remains is to make this diagram or drawing a bit more graphic
so it’s more useful.
Clean up your lights.
If you want to you can start with a graphite pencil.
You can erase that all the way to white.
I’m not too concerned about that because what I’m about to do will explain things
in pretty good detail.
Let’s start here where the brow bone overlaps the socket behind it.
Here the zygoma overlaps the nasal bone.
Here there is a very deep overlap of zygoma in front of the front plane of the face, which
overlaps the nose behind it.
Don’t fall victim to getting trapped into doing small details before
you have the larger masses.
Once again, the cranium, the facial mask, and the jaw.
If you can see those things in your drawing, then the features
can literally be dropped into place.
Once again, the best homework for you is to buy a skull.
They are about $30 at the hobby store.
They will have plenty in stock coming up in October.
You know Halloween starts way before October.
You can pick one up for about 30 bucks and just place a simple desk lamp to illuminate it.
The pillow underneath it so that you can angle it anyway you want and do these drawings.
Keep them simple.
I’d rather you do a number of simple ones to you learn these forms and processes, and
at that point you’re going to be very successful at drawing the skull in greater detail.
All of it will lead to drawing the living head in better proportion, understanding,
and expressing it what’s truly important as opposed to secondary form.
Let’s turn the teeth from the side plane to the front plane.
Here is the other part of the facial mask which is overlapped by the nose.
I’m massing the teeth together but showing the overlap here
above the lower teeth and then the angle back inwards above the jaw at the chin.
Here is the cavity for the ear.
This shadow shape can have a soft edge specifically because it's a rounded form.
It’s not a soft form, although the edges on any rounded form, whether the form is hard
like a bone, soft like the thigh.
The rounded edge of the shadow, the soft edge of the shadow will show that it’s a rounded
form helping to get across the whole idea.
This helps to show us where the side plane of the skull
joins to the back plane of the skull.
Alright, so this gives us our profile head.
Notice how much wider it is than the three-quarter and then the front view.
The height remains the same.
Three units in height.
The width goes from two units to two and a half to three.
Okay, good.
We’re going to cover the neck, cervical column of the spine beneath the skull, and
we’re going to go over the muscles that can be placed on this bony foundation.
It’s always skeleton and then after that it’s a matter of muscles.
Alright, I hope that was clear, and I hope you do some homework as I described.
I think if we follow this step by step in progression you’ll have a pretty profound
understanding of the head structure and obviously proportions.
with the muscles. Just a quick review.
The cranium takes up two-thirds of the entire mass of the skull, and the first muscles we’re
going to attach is called the temporalis, which lies on the temporal bone.
The frontalis is going to lie on the frontal bone, and the parietal bones are at the top,
and the occipital bone is found at the back.
Let’s go ahead and get started with that.
The muscles are named for their position or for their location or for their function and
sometimes two of those.
Here, this muscle, the temporalis is named for its position lying on
the temple or temporal bone.
It’s a very broad muscle and it inserts into that part of the jaw which is in front
of the joint so it would come in here.
I won’t attach it to that point of the jaw because that is going to be overlapped by
another muscle yet to come.
Let me just darken that so all of you can see it better.
Alright, at the front of the cranium we have another muscle named for its position.
That is the frontalis muscle located no the frontal prominence of the frontal bone.
Easy to remember just by its name.
Next we have a sphincter muscle.
That will be another surrounding the teeth.
And this is called the orbicularis oculi, which means the muscle
that orbits the oculus or eye.
This muscle includes the eyelids themselves and surrounds the eyeball.
It also attaches to the zygomatic arch or the cheekbone.
It’s thickest at the outside of the socket and it spirals over its own fibers and within
those fibers, thickest at the outside, thinnest at the inside we find the eyelids which are
part of the muscle.
Now let’s place the nasalis muscle, named for its position on the nose.
In front of it—well, let me skip before I draw these muscles.
What I want to do is show first the second sphincter muscle of the head, and this is
known as the orbicularis oris, the muscle that orbits the mouth, orbicularis oris.
Its fibers include the lips themselves.
Different skulls will have a different depth to the tooth cylinder.
In our case, it’s quite a substantial depth.
But in any case, the mouth is orbited by this sphincter muscle.
The lips are part of it.
There are a number of muscles attached to the fibers of the orbicularis oris, and one
important one arises here from the spine of the mandible and weaves into the fibers of
the orbicularis oris.
This muscle is known for its shape.
The triangularis muscle.
Here it arises on the mandible and then rises and joins the fibers
of the orbicularis oris muscle.
The chin is made up at the center, the mentalis muscle, and at each side
the quadratus labii inferior.
When it says labii inferior that means inferior, below, and of the lips, labii.
The front at the center of the chin is the mentalis muscle.
I’m not sure how that got its name but there you go.
Next let’s draw the muscle groups that extend downward from the front of the zygoma and
the side of the zygoma and attach or insert into the fibers of the skin
of the orbicularis oris muscle.
The first of these, situated more to the outside...
is known as the zygomaticus.
Well, we know, therefore, that it attaches at the zygoma here.
Then between the nose and the turning back of the zygoma, we have a group of four muscles
very closely associated to each other, and those are known as the quadratus labii superior,
meaning four muscles virtually combined and positioned above the lips.
Superior means above.
Okay, now as we move under the zygoma and to the mandible
we find the most powerful muscle of the skull, and it’s known as the masseter muscle.
This is the muscle that you feel when you chew or clench your teeth.
You’ll notice on horses, cattle, any other grazing animals that the masseter muscle really
stands out quite strongly.
Alright, I’m going to now just outline the skull and darken the muscles a little bit
so that this can be as graphic for you as possible.
Okay, so there then are the important muscles of the skull seen in profile.
Now I’ll describes those same muscles in the front-view skull.
For the most part, I’m just going to draw the muscles on one side of the skull because
you’re probably aware that the head being symmetrical, the muscles on this side are
mirror images from the muscles on the right side.
Let’s start off with the frontalis muscle.
Once again, it’s located on the frontal bone.
The temporalis muscle behind the zygomatic arch and following the temporal bone is here
on the side of the cranium.
And I’m going to try to place it carefully.
There is the zygoma overlapping that muscle, and then the muscle passes here
underneath the zygoma.
Okay, next we’ll place the sphincter muscle, which is the orbicularis oculi, and that
attaches to the brow ridge and completely surrounds the eye socket.
Let’s get rid of this first.
This is the nasal bone.
I should say this is the nasalis muscle, but it’s here just above the septal cartilages
which form the base of the nose.
Okay, up against the nasal bone here, we find the more shallow fibers
of the orbicularis oculi.
Again, this muscle is thickest on the outside of the socket and then folds over itself where
it’s closest to the nose.
It also forms the eyelids.
Alright, at this point, let’s draw the orbicularis oris, the muscle that orbits
or surrounds the oris, the mouth.
This groove above the upper lip is known as the philtrum.
And the lips themselves are part of the orbicularis oris muscle.
Beneath that orbicularis oris, we have this muscle arising from the front of the mandible
and centered on the center axis of the skull, and this is known as the mentalis muscle.
Opposite that muscle we find the triangularis muscle.
In between them, this muscle and the mentalis muscle, we find the quadratus labii inferior.
I’ll just draw it on this side so you can see where it attaches at the mandible.
If we go back now to the zygoma we have a muscle attaching there,
and this muscle follows
the line of the horizontal thrust formed by the facial mass as it overlaps the mass of
the mandible.
It’s known for its position as the zygomaticus muscle.
Next to it is a group of muscles known as the quadratus labii superior.
Those muscles come from the zygoma at the front of the face
and insert into the skin above the muscle known as the orbicularis oris.
Then we find the masseter muscle.
Again, the most powerful muscle of the skull.
It overlaps the buccinator muscle which inserts into the fibers of the orbicularis oris muscle.
And we see it here.
Okay, at this time I’m now going to go back and outline in black the bones of the skull
and then the red which represents the muscles of the skull.
Okay, as I go, we’ll review.
This is the frontalis muscle.
This is the temporalis muscle.
Here we’ve got the orbicularis oculi.
Its deepest part, its shallowest part, the eyelids are part of that muscle.
The nasalis muscle.
The zygomaticus.
The quadratus labii superior.
The masseter muscle.
The orbicularis oris.
The triangularis muscle.
Buccinator muscle.
The lips where are part of the orbicularis oris muscle.
Then attaching to it, coming up from the mandible is the are the quadratus labii inferior muscles.
Finally, the mentalis muscle.
That’s why when you look at the living subject you’re going to see one, two, three muscles
at the front plane of the chin.
Alright, just for clarity’s sake, I’ll go ahead and sketch in the muscles on both
sides of the skull.
We have here the frontalis muscle, again.
These fibers actually fill in a bit more.
They’re a bit closer so I’ll just indicate that by that like this.
Okay, then we’ve got, here is our sphincter muscle, the orbicularis oculi.
Let’s show how it folds over itself.
From thickest at the outside to considerably more shallow at the inside.
The lids are part of the muscle.
We’ve already completed the orbicularis oris.
I can overlay the buccinator muscle and the quadratus labii inferior
with the triangularis muscle.
We can place the zygomaticus muscle, which is starting the underplane of the facial mask.
It overlaps the jaw.
Masseter muscle and the quadratus—before we do that, let’s get the important temporalis
muscle in place.
And then let’s place the quadratus labii superior.
Good, alright, I’ll darken this.
There is the orbicularis oculi muscle,
quadratus labii superior
and zygomaticus muscle.
Eyelids.
Triangularis muscle.
I’ll extend it a little too far because
I want to obviously leave room for the masseter muscle.
There we have the muscles of the skull seen from the front view.
Next, we’re going to lay muscles over the skull on a three-quarter view head.
Try to imagine your vertical axis now.
Okay, good. That will help.
Just very lightly.
Let’s start off with the frontalis muscle.
The head is symmetrical so we’re going to go ahead and place that muscle on both sides
of the three-quarter view skull.
Then the temporalis muscle behind the zygomatic arch and running all along the temporal bone.
I’m actually inserting here out to the mandible.
Here we’ll pick up the nasal bone, the nasalis muscle—forgive me.
Then the orbicularis oculi.
Once more that surrounds or orbits the eye socket.
The muscle overlaps itself here and is thickest at the outside of the eye socket.
The lids themselves are part of the orbicularis [oculi] muscle.
Okay, now we’ll place the other sphincter muscle on the skull, and that would be here,
the orbicularis oris muscle.
Notice the forward thrust of that set of forms.
Philtrum.
The lips are part of the orbicularis oris muscle.
Here is the mentalis muscle at the front of the chin.
Next to it, quadratus labii inferior.
Overlapping that is the triangularis muscle all the way to the mandible.
Here are the quadratus labii superior
and next to those we find on the zygoma obviously, the zygomaticus muscle.
Here we pick up the most powerful muscle on the skull, the masseter muscle.
Then the buccinator muscle beneath it, and let’s do the same on the other side too.
Depending you might pick up a bit of the masseter muscle on the far side of
the head as well.
Okay.
Now I’m going to strength the black for the bone and the red for the muscle.
Now I’m going to go ahead and indicate the bony structure of the skull with black pencil
and the muscles with a red pencil.
I’m not sure we really would see the muscles behind the orbicularis oris
muscle and the triangularis muscle so I’m just going to take those out.
And now let’s strengthen the red for the muscles.
The masseter muscle.
The triangularis muscle.
Zygomaticus muscle.
The quadratus labii superior.
The orbicularis oculi.
The lids, part of that sphincter muscle.
The nasalis muscle.
The frontalis muscle.
The temporalis muscle at the side of the head.
Here is the orbicularis oculi on the far side of the three-quarter head.
Here is the zygomaticus muscle, and these are the quadratus labii superior muscles.
This is the orbicularis oris and I’ll show the overlapping and dovetailing into its fibers.
That occurs where the triangularis comes up to join the orbicularis oris.
Here is the grove above the lip known as the philtrum.
It’s on an inclined plane because the tooth cylinder projects so it should not be vertical.
It has to be diagonal.
The lips too are on this inclined plane, otherwise the peak of the lip would be centered here,
but because it’s located on an inclined plane it pushes forward of it.
The lips are part of the orbicularis oris.
Masseter overlaps the buccinator muscle and here, but here we get the bottom of the tooth
cylinder above the chin.
Here is the mentalis muscle at the front of the head and the quadratus labii superior
overlapped by the triangularis muscle.
Some might wonder that the buccinator muscle joins the orbicularis oris.
Well, I’m just going to cut in between here and show you what happens.
The fibers come up this way and this way in the direction of the corner of the mouth.
Here we get the orbicularis oris overlapping the buccinator and in turn we get here the
buccinator overlapping the orbicularis oris.
I’ll do a little cutaway that’ll help you see it even better.
If we could see beneath the triangularis muscle and the masseter muscle and the zygomaticus
muscle, it would look just like this.
Alright, so there we have the skull seen from profile, front view, and three-quarter,
and its muscle from profile, front view, and three-quarter.
In our next lesson we’re going to be going over the bones that make up the neck, and
we’re going to also do the muscle that come up from the shoulder girdle at the clavicle
and the sternum and from the back above the scapula, so we’ll have a complete view of
the skulls and muscles of the head seen from three angles, and then also of the neck in
those same three angles.
tissue, the skin, the cartilage, the fat, all that reveals the form on its surface.
I’m going to emphasize how that is structured
based on the bone and the muscle and the cartilage that we’ve already discussed.
Today, we’ve got a young male model, and most of the forms in the front view head are
evident in his case.
It can be more subtle in some people or more pronounced in others, but let’s go ahead
and try to find them here.
We can see, for starters, that here on the frontal prominence we can see the furrows
that are formed by the frontalis muscle, and then if we look carefully we can see
the eyebrow as it overlaps all of the eye within the socket.
On the opposite side, the head falls from light to shadow, approximately here and then
turns away from the light on the frontal prominence of the forehead here.
Then also on the opposite side we can see within the shadow pattern the overlap of the
brow over the eye sockets here.
We see the socket turning away from the light and against the side plane of the nose here.
We also see the overlapping muscle, the orbicularis oculi above the eye socket.
That’s the overlap of the muscle above the eye socket, and here beneath it we see the
eyelid overlapping the ball.
Here we can locate the tear ducts.
The iris.
The top plane of the lower lid catches the light, but the lashes are dark so we’ll
indicate those.
Then turning from right to left we have the lower lid, part of the orbicularis oculi
muscle, and then that in turn here overlaps
the inside angle of the orbicularis oculi muscle.
I’ll lift the tracing paper now so you can probably see it better.
Okay, now we have the underplane of the orbicularis oculi muscle
as it overlaps the front plane of the face.
We also now can find the bridge of the nose starting with the bone, the nasal bone here
and then extending toward the mouth with the cartilage that forms the bridge of the nose.
Beneath that, we see here the septal cartilage above the tooth cylinder.
Then the cartilage is called the alar cartilage on either side of the septum.
I’m using a 2B conté pencil.
You could use anything, a graphite pencil or a Prismacolor wax pencil or any other wax
pencil just as long as it can make a definitive statement, make it clear.
Here at the center of the orbicularis oculi muscle we see a valley above the lip into
which we see a shadow that describes the philtrum.
And then we get here, the orbicularis oris muscle which forms
also the upper and lower lip.
The lower lip overlaps the underplane of the orbicularis oris muscle and then it turns
from its front plane to its side plane here.
Beneath it we get the overlap of that muscle above the chin.
There is the overlap and beneath that we pick up the side plane of the chin as it turns
from light to shadow and then turns under just about here.
Moving on to the structure opposite the eye socket, we find the turning of the temple
from the front to the side plane, and then the cheek turning from the front plane to
the side plane, and here the hair as it turns along the side plane of the head.
Here is the turning of the facial mask into its side plane and here
the mandible.
It may turn a little bit higher in this individual’s case, from its vertical to its diagonal.
We always look for that in each individual.
It varies.
Here and here a hair at the scalp.
Apex of the head.
Now we place the ear which is somewhat lower than the septum in our pose.
It angles like that.
The neck...
slight diagonal.
We’ll discuss the anatomy of the neck in great detail in the next lesson.
I’m just going to place the shadow over the front of the neck and the mastoid tendon,
and I’m also going to angle the shoulder toward the shoulder girdle,
toward the deltoid muscle.
Let’s balance the ears.
We should be symmetrical in a front view head.
There we have.
I haven’t developed the shadow side, but here we have what you would see if you squinted
at his head and developed the features and structures as I’ve done.
I’ll just go ahead and make this a little more graphic by going ahead
and filing in my dark pattern quite simply.
To make it very clear I’m just going to use one value for all my darks, whether they
are shadows, eyebrows, irises, or hair.
But, as I drew I mentally projected the abstraction of the head which we’ve gone over as well
as the anatomy beneath, which the distraction clearly represents.
I’m definitely referring as I draw, mentally projecting the anatomy, which is both the
bone and the muscular structure of the head.
Notice that I just simply overlap each stroke so that I get an even tone and the effect
is very clear, graphic, and something we can learn from.
Try not to be sketchy, just overlap each stroke, and you’ll wind up
with a nice, legible value.
It could be a dark gray, middle gray, or a light gray, but it will be easily legible.
Aside from the fact that we based this drawing on the anatomy beneath it, we
also see that we can get a nice graphic effect just by using two values.
Oftentimes, in painting and drawing and illustration, that’s all you really want.
Of course, you can go back into it and develop even darker tones.
But for now, I just want to draw the structure and emphasize how much can be done with just
the design of the shapes, correct edges, and then single separation of light and shadow
based on the anatomy beneath it.
Next we’re going to go over a three-quarter view head.
I’m going to go right ahead and superimpose the flesh.
I’m not just going to break it down into a light and dark graphic pattern.
I will do that, but I’m going to add a third value for the darker darks, so get a little
more sense of something more of a completed drawing.
Alright, then.
If you squint, you’ll notice on the photograph there is a much clearer light and dark pattern
than if you scrutinize that photograph and try to see all the detail.
What we’re going to notice, for instance, is here just in front of the temple, the form
of the head is going to fall away from the light into shadow.
That’s also going to happen with the zygomatic process here and at the nasal bone.
The shadow actually will rest all the way up to the side plane of the nose and her at
the tooth cylinder the orbicularis oris muscle will turn away from the light into the shadow.
Same thing with the underplane of the tooth cylinder and the front plane of the chin.
These are the things I’m looking at first.
I also know that from the outside of the eye socket just outside the temple we have the
mass of the hair.
That may or may not be in shadow but it is part of our dark pattern so we have make sure
we refer to that in terms of, again, our dark pattern.
Then eventually we come out the edge of the mandible, and the ear, which lines up with
the nose beyond it.
Finally, we have the neck and we have the hair.
Alright, so let’s go ahead and proceed starting with the forehead.
I’m going to turn the form here at the brow and here at the frontal prominence.
Pick up the silhouette of his head.
How is it that the eyebrow overlaps the socket?
Why is it that the orbicularis oculi muscle overlaps the ball of the eye?
And at what angle?
Overlaps are usually connoted by a hard edge so that’s what I’ve done.
Now the front plane of the zygomatic process is at an angle to the light source, so it’s
not catching the light so I put in that shape and the shadow.
The eye itself is within the shadow, and the front plane of the lower lid turns from light
to shadow like that.
We can do things later such as placing the dark overlap of the lid or the iris or the
catch light, but for now this is the essence of it.
Here is the front plane of the entire zygomatic process turned away from the lights.
Let’s dive over now to the nose.
We pick up the angle of the nose and we extend it because in our anatomical diagram we do
not continue all the way to the tip of the nose which is formed by cartilage, but in
the living model we have to add the septal cartilage.
That will take us to a point just above the philtrum.
Then we pick up the shape of the alar cartilage, forming the wings of the nose, and they overlap
the philtrum below.
They also catch the light so the shape itself would look something like this.
With a little triangle of light catching here next to the philtrum.
Just here below the root of the nose the bridge falls into shadow, and we get a little bit
of a cast shadow from the eyelash.
It’s very incidental, not too important.
Then we get the shadow from the zygomatic process over the bridge of the nose.
This region would be in light but there is more to do.
Here this is more of a construction issue.
I want to find how the upper lip overlaps the lower lip, and I want to find how the
orbicularis oris muscle overlaps the corner of the mouth.
Here we get a shadow overlapping the tooth cylinder.
Here we get the front plane of the cheek.
Beneath that to the left we get the turning forward of the facial mask.
Don’t be too subtle for your own good.
Just try to keep this all quite simple.
Upper lip as is usual, falls into shadow.
Front of the maxilla or tooth cylinder turns into shadow.
I’m just mapping this out.
I’m not bothering to fill it in at this stage.
Lower lip turns under and the front plane falls into shadow.
There is a logic to this.
The underplane of the tooth cylinder or the maxilla turns into shadow here and overlaps
the chin here, which turns from light to shadow, from right to left.
It turns under above the mandible.
Let’s go back to the silhouette for the moment.
Here is the hair.
Let’s have a look at what goes on with this silhouette.
In our case, the photograph is a little different than the three-quarter view.
I’m going to push it toward our three-quarter view.
Our model is very lean, a little more lean than our anatomical diagram.
That doesn’t have to trip us up or phase us.
We’ll just follow that.
The hair at the temple, it arcs like this.
It angles out and back toward the ear.
With a very light stroke I indicate the line of the jaw which is part of the light pattern.
Here is the center of the neck and past it right here is the silhouette of the neck.
Now we’ll place the ear which is pretty much in line with the nose.
We have the tragus overlapping the ear’s opening, and the antitragus opposite
and then the shell or concha of the ear opens out then overlaps the helix here.
He’s got a full head of hear which extends well beyond the ear.
It looks close to that.
If I were to go back and fill in my light and dark pattern, this is what we would get.
This is going to help you in all subsequent drawings.
Just overlap your strokes.
Don’t be too sketchy.
It’s actually quite simple and quite fast.
Same thing with the skin just like the hair.
Actually this is a technique used with the poster-izing or logo-izing a likeness or an
image just done in two values.
I’ll add a third value for the darkest darks, but I first want you to see the effect we
can get with only two.
It doesn’t work if your tone is scratchy or illegible so keep it simple.
Okay, let’s pause for a moment, take a look at what we’ve got.
The light and dark pattern alone, and then we’ll proceed to put in a third value for
the darkest darks.
At this point now, I’m going to introduce a third value, and this will be the darkest value.
Actually, I could go darker.
I could go all the way to black, but I think I’ll get my point across if I just go with
a very dark gray.
Black is considered zero on a scale of zero to 100, and white is the absence of light
so we call that 100.
This would probably be a 25.
Not a full black at 0 but three-quarters of the way to it.
Most of his hair is part of his third value so we’ll start with that.
Start with the larger shapes of your darks before you go down to the smaller ones such
as around the eye, etc.
I’m using the side of a conté pencil so my pencil doesn’t really get dull.
It stays dark.
It stays sharp, rather.
You can see it here.
Again, just overlap your strokes. It doesn't take much.
If you’re having any trouble doing then just take a sheet of paper and practice creating
squares or cylinders or circles and filling those in with one even value until you master it.
It’s going to serve you very well if you can do that.
Now, within the shadow on this head we have areas that go very dark.
Some because they are just intrinsically dark like his eyebrow and others because they are
receiving the least reflected light within the shadow.
So here, let’s start with the eyebrow which just happens to be darker in itself than the
rest of the skin.
So as I do this, I’m aware, for instance, here the frontal prominence of the
skull, the frontalist bone of the cranium overlaps the socket, and so the eyebrow rests
inside of that overlap.
It’s going to naturally, therefore, get less light so we can expect that.
Other areas, for instance, here—we get the clear overlap of the orbicularis oculi muscle,
and that’s going to receive less reflected light as well.
Based on the position of these features and structures we can expect some to go darker
than others right off the bat, and
I’m careful to think of that when I design my darkest values.
Here we get the overlapping muscle above the lid, and then we measure the distance from
the lid—I’m sorry—from the muscle to the bottom of the lid as it overlaps the eyeball.
That’s going to go quite dark too.
You have to remember that the upper lid has a certain thickness which is going to cast
a shadow over the socket.
The iris, let’s look carefully at that.
It does have blue eyes, but in this particular lighting they tend to go very dark.
I should say at least darker than the surrounding white of the eye and some of the other shapes.
Lower lid, the lashes happen to be quite dark.
That isn’t always the case but it is here.
Here the nostril cavity gave very little reflected light tends to go
darker than the surrounding shadows.
We have here the eye socket on its front plane.
That’s fine but inside of that our shadow gets less reflected light so we can darker
with that as well.
I’ve switched my grip to get these smaller, more precise areas, and in doing it notice
that the pencil tends to get a little bit dull.
Earlier I didn’t switch my grip at all, and the pencil stayed quite sharp.
So that’s alright.
I have my pencil sharpener at my side.
The upper lip is not getting much reflected light so it tends to go darker too.
So there is a rendition of the head not just using two values, but putting in a third darkest
value, all of it constantly referring to here, the front plane of the zygoma.
Here the front plane of the muzzle, the muscle wrapping around and
joining to the orbicularis oris.
You always have you anatomy in mind.
You’re not drawing anatomy as such but you are informed by anatomy and referring to it.
Okay, now we’re going to move on to a profile head.
light and shadow.
There definitely is shadow under the jaw particularly and at the back of the neck and at the back
plane of the cranium of the hair but for most of our drawing we’re going to be dealing
with half-tones in the light.
I’m going to switch over to a Verithin black pencil.
It’s made by Prismacolor.
It’s a wax pencil.
In this case, unlike the first 2 examples, I’m going to not just do the construction
and refer to the anatomy, but I’m going to explore how we can describe the anatomy
within the light using half-tones.
Half-tones are not shadows.
They belong to the light.
They’re darker than much of the direct light because they are capturing the light at an
angle rather than 90 degrees, let’s say.
In our case we see half-tones at the side of the nose, under the brow, certainly under
the cheek over the zygomatic process and then also overall half-tone over the jaw and beneath
the lips, as well as some of the shadows or I should say half-tones on the neck.
Half-tones can never be as dark as anything in the shadow, otherwise you’re drawing
will look muddy and it will be called what we call over-mottled.
Let’s go ahead and get started.
I want to point out one or two more things off the top.
The mouth of the skull that we’ve employed is a little bit farther in terms of the projection
of the tooth cylinder.
Our model is a little more recessive, so I am going to pretty much follow the model and
pull back the form of the muscles that we did earlier.
You know that’s a good exercise.
Nobody has the bones and the muscles in the same proportion or placement.
They vary and so it’s good to know that so you can actually use the anatomy and not
just be used by the anatomy.
Let’s start here at the brow ridge.
He has a pronounced brow ridge.
There is the frontal bone and turning here into the brow ridge above the socket and extending
from it, you’ve got the nasal bone.
He does have a nice clear angle to the bridge of his nose.
We have overlapping the eye socket, of course, the bone and not just the bone, the eyebrow.
I’m going to indicate that.
Then we see here that the orbicularis oculi overlaps the eye with that lid.
Let’s pick up that lid and the manner it which it overlaps the ball.
The ball is seen in silhouette.
It’s the bottom third or so of the ball that we actually see, and we see an ellipse
since the iris is turned away from us, an ellipse like this.
The lower lid does not come as far forward as the upper lid,
and it is shaped something like so.
We catch a bit of a half-tone right here where the front plane of the facial mass is overlapped
by the eyelid.
This whole region under the brow is angled away from the source of light but not in such
a manner that it falls into shadow, so it does deserve a half-tone.
It’s very important to measure the distance from the bottom of the eye socket to the top
on the wing of the nose, this distance.
If you do that carefully you almost always succeed in getting the nose at the right length.
There is a half-tone here over the septal cartilages.
Bring back the septum to the facial mask.
I think it’s a little lower than I’ve drawn it so I’ll adjust it.
When you’re using the wax pencils, it’s very important to use the kneaded eraser,
but you could also be well served by a white plastic eraser.
Good to have both on hand.
Let’s turn the septum under above the nostril.
In a moment we’re going to turn the wing of the nose back against the facial mass.
Here when we do this we should be careful to use a plumb line and determine where that
wing meets the face, comparing it, for instance to the eyelash or any other form that you’ve
already indicated so that you’re measuring as you go.
Alright, here we have the same muscle that we see in our example,
but the angle is different like that.
Then the lip projects but not as much as the example.
The example it projects farther.
It doesn’t matter.
Everyone has the same muscle, the same bones.
They are arranged differently and a different scale to each other.
It doesn’t matter if we still have a standard head and a standard abstraction or understanding
of its structure we can use it.
Notice the upper lip is farther forward than the lower lip, highly important.
Then we get the underplane of the orbicularis oris above the chin.
Once again, I use the pencil as a plumb line
so I can compare this point with a point anywhere above it.
Otherwise, we’re in unsafe territory.
I do this from drawing from live models or drawing from photographs.
It doesn't change.
Let’s duck over here from the outside of the eye socket
to the hairline.
I’m just going to give a little indication here for where the zygomatic
process overlaps the jaw.
Get the hair to overlap the head.
Find the highest point, the apex of the head.
Develop the jaw.
You’ll notice I’m typically drawing with the tip of the pencil instead of the side of it.
That’s because the Verithin is a very precise tool.
Another good tool to use for this exercise would be a Prismacolor or other wax pencil
that is a little less refined than the Verithin.
Pick up the underplane of the head at the jaw here.
Notice and we’ll get into this more in our next lesson on the neck, notice how diagonal
the neck is in the profile so that the vertebrae can get up and under the center of gravity
of the skull.
There is a shadow cast by the ear over the neck.
It’ll probably come out alright, but I’m not
really concerned about having a portrait likeness here.
My model is for my purposes.
I’m paying him.
He’s not paying me so what I am looking for is structure.
Here we find the turning back of the mastoid muscle and the trapezius muscle beneath it.
These were items that we’ll get into more detail next time.
Okay, now for my darks,
I think it’s faster and simpler just to go right away with the Conté.
Conté contains charcoal and wax so it’s compatible with a wax pencil such as the Verithin,
but at least for broad areas of dark, it’ll get the job done efficiently.
Here I’m using more of the side of the pencil.
I won’t be using this on the face because the face is in the light and has some very,
very subtle close values.
This is more for my heavier tones.
But I will show you how you can go back over the Conté using Verithin and make it quite
refined even though here it looks grainy.
You can get a good likeness just by copying the shapes and their placement, but you can
get a convincing likeness if you use the underlying anatomy in the design of your shapes.
Some people confuse anatomy with figure drawing or head drawing just the way they do with
perspective.
Both of those, anatomy and perspective are tools, even guides at times.
We need to be aware of them.
They need to inform us, but they’re not straight jackets.
They are actually just understanding that we can employ.
They are not synonymous against with figure drawing or head drawing.
You’ll find a lot of books, for instance, and I don’t fault them; they’re good,
but there is a slew of them on anatomy for artists.
There must be 40 or 50 of them.
I know many, many students who have studied those books, and I must say that their drawing
hasn’t particularly benefited from it because they are not synonymous with figure drawing.
We’ll be discussing this in detail as we go through the lessons, but we want to draw
naturalistically and not mechanically.
Your drawings shouldn’t look like blueprints.
You’ll notice in the best drawings by people like Alfons Mucha or John Singer Sargent,
the anatomy is there but that’s not the first thing that you take delight in when
you look at those drawings.
If you don’t have anatomy they’ll be a ceiling that you can rise above in your drawing.
It’s one thing to correctly draw your shapes, even your edges, and I hope your values, but
without anatomy you can’t go beyond a certain point.
It’s a tool. Not a straight jacket.
There we go.
We’ve got our dark pattern.
We’ve left our light pattern.
Now I’m going to go ahead and refine the dark pattern and its edges and use the finer
pencil to do some of the half-tones which are dominant in this particular drawing, in
this photo.
Now, if I take the Verithin pencil, first let’s look at what course texture is when
we use the Conté.
I’m not against it but let’s recognize it for what it is.
If I take the Verithin pencil and sharpen it to a good point, notice I can go over those
darks and make them thoroughly legible.
I hate to use the word smooth, but I suppose that too.
It doesn’t take too long either.
I can do that.
Let’s take a larger area, make an example of that.
In life drawing, very often I’ll lay in the figure with Conté, put in the darks using
Conté, and then go back over it using a 2B charcoal pencil or even a lighter gray depending
on the manufacturer.
Conté is kind of a heavy lifter.
It gets the job done.
And then we can refine using harder pencils.
You have to keep the pencil sharp.
I am going to do this for a couple of minutes because I want to have a clear, legible dark
pattern before I go back into the head and start to mottle in detail the half-tone planes.
Here too, I just overlap each stroke with the next.
This is good to know if you’re doing, let’s say you’re doing some sketches professionally
especially in advertising.
You’re going to need to know how to create nice, simple, even legible tone.
You can always do it this way.
Or you can start out with a Prismacolor wax pencil, which is more grainy than the Verithin
and then come back in with the Verithin.
It doesn’t take all day.
This is not a technique class, per se, but to get your ideas across, to get your structure
across, it’s important to understand what you can do.
The values in this hair also depend on the structure beneath.
Here, for instance, we get a crest of light.
The body of the hair is darker than this, but at this point where the temple turns to
the side we get a reflection of the light source even though his hair is not slick,
this is typical.
It depends on the anatomy beneath.
Imagine if you’re drawing a very silky black cat.
It’s really hard to find little half-tones, but the crest lights tell it all.
Let’s go back in with our half-tones.
Of course, this is not a half-tone but we’ll start with this.
This is part of our dark pattern.
Not because the eyebrow is in shadow.
It is not in shadow.
Just because it happens to be dark by itself.
The white of the eye is not very often white.
The nostril belongs to the underplane of the nose.
The underplane of the nose is angled to the light so it falls into half-tone.
One way of getting effective half-tones, not just on tracing paper like this but on any
paper, is to lift the paper, keep it taut, and then draw your half-tones carefully.
You’ll get more control over those half-tones.
It’s almost literally like drawing on air.
Like everything, it takes practice.
It’s a hard edge.
We’ll get that lower lip to tuck under the upper lip.
The hard edges connote overlaps.
Even though we’re resting heavily on anatomy, you don’t really want to just draw what
you know, you want to draw what you see.
In particular, drawing the lower lip, getting the proper value,
you’re going to have to rely on your eyes.
Here I’m going to draw up from the point at which the cheek overlaps the jaw in the
direction of the eye socket.
I kind of skip around the head.
I don’t fixate on one part of it.
If I do I can wind up with something that’s developed in the wrong value scale relative
to other passages in the drawing.
If I move around the drawing I tend to get more accurate value arrangements.
Some of that comes from painting background.
Before you paint, you really need to understand form by drawing.
If you’re going to be a tonal artist you shouldn’t put off painting forever.
You shouldn’t put off painting forever.
There is much to learn from that as well.
Here is your buccinator muscle.
Here is your orbicularis oris muscle.
Same thing here.
Here is your zygomatic process, but you don’t want to just draw them as lines.
You’re using them to construct a head in a naturalistic way.
Soften the turning of the edge on the tragus.
None of these forms are papercut.
That’s definitely the kiss of death unless you give it the proper edge.
Just evening out the value here.
Here is the inside of the nasal bone.
Here is the turning back of the masseter muscle
away from its front plane to its side plane.
That’s where the chin and the jaw turn under before
they reach the underplane of the head.
The silhouette of a form is defined as the last half-tone before the background.
We can’t just leave this hard edge with no tone to give it a little half-tone.
Here is the zygoma turning back in the direction of the ear.
At some point in the drawing you’ll put in your very darkest dark.
It doesn’t mean you have to put in every dark dark that is equivalent to it, but I’ll
just put it right there in the eyebrow for the moment.
I hope you can see here how the direction and the construction of the half-tones depends
on understanding of the bone and muscle structure of the skull.
We can carry this further but I think for our purposes,
this probably will get the point across.
Here is a front view head with one value plus white.
Here is a three-quarter head, kind of rough but with two values plus white.
Here is a profile where there is very little shadow on the head so we rely on half-tones.
skeletal structure of the head,
the muscles, and we've added facial features and hair
to bring the drawing toward a finish. But we're going to go back now
and draw the vertebrae of the neck, and the muscles and the tissue
of the neck. It's obviously very important
just how the head rests
on the cervical vertebrae, that's the seven
vertebrae that form the neck, and that's critical
to understanding the posture of the head. It's very rare
when we're gonna just draw the head floating by itself so,
almost always, especially in a portrait for instance, you'll want to have
the head at a particular angle relative to the neck.
And usually not directly above it and straight, which is rather stiff
and monotonous but perhaps turned somewhat or even
tilted. So it's important to understand
the general shape of the neck seen from different angles and
also the angle of the neck, which is certainly not
vertical, nor any of the vertebrae in the
spine, but the curves under
the skull to get beneath its center of gravity.
So that's gonna be my first point. And in doing so then
I will draw the long lines of the vertebrae
with no musculature and I'll talk about
how the curve of the neck actually holds
the skull in a position that gets under the center
of gravity. So for this, let's see what shall I use?
Today I'll try to go with a
graphite pencil and
in this instance I'm using a 2B grade
graphite pencil. I might draw over it with Prismacolor
but at the beginning I can lightly lay in the
angle of the neck.
To help us it's
useful to add
the outside silhouette
of the neck, including its muscles and other
tissues.
So I'll start there. We sometimes call this the
long line, or the long lines, of the pose
and within that then we can place the bony structure
Rather than drawing
vertebrae by vertebrae, I'm gonna draw the entire column
and then we can separate the individual vertebrae.
So here's the front silhouette of the neck
and of course this is the back silhouette of the neck.
It has seven vertebrae starting
just beneath the occipital bone and running to
the first rib. And the height of that
column is just about equivalent
to the height of the skull itself.
A little bit less
but close.
So in drawing anything you want to draw its shape and its extent.
And then you can break it down. So here
you see I've got the whole cervical vertebral column
coming under the skull at an angle.
In addition to that, we have
two important pieces at the front
The first one is the hyoid bone,
it's not connected to the vertebrae themselves, but
it's connected by muscle and tissue. And at this point
muscles come up from the shoulder girdle, joining at
hyoid bone, gathering there, and extending up to
the spine of the mandible. Beneath it
we have a prominent cartilage,
known as the thyroid cartilage,
and most often it's referred to
as the Adam's apple,
causing this particular protrusion at the front of the neck.
Okay, then we want to break down the vertebrae.
Here would be the first
thoracic, or chest vertebrae,
and above it we have the seven vertebrae that form the
column of the neck.
column of the neck.
At the top we have
the axis
bone. This particular vetebrae does not
have
a body to it. Each vertebrae
has, I mean this is the crudest of
diagrams, but it has what's known as a body, and then
coming off of it, it has
a spinous and a transverse process,
and those allow for muscle attachments. And then
in between we have this cavity, which
allows for the spinal cord to go up and down
the whole spinal column.
Now here
we find the axis bone
just beneath the atlas bone
I'm not gonna draw the
transverse process, which projects toward us, until I first
drawn the whole silhouette of the vertebrae.
Now we find here the third cervical vertebrae.
You're not gonna see any of these
on the surface of the living model.
The only process
among the cervical vertebrae that will be visible
is gonna be the seventh
cervical vertebrae here. And then in the front
you'll see the Adam's apple, or as
we know it, the thyroid cartilage.
And this is the hyoid bone.
Now I'm just sketching it very
roughly at this point. I should
say I'm just sketching the vertebrae roughly.
As we'll see later, these
processes: the spinous
processes of the vertebrae are pronounced
for the attachment of muscles, and same thing with these
transverse processes, which we're gonna
get into momentarily.
This area, with each vertebrae, is
called the body of the vertebrae. And between
the body of this vertebrae and the one above it and the one below it,
are cartilages, which we call disks.
If you talk about somebody having a slipped disk
that means that it has slipped out of place
and that needs to be corrected, obviously.
But we're not gonna draw those.
You know, this is
true for all of the figure, whether it's an arm or a leg or even a
torso. You'll always want to draw the long lines of it
and within it you place the musculature or the bony joints.
For me to draw each vertebrae by itself
well that's all well and good, I could render them all nicely and
feel happy about it, but it wouldn't necessarily conform
to the most important aspect, which is the big shape of it.
So, I'm giving you
kind of a loose
depiction
of the vertebrae and their spinous
processes. If you want to go into more detail,
naturally you can study further in your anatomy.
But for us, this is more than sufficient for
our purposes.
I'm just sketching these
in using a 2B graphite pencil. This happens
to be made by General Pencil Company, Kimberly
525. I can go over it, and I probably will,
with the Prismacolor pencil
to darken it; make it a little more clear.
Okay,
so those are very loosely drawn, but placed in
position. Here
we have the hyoid bone, that bone which I described
as a floating bone, however connected by
tendon and muscle.
And then here is the
thyroid cartilage beneath it.
This is visible in most cases on the
living subject.
Okay, let me flesh this out a little bit. I'll switch over to a
Prismacolor pencil just because it's a little easier to read,
a little bit more graphic. I did not start with it
because the graphite pencil is
lighter. Alright, actually let me use a verithin pencil,
which is another form of wax pencil made by Prismacolor.
At this stage it doesn't matter much if I use a black Prismacolor
or if I use a black verithin, so I'll use a black verithin. but
as I've been emphasizing all throughout, you want to keep it nice and
sharp. And then I keep a kneaded
eraser on hand to clarify matters or change
things, what have you.
So here's our atlas bone.
This is the
bone upon which the head pivots and rocks.
Beneath
it, beneath the atlas
bone, we have the axis bone.
Again, you're not gonna see either of these
on the surface
of the living head or neck.
This is the third cervical
vertebrae and you can see it now has a very pronounced
spinous
process, that's the process that extends from the body of the
vertebrae to the back, or the
dorsal view of the neck.
This is C4, cervical vertebrae number four,
essentially very
similar. As far as you're concerned, they can all just about
be the same. Although, they will graduate in size.
So that, eventually, when we get to the thoracic vertebrae
or sometimes called the dorsal vertebrae, those
of the rib cage, they will be larger.
And the largest vertebrae, of course,
are the lumbar vertebrae, the ones between
the ribcage and the pelvis.
So this is C5,
cervical vertebrae number five.
And beneath it, obviously, is C6
the sixth cervical vertebrae.
And here we have the
seventh cervical vertebrae and this one has a pronounced
spinous process, which is actually visible
on the back of a model.
Here, we finally come to the first
thoracic vertebrae. There are twelve of them.
They obviously correspond to the twleve ribs.
I'll just put it in place so that we have that as a reference.
This too can be seen frequently
on the live model.
And it's here where we
pick up the first rib.
I'll just lighten or erase that section.
Okay, so let's go back
and try to clarify
what we've done.
I think the salient points that we want to get across are
the angle of the vertebrae as they curve up under the cranium,
or under the skull i should say
We'll talk about these muscles, this will be the trapezius muscle,
but we're getting ahead of ourself. We'll do that
in good order.
And here again, this is the hyoid
bone, and that's where muscles coming up from the shoulder
girdle gather and spread out to
the mandible.
And finally, the Adam's apple,
or its proper name: the hyoid cartilage.
I'm going to accent
now
the transverse processes
as we move down the vertebrae. And these
extend out from
the body here
of each vertebrae, to the left and to the right.
Hence, their name is the transverse processes.
And, like the spinous process behind each,
they serve for the attachment
of muscle and tendon, or I should say of
tendon.
We'll see them a little bit
better when we drawn the front view
of the vertebrae, but we will not see the
spinous processes when we do that.
Okay, so that should be pretty clear
about how things work along the
lateral view of the skull
and the neck. And then we'll better understand
how the muscles attach when we get into that section.
Good.
At this time I think we'll switch right over to doing the
front view of the cervical vertebrae.
But, you have to be conscious of the fact that you're only gonna see
just a couple of the
cervical vertebrae because they're all overlapped by the jaw.
And before long we reach the dorsal, or
thoracic vertebrae, beneath them.
profile. That is, we are going to
do a line version of the silhouette of the head,
as we did here. The front view is gonna be
less descriptive of the
vertebral column because we're gonna have four,
or even five, of the cervical vertebrae, hidden
behind the jaw. As you can see here in the profile.
But we'll start
with an approximate silhouette of the
outside of the head.
Okay. We really only need to do this on one side of the head because
we know the head is symmetrical. But we'll start here.
Alright.
The width of the vertebral column
is similar to, slightly greater
than, the distance between
the tear ducts.
Just slightly,
or in the neighborhood, of the point where the front teeth
turn to the side.
The height is similar to the distance from
the septum to the chin.
After which, we find,
I should say actually the height is
more similar to the
top of the teeth, which would be here
to the chin. So shorten that. When looking at
it, it's confusing because we also have in the front thyroid
cartilage. And after that we pick up the first
thoracic vertebrae.
Well because it's in front of the vertebral column
I'm gonna first draw
the hyoid bone.
We talked about this important bone.
It serves as a point of attachment
for the muscles that lead up from the shoulder girdle
to the spine of the jaw. Beneath it
we find
the thyroid cartilage, or Adam's apple,
if you will
Behind these,
this bone and this cartilage, we're
gonna find now the cervical vertebrae.
But before we try to do that, let's pick up
here, the first thoracic vertebrae
and its transverse processes.
We do see also
a couple more of the
thoracic vertebrae
beneath that.
Alright,
above it we pick up the transverse
process of the seventh cervical vertebrae.
Here and here.
We're not gonna see any of this on the model.
This is purely structural.
And above that,
right behind the
hyoid bone,
we find the transverse process
of the sixth cervical vertebrae.
And above that we see
part of
the fifth cervical vertebrae.
So, let me just go ahead and go back and darken those
so that I think
it'll be a little easier for you to see at home.
Starting once again
here,
with the hyoid bone
and the thyroid cartilage beneath it.
Here is our seventh
cervical vertebrae.
and the sixth.
That's the transverse process of the sixth cervical vertebrae,
and the fifth above it. Obviously in the front view they're all
stacked vertically.
Here is the first thoracic vertebrae,
coming off of which we have the first
rib.
I'll just go strengthen this outline.
Here we see
the trapezius muscle, which we'll talk about later
and that is overlapped by the sternocleidomastoid
muscle, or simply called the mastoid muscle. So we
see that in the front view of the head, it's the neck that overlaps the
torso, not the other way around. And,
it's particularly important
that we get that right.
If, on the other hand, a student draws the neck like this
in one continuous line, it looks as if the neck is in the
same plane as the shoulder, which of course it is not.
So there should always be some sense of overlap at the point.
I'll just strengthen the outline around these vertebrae before we move on.
Just using a black verithin
pencil, but you can use any pencil you like
when you're doing simple studies
of the vertebrae.
Alright, in a
three quarter view
we still see, not the entire seven vertebrae, but
some of them. And that has to do with the angle
at which the vertebrae come up underneath and
support the head. I'm gonna start by adding
tissue to this silhouette.
On the back of the neck
and here,
the underplane of the
jaw,
and the front of the neck.
Notice we still have a diagonal thrust to
the neck. It's not vertical, as it would
be only in the direct front or the back view
of the neck and head.
So now let's establish the
center line of
the neck. And this would also involve the shapes
of the - if it's visible from this angle
at least - the hyoid bone and and certainly the
thyroid cartilage. So let's go ahead
And now build the vertebral column along this.
Remember, it comes up underneath
the mastoid process
like this.
Now here we're gonna see something of the
transverse processes to go along with the
posterior processes of each vertebrae.
So let's start
with the hyoid bone, here.
Behind it
we find
the cervical vertebrae.
And so I draw the column instead of the individual vertebrae at this point.
We're gonna establish here
the last of the cervical
vertebrae.
And then above it we're going to divide.
And we add the thyroid
cartilage as well.
You can clean up the
drawing just using your kneaded eraser. Another
important reason, when you're doing the lay in for figure study
or drawing anything really, is to just
draw light enough so that you can go ahead and clean it up
and make any adjustments you need to make.
There's the
spinous process and here is the transverse process
of the seventh cervical vertebrae.
And then the
thyroid cartilage in front of it.
Above that,
the sixth cervical vertebrae
with its
transverse process here, and
spinous process behind it.
And above that,
the
hyoid bone.
So in this particular angle, we're only going to see
four of the cervical vertebrae.
That would be numbers seven, six
five, and four.
But in front of those we see the
hyoid bone and the
thyroid cartilage.
And if I
strengthen
those shapes with the verithin wax pencil
it should make it a little more clear.
Okay, so there we have the
profile, front view, and three quarter view
with the main structures of the
cervical column of the vertebrae.
Our next step will be to overlay those
with the muscles: the deep muscles and the ones
covering those, and finally the superficial muscles that we
know the best, which are the mastoid muscles
and the trapezius muscles.
described the head in detail and we've
laid in the cervical vertebrae. Now, in order to
place the muscles of the neck, we're gonna want to
sketch in the shoulder girdle. That consists in the back
of the two shoulder blades, or scapulae, and in the front
of the collar bones, or clavicles,
and the sternum between those two. The sternum is
sometimes called the breastbone. So, in order to do it
let's start off with
here, the first thoracic vertebrae and the first rib
which attaches to it. Now we're gonna just
place the second
thoracic vertebrae
here.
And these are its
transverse processes. In front of that
we find the
sternum, or breastbone,
which extends quite a ways down
the thorax at the front of the
figure.
There's a joint here
where the collar bone, or clavicle,
joins to the
sternum.
I'm gonna describe just one half
here of the bony structure.
Well, I'll extend it out and just
bleed it off. We find the same, obviously,
same circumstance in the profile view.
You'll notice
that the first rib come up beneath the
collar bone and attaches at the sternum.
Which is here.
Seen from above, the sternum is shaped
somewhat like a bow, as in a bow and arrow.
So it curves from this point and then
inward at the pit of the neck.
The first rib comes up under it
and articulates
with the
sternum. So the collarbone
or clavicle arcs like a bow, as in a
bow and arrow, and then attaches at the front
to the sternum,
as does the first rib
So you have the clavicle, the first rib, and
here the sternum, or breastbone.
In the three quarter view
we have here
the first thoracic vertebrae
and then
we have the sternum,
the clavicle
or collarbone, and
then here, the first rib
which runs beneath the
collarbone to attach at the sternum. Okay, I'm just gonna
clean these up a little bit and darken them with wax pencil.
And then I'll proceed to diagram to muscles.
Okay then, so we have the
sternum, the clavicle, and the first rib.
In the three quarter view
it will look like this.
The first rib passing underneath the collar bone
and attaching at the sternum.
And then the
collar bone, or clavicle, running off to its attachment
at the scapula.
It's kind of like the
hip joint
in that the hip is comprised of three
bones: the ilium
and then the ischium, and the pubis.
And so that's known as
the pelvic
girdle because altogether they comprise the pelvis,
which is made of those three bones. Here we have the shoulder girdle,
which is not fixed in place like the bones of the hip.
But it is comprised of the scapula,
or shoulder blade, and here
the collar bone, or clavicle, and here the sternum.
The difference
of course is that the
pelvic girdle has to support the weight of the whole
figure, whereas here the issues is not
bearing the weight as much as it is
allowing for mobility
of the upper extremity
and the neck.
that extend from the
the shoulder girdle, or from the
scapula, or from the base of the skull,
or the cervical vertebrae and
extend up to the head. I'm gonna
draw the overlapping muscles and then beneath them I'll draw the overlapped muscles. So let's start off
with one of the most prominent, maybe the most prominent muscle of
the neck, and that's known as the
sternocleidomastoideus muscle.
Runs up here. So it comes
from here and runs diagonally behind the ear
to the mastoid process of the skull.
So it has two heads: one
on the sternum, sterno, and the other on the clavicle,
cleido. We usually abbreviate this muscle into just the
mastoid muscle when we speak of it, or maybe the
SCM muscle, which is
sternocleidomastoideus. So let's go ahead and draw
its origin here
and then the angle
at which
it comes up behind the jaw
and behind the ear. This
is a taut, very pronounced tendon
that we find at the breastbone
or sternum.
and the second head of the muscle is here.
Also, the fibers joining
and
extending to the base of the mastoid
muscle. Here, the second
truly prominent muscle of the neck is
found at the side and at the back, and that's the most
extensive muscle in the figure. It's called the trapezius muscle.
And that runs all the way down the spine,
attaching at the scapula and then
rounding the top of the scapula and then
running up along the cervical vertebrae,
all of them, and inserting into the back of the
skull. So this is that muscle.
Let me just darken them for us here.
Sternocleidomastoideus muscle:
two heads, one at the sternum and one
at the clavicle.
And then here, at the side and back
we find
the trapezius muscle.
The first muscle, the sternocleidomastoideus
is named for its position: sternum, collar bone,
mastoid process. The second one, the
trapezius, is named for its shape: that of a trapezoid.
Alright
now let's talk about the muscles that - so I really
think of the neck as having five columns:
one made up by the mastoid muscle, one by the
trapezius, and then a column in the center of smaller
muscles. And we're gonna discuss those now.
First, we have this muscle:
it is known as
the sternohyoideus
muscle.
Means it comes up from the sternum here, behind the mastoid
muscle, and then attaches
at the hyoid bone.
In front of that muscle we have another one
which attaches there, and this is called
the omohyoideus muscle, because it comes up
from here. Omo refers to the first
rib. So it would come down like so.
I'm thinking it might be better
if I actually drew a little bit more of the collar bone here,
so that I could draw these attachments and not be covered
over so much by the superficial
muscles. So we'll do that.
In our case now,
we'll pick up once more
the sternohyoideus muscle.
Means coming from the sternum, going to
the hyoid bone here.
And then,
to its side,
we have
the omohyoideus muscle
here,
attaching near the outside of the hyoid bone.
We see it here.
Here, next to it,
visible only slightly beneath the mastoid muscle,
and attaching at the hyoid bone,
actually attaching at the jaw, we have
the scalenus medius
muscle.
And
we also have a muscle here,
it comes from the back of the skull
and attaches at the hyoid bone,
and helps to fill out the space between the
jaw and the neck. And that muscle is called
the digastricus muscle.
It's one of the
depressors of the tongue.
So I'm just gonna go now over these,
strengthen them so you can see best.
I'm certain
that the most important of these muscles
are the mastoid, this one,
and the trapezius.
at the side and the back.
Okay,
now we're going to
switch over to a three quarter view head.
Now in the profile view
we still have the dominant muscles:
the trapezius, which will go here, and the sternocleidomastoideus
here. Let us start with that.
Here it attaches
at the sternum, runs back behind
the ear
to attach at the
mastoid process, here.
Its second head
attaches at the
clavicle,
here.
Coming up
from the collar bone, clavicle,
and attaching at the back of the cranium
we
have the trapezius muscle.
Okay. Now at the front of the neck
we have the omohyoideus
muscle
and the sternohyoideus muscle.
And those
fibers extend from the hyoid bone
out to the spine
of the jaw.
The digastricus muscle
we mentioned earlier, coming from the back of the
cranium
here
and attaching at
the hyoid bone.
And from there up to the mandible,
in between, we have a muscle called the
mylohyoid bone. It extends
from the jaw to the
hyoid bone.
And
here
we have part of the omohyoid
muscle, which
comes here and starts back here,
at the first rib here.
Actually
that's a boo boo. I
drew accidentally over
the mastoid muscle. So quick correction.
In between
the space created by the mastoid
and the trapezius muscle
we have the levator scapulae.
This muscle extends from the
spine of the scapula up to the skull.
And then we have the scalenus muscle
here.
And that extends upward
and joins here
at the outside
of the hyoid bone. So let me
go ahead and heighten these so we see them a little bit better.
This is the
trapezius muscle
and this is the sternocleidomastoideus muscle.
The levator scapulae
and
the scalenus muscle,
the omohyoideus muscle,
the mylohyoid
muscle,
the digastricus muscle,
and here's
your omohyoid muscle again.
And then the sternohyoid muscle
in front.
But once again, the dominant forms
seen from the side are the mastoid muscle
and the trapezius muscle at the back.
In the three quarter view
it's a good idea to put down your
front axis very lightly, just as you would do if you
were doing a head drawing at three quarter. I'm only gonna draw one
side, that'll be this side, but
some of the muscles will extend beyond this axis to the left.
So, it's good to know where the center of the neck is.
In fact, this will always give you the
pit of the neck, which is an important landmark when you're doing
figure drawings. Well, let's start
off then with the -
I think we'll start with the
sternocleidomastoideus muscle and its head
right here at the outside of the sternum.
So here, outside the pit of the neck, we have the
tendon of the sternocleidomastoideus muscle.
And that's gonna run from this position at the outside of the
sternum up to the back
of the mastoid process here. So it's a good
idea to kinda map it out, putting your landmarks before
you actually do the drawing.
The tendon
attaching to the collar bone is a broader sheath of tendon
than the narrow, taut tendon that attaches to the sternum.
The second really
important muscle we always see on the surface
is the trapezius muscle.
And so let's place that.
Narrow that a little bit.
I'm gonna see the trapezius muscle here.
Now at the front,
this is the key,
the attachments at the hyoid
bone.
We have one coming off the front of hyoid
bone,
and that's the digastricus muscle,
attaching here and coming
from outside
in this manner
from the back,
at the base of the skull.
And here
let's draw the muscles that we find in between.
Excuse me for a moment while I darken this.
Okay.
That brings us to the
levator scapulae
and the scaleneus muscles.
The omohyoideus
muscle,
and then at the front of the neck
we've got the omohyoideus muscle.
And we have
the sternohyoideus muscle.
And so that gives you the back view.
Actually this muscle flares out
farther because it attaches at the scapula too.
So that gives you the muscles of the three quarter view.
Let me just clean that up a
little bit
and strengthen the lines for you.
Alright, so that gives us our three views.
From the front, the profile, and the three quarter.
I'm just gonna go back to the superficial muscles
and apply a very light -
an arbitrary tone to them - so that you can
see them separating, overlapping a little bit better
the muscles beneath them.
So this is your sternocleidomastoideus muscle
and this is your
trapezius muscle.
I'll do the same on the profile.
And here on the three quarter, try to get
that to overlap.
So here's your mastoid muscle
and at the back
is your trapezius muscle.
And that may make it a little clearer as to which muscles are overlapping and
which ones are overlapped.
its muscles, and then
drawn from a photograph
of a real, living model. So
on this layer we see that. A couple points about the
neck. You'll notice, in this case,
the form comes down and then turns at the hyoid
bone and then extends down
along the
the sternohyoideus muscle that runs up
to it. Here you can see the hyoid bone projecting
forward. Actually at
this point, I should correct myself, this is the thyroid cartelage,
and the hyoid bone's just above it. Same for this.
In the third case, you'll notice that this is where the neck is
most diagonal, in profile view.
And of course it's vertical in front view.
Here there's a change in direction at the
sternocleidomastoid muscle and then the form turns along
the diagonal trapezius muscle.
Just a couple comments on the muscular structure of the
skull and neck. A reminder in drawing the
head, the key is to get the three volumes: the cranium,
the face, and the jaw beneath it.
The muscles do weave and dove tail
in and among those three volumes but they always remain
and the muscles are secondary to that. And in
the case of the neck, be aware of the diagonal
that the vertebrae assume here and here.
And also be aware
of the gathering of the muscles at the hyoid bone
and then the two main, four when you
take in both sides, columns of muscle.
That would be the sternocleidomastoideus
and the trapezius muscle. Finally, as to the bones
themselves, just remember that
once again, we find in all three views
the three masses of the skull: cranium, face, and jaw.
Cranium takes up fully two-thirds of the whole skull.
Well that should enhance our understanding of the structure of the skull
and the neck, and the face and the jaw and the cranium;
and to some degree the facial features themselves.
So, this underlying
structure, of course, is the most important understanding
we can bring to the table when, or the easel,
when we're drawing from life or from photo reference
or, later on, when you want to make up figures
and heads from imagination. So without this
the beautiful turn of an eyelid,
or lips, or
any kind of nose, it really doesn't have much meaning
if it's not involved in the big structure of the
head. So for homework, I'd like you to
repeat the same exercise I just demonstrated. I recommend using
smooth newsprint or Bristol plate.
If you're using Bristol Plate you can use graphite pencil, charcoal,
or wax pencil. If you're using smooths newsprint
you're best served by using Conté or charcoal,
or Prismacolor. And you're definitely gonna need a
firm, white plastic eraser and a kneaded
eraser. After you've done the initial drawing, on the Bristol plate or the
newsprint, you'll use a second layer of the same size.
And for this you'll want to use light weight tracing paper, and on it
you'll be drawing the muscles over the bones.
And then a final third layer,
you'll need to have the same leightweight tracing paper
of the same size. Here you'll be drawing the facial features
and the skin and the hair. So the
surface of the living figure. Remember, when you're
doing the homework exercise, it's best to keep available
the three stages of the demonstration that I did.
Keep those on hand and they'll act as guidelines for you.
That's the end of Unit One Anatomy. And so
with your newfound knowledge of the bony structure, the
musculature, and how they affect the surface form of the head and
neck, we can now move on to the Reilly method
of creating rhythms and enhancing, really burnishing our
knowledge of anatomy.
Free to try
-
1. Lesson Overview
1m 30sNow playing...
Watch the whole lesson with a subscription
-
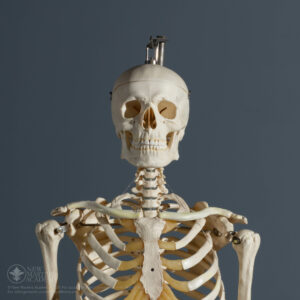
2. Front View of Skeletal Structure of the Head
27m 23s -
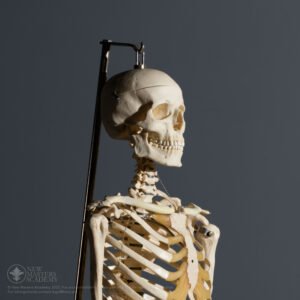
3. 3/4 View of Skeletal Structure of the Head
24m 56s -
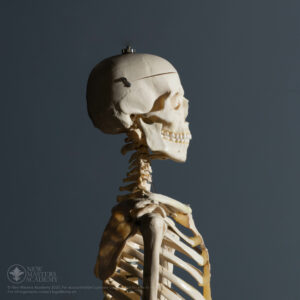
4. Profile View of Skeletal Structure of the Head
30m 19s -
5. Profile View of Musculature of the Head
16m 52s -
6. Front View of Musculature of the Head
22m 41s -
7. 3/4 View of Musculature of the Head
21m 50s -
8. Front View of Surface Layer of the Head
17m 29s -
9. 3/4 View of Surface Layer of the Head
29m 54s -
10. Profile View of Surface Layer of the Head
36m 3s -
11. Profile View of the Vertebrae of the Neck
19m 48s -
12. Front View of the Vertebrae of the Neck
21m 30s -
13. 3/4 View of the Vertebrae of the Neck
9m 15s -
14. Musculature of the Neck
28m 17s -
15. Review and Assignment
5m 28s
CONNECT
New Masters Academy
16182 Gothard St
Huntington Beach, CA 92647
Contact US