- Lesson Details
- Transcript
- References
- Instructor
- David Simon
- Subjects
- Modeling & Sculpture
- Topics
- Anatomy, Human Figure
- Mediums
- Oil-Based Clay
- Duration
- 1h 52m 26s
- Series
- Figure Sculpting in Clay
A sculptor of international acclaim, David Simon’s career has ranged from life-size portraits and figures to massive bronze statues. Among others, he helped oversee the giant Leonardo da Vinci Horse project. David created maquette and sculptures for films such as Where the Wild Things Are, Fantastic Four, and Watchmen, and holds private workshops abroad and in his Los Angeles studio.
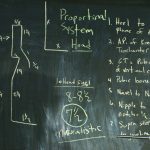
In this series, David Simon shows you his entire process for sculpting a female figure in oil-based clay. In this first lesson, he begins on the blackboard with a detailed breakdown of the proportional systems used for building an armature. Then, he bends the wire to approximate the underlying structure of the model’s pose, and discusses workflows for retaining a similar line of sight on the model and his armature. Sculpting from life is a dynamic and process-heavy endeavor, by watching this series we hope that you learn about the intricacies involved and are inspired to tackle the challenge!
Discuss this video in the forums!
DiscussToday
I'm going to begin a course in
figure sculpture. I'm going to go into how to make the armature,
how to figure out all the different sizes of all the different components
of the sculpture. I'm going to explain a little bit about proportional
systems. Once we get involved in the sculpting itself, I'm going to
talk about issues like rhythm and pose and
movement. A sculptor of international acclaim, David Simon's
career has ranged from life-size portraits and figures to massive bronze
statues and holds private workshops abroad and in his Los Angeles
studio. So I'm gonna get involved in all of that over the next few sessions
as we work on this figure in oil based clay. So let's get started.
(music playing)
some figure sculpting. I'm going to go
over how to make a figure sculpture in
oil based clay over an armature. During this lesson I'm going
to discuss proportion, the properties
of the armature, how to figure out the scale
that you're going to be working at, how to work with oil based
clay, different ways to finishing the clay,
and I'll discuss a little bit later on what you can do with the piece when
it's finished. Because firing oil based clay
over an armature is not an option. So there are various mold making techniques that I'll
talk about a little bit later. So let's get started.
(walking)
Okay, so on the board I have
a diagram here on this side and a set
of written out measurements on this side.
Whenever you're dealing with the figure, you're dealing with
translating a lot of information from one scale to another. And that's
really the foundation of how the figure sculpture is begun.
With the figure sculpture
the armature takes on a great deal of importance both in
terms of its function of holding up the clay, which is its primary
purpose. And the way that that's accomplished
is by taking the wire that you use, which is this
aluminum alloy wire and
getting it sized correctly to the scale of the figure that you're gonna be making.
There is not really
a specific rule as to what diameter wire you need for
what figure but generally for very small scale - let's say 12 inches -
let's say 13 inches and under you would use about an
eighth inch diameter wire. When you get into an intermediate
between let's say, 13 inches and 18 inches, then
they make a three sixteenths inch wire, which is
a little bit wider than that. And then between that and
let's say 24 to 28 inches I use this quarter inch wire and then
beyond that three eighths, which is very, very heavy gauge.
The wire is designed to be bent
and then unbent and changed
repeatedly without breaking. The one exception to that
is if you break the surface of the wire. So when
you're using wire, particularly the smaller gauge wire, be very
careful about using pliers to bend it because the teeth on the pliers
will mare the surface and then as you start bending the wire it'll
snap. So it's best to use your hands. If
you need a little extra help, you can insert it into a piece
of pipe and use that to help bend it. You can
put it over the edge of a piece of wood and hammer it. As long as you're not
breaking the surface, it's designed to be bent again and again.
So the wire is what accomplishes the function of holding
the clay up. The other function that the armature in
a figure sculpture needs to give you is it needs to provide you with all the
proportions. So, in the end when you begin to work with
the model, everything that you need to know proportionally is built into
the armature and you can look at the model and just focus on
the angle of her knee, the angle of her hip, the angle of her
shoulder and her arm. And these are all predetermined
in terms of their location. So you need a system
in order to figure out how big the armature is going to be for the
sculpture that you're going to make. And that system is called
a proportional system.
And they're all different types of proportional systems out
there. The two main units of measurement
that are used to measure the human figure are the head and the
hand. In this lesson I'm gonna use the
head as a unit of measurement.
So what that means is rather than measuring
in centimeters or inches, we're gonna use the head as a unit
and each division of the figure, the width of
the hip, the length of the lower leg, the length of the hand, can be
translated into how long that section is in relation to the head.
And the benefit of using that system is that once
you understand what the system is, it can be used for any size figure. From an
inch tall to a hundred feet tall. That said, there are
several different head sized systems. In ancient Rome
and ancient Greece the most typical was between
eight and eight and a half heads
to the height of the figure. So from the top of the head to
the bottom of the feet you would measure eight
to eight and a half heads. And different anatomical
landmarks, like the bottom of the knees and the top
of the femur would land at different spots within that system.
We are gonna be using
a seven and a half headed system. A
seven and a half is the closest to naturalistic.
(drawing)
And that's why we're
going to be using it. A proportional system works
better the smaller the sculpture is.
And I'm gonna illustrate that, if I can,
so I'm gonna grab my eraser from back here
and I'm gonna make a little bit of room
here.
And I'm going to
place this here for the moment.
I'm going to illustrate the inverse relationship
between the head system
and the actual size of the head.
So here I'm going to
draw a little stick figure.
Man. With a gigantic head.
This would be a
two headed system because the size of the head
fits into the overall size of the figure two times.
So very small number, very big head.
Here I'm gonna draw roughly,
let's say a 15 headed figure.
Very, very long and thin with a tiny head
and that head, if you counted it out, would go in many, many more times
to this figure than it would to this. So let's call this, for the sake of argument,
15 heads. So there's an inverse or
backward relationship between the number assigned
to the system, eight versus seven and half, and the actual
size of the head. Which is to say, the smaller number the bigger the head,
the bigger the number, the smaller the head. And the reason why I use
these sort of very extreme diagrams is because when you get
to the difference between eight and seven and half, it's very
difficult to observe the difference. But it is there
and it's subtle. And the reason why it's there and
why, for example, the ancient Greeks and the ancient Romans used eight
or eight and a half headed figures is because, with a slightly
smaller head, the body
appears larger. And so
when you're making sculpture, primarly
sculpture for the reasons that the Greeks and the Romans
primarily made sculpture, which was to glorify
gods and athletes and emperors, you want to
make the body appear powerful and larger. And one way to do that
is to play with the proportions and slightly shrink the size of the head.
And so that's what they would do. Since we're dealing with
learning how to sculpt from a model,
I am going to be using a more naturalistic approach
and that is a seven and a half headed figure.
If you measured the majority of people
that's where you would get the closest correlation.
Right around seven and a half heads. Having said that,
any kind of proportional system is an abstraction
of reality. So it's not total reality.
Meaning, if you took 20 people and you measured
their proportions relative to the system that I'm explaining,
people would be slightly off in very,
in various different ways. So for example, an
upper leg might be a quarter of an inch different if you
measured it directly from the model versus what the
proportional system that I'm talking about would
say it should be. Now the reason why I mentioned,
just a little bit ago, that the smaller you sculpt, the more effective
the system is is because, let's say that quarter of an inch
difference between the live model and the measurements existed.
Well if we were to do a half live sized
sculpture. Let's say it was a six foot man, half life size would be
three feet, that quarter of an inch would become an eighth of an
inch. Because everything gets cut in half. If you were to
do a quarter life sized, now suddenly
you're going down to a 16th of an inch. An eighth life size
a 32nd of an inch. So as you get smaller and smaller with sculpture
the actual dimension of the difference between
the measurement taken directly from the model and
the measurement that the proportional system is telling you becomes smaller and smaller
to the point where you're just not able to sculpt within the degree
of accuracy or the discrepancy
between what the system tells you it should be and what the
measurements taken directly from the model are telling you it should
be. So that is to say the smaller
you make your sculpture, the more - the closer
to being perfectly accurate in terms of the sculpting
this system will be. Meaning, you won't be able to sculpt within the degree of
accuracy that it would take to make the measurements taken from the model
be that much more
important to have. The only exception to that would
be if a model walked into your studio and you were
absolutely shocked at their proportions. If they had a giant head or a tiny head
or one leg longer than the other or some other thing that really
struck you as odd, then these measurements would probably be
not what I would use. I would begin to take the measurements directly from the model.
So those are the two basic ways you can approach
the proportion. You can use a proportional system or
you can take measurements directly from a model. The proportional system has
the advantage of not needing a model at all to get started.
You can begin the armature without a model, have it all set, and when the model
arrived it would all be essentially correct
and ready to begin. if I were taking the measurements
directly from the model there'd be nothing I could do without the model.
If you work from photographs, if you work part of the time without the model
a proportional system is very helpful and very effective.
Okay, having said that I have two
sets of measurements on the board. On this side of the board I have
the measurement for my armature, which includes everything
that's bendable, or most of the things that
are bendable. So in other words, the joint of the knee, the joint of the hip,
the joint at the - where the collar bone
meets the sternum, where the shoulder can lift or lower, the
shoulder, the elbow, the wrists. The one thing that I don't
measure into this is the
point where the pelvis and the
ribcage articulate. And I'll get to that in a little bit.
So these measurements:
one and a half, two and a quarter, one and three quarters, are all measured
in head sizes. So two and a quarter means two and a quarter heads.
And so once you have this drawing with these
proportions, you know essentially how to make a hundred foot tall
figure, a ten foot tall figure, a two foot tall figure, a one foot
tall figure. It all is the same number. But one number
that's missing from this is how big
is one head. And that becomes the question.
So the way you figure out how big one head is is to know
how big the sculpture you're going to make is.
In this case, I have this
armature begun with a couple of pieces of wood,
a few pieces of steel pipe,
and some screws. And I'll go
over it very briefly because it should be more or less
self explanatory. I have a three quarter inch piece
of plywood on the bottom, lifted up on a couple of one by two
inch runners on the bottom. The reason the runners are
there are two fold. One, to allow me to put my hands underneath it as
it gets heavier and heavier and lift it up. And two,
I have bolts going through this flange on the bottom
and if I didn't have these one by two runners underneath
the bolts would hit the table and make the whole sculpture rock back and
forth. So those runners give me enough height to be able to get the nut
from the bolt through. In this particular case I
added a piece of half inch plywood above the three quarter
to get my pipe here to the right height.
I'm going to be sculpting roughly a 22
inch figure. And that's the
question or the bit of information
that you need in order to make this system work.
(writing)
So the height of the sculpture you're going
to make is the crucial piece of information you need in
order to know how big each head is.
Once you
know how big each head is, you multiply that number by any of these numbers
and you'll know the exact dimension of each of these components.
I've already done the math and for the 22,
slightly over 22 inch figure I'm going to make, the size
of each head is 3 inches.
So one head, for example,
this section of the forearm is one head.
So that section will end up exactly three inches.
Two heads is going to be six inches.
But as you look through this drawing you see halves and quarters,
three quarters. So in addition to having that three inch
head, we have to be able to divide that three inches
into quarters. And I'm gonna show you how to do that
very simply without a calculator. And
some
figure sizes, for example if you're using a four inch head, it would be
pretty simple. A quarter of a head would be one inch.
But you could also get into, for example, three and a quarter inch
figures, which would make roughly a 24 inch tall figure. And that
becomes more complicated mathematically to divide into quarters.
So what I'm going to do is take simple
scrap of paper, preferably one that's got a nice
straight edge on one side. And on my board
right here I've
put a line on one end and measured
three inches on the other end. So I have
a three inch interview draw on the board. Now I'm going to
simply transfer that to the piece of paper by taking the edge of the paper,
laying it on one line and
marking off
three inches. So I just have the edge of the paper with a mark at
three inches. Then I'm going to take the paper
and just fold
the edge of the paper
to the mark that I made. Like a nice, tight
fold. So essentially I folded
it in half and that fold is half a head.
If I keep it folded
and then fold that folded corner
once again to that three inch line
now I've got
quarters of a head.
And if you look at
the board, quarter, quarter,
half we already have, three quarters we can do. The only
measurement we don't have yet is eighths.
I'm just going to make it easy, because
I only need one eighth
and I'm gonna take one of those quarters and fold it
in half. And that'll give me
one eighth.
Just gonna measure that.
Okay. So now I have three inches
divided into quarter, quarter, quarter and eighth.
(writing)
And when I do this I like to put little pen marks at each of those
folds because depending on the light it can be hard to see -
you know if you look at that side, sometimes the folds are not as obvious.
So I just mark each one of those folds.
Now that I have that, I'm going to lay it down
in between the two marks that I made, which are
three inches apart. And I'm going to
transfer each of those
measurements onto the board. So on the board that I have
in front of me, I have
(writing)
one head divided into quarters
And because five eighths is
midway between a half an inch and three quarters of an inch
or half a head and three quarters of a head, I've
gone ahead and just placed that
measurement between half
a head and three quarters of a head. Okay, so here
this line here is the starting point for all my measurements.
From there I measured three inches, which is
one head and then I took my piece of paper,
I laid it in between those two
marks so it lined up perfectly
and I just
transferred the marks for the quarters down.
This five eighths measurement
I placed between a half and three quarters. So I just went in between those
two and transferred my eighth measurement.
So this is where everything begins. This is a quarter, a half,
five eighths, three quarters, and one head.
And because you can see
two and a quarter heads, one and a quarter,
it's gonna be helpful for me to have one head
laid out here. So I'm gonna start once again
right from that one head mark
and continue the quarters
across my board
(writing)
and do it one more time.
Line that up.
(writing)
And we'll do one - this last one -
I'm just gonna measure a full head.
So let me turn it for a second so I can
draw the numbers on here.
(writing)
One quarter, one half,
three quarters,
one quarter, one half, and three quarters.
So here, and I like to
just circle the full head measurements.
So everything begins from
here, all my measurements start there. If I need a quarter of a head
I can measure from that line right to there. If I need a full head
I can measure to there. If I need a head and a half, I can measure from there
to one and a half. I can go all the way
up to four. And I don't ever need a measurement bigger than four heads
so that's what I ended with. Now that
I have the scale I don't need a ruler any more because I'm not working in inches
or centimeters. I'm working in heads. And this head measurement
scale is the right scale for this armature,.
I used to keep my scales on pieces of paper
but it became too easy to confuse one sculpture with another
and have my proportions for the wrong sculpture
be picked up and used
on a sculpture it wasn't intended for and I'd end up changing things
proportionally that I didn't intend to. So if you keep it
on your board you don't have to worry about that. This scale goes with this sculpture.
measurements that overlay this armature. In some ways we can think of this the way you
would think of building an office building. This would be the steel structure underneath
that holds up the bones of the building. This would be all of the drywall and doorways and
things that would go onto that steel structure. You don’t necessarily need to go onto that
steel structure. You don’t necessarily need to know where every doorway is in order to
build the steel structure of the building, but once you start going into each floor and
laying it out then you’d want to know where the bathrooms and stairways are.
In many ways, this set of measurements parallels this set of measurements. In some ways they
don’t. One of the ways that they don’t is the first measurement. I’m always starting
at the bottom and working my way up when I construct the armature. Not necessarily when
I’m sculpting. When I’m adding clay I’ll go into how I do that. If we start at the
bottom here with this 1-1/2 head measurement, that in this sort of little diagram that looks
like a figure seems like it would be the foot, but in reality, this is the anchor that sits
underneath the clay base that I’m going to build. This can be anchored down to the
wood in case that it wants to move around. Two and a quarter from here to here indicates
both the lower leg and also the clay base. The way that you can tell that is measurement
number one which starts at the heel and goes up to what’s called the articular plane
of the knee. The articular plane of the knee is simply the plane through the femur and
the tibia, where those two bend. You can see it on the front of the figure. It’s at the
very bottom of the kneecap, and on the back of the figure there is a fold in the back
of the knee. That’s where the articular plane is. But if you notice 2 heads as a measurement
versus 2-1/4 heads here, the difference of a quarter head is that clay base. There will
be a quarter of a head thick clay base and then 2 heads to the knee. So that’s one
of the areas where the structure necessities of the armature conflict a little bit with
the anatomical measurements.
Number two, articular plane of the knee, I’ve just abbreviated AP for articular plane. Two,
what’s known as the great trochanter which is the bony outcropping at the end of the
femur which is this bone of the upper leg. So from the knee to the top of the femur is
1-3/4 heads which is the same as it is in the armature. Number three, and I like to
put an asterisk next to number three. GT which stands for the great trochanter, which again
is that bony outcropping right here at the top of the femur is in line with, the same
height as the center of the vertical crease of the buttocks. Meaning, from the back view
the buttocks have a vertical line going up and down. The bottom of the buttocks are at
the bottom of that. The sacrum is at the top of that. They are divided in half, that vertical
line of the buttocks is divided in half by a line through the great trochanter. That
line divides the vertical line of the buttocks in half.
In addition, the pubic bone is in line with that same line through the great trochanter.
It’s a very important point and if you add two heads, which is the measurement from the
heel to the knee and 1-3/4 of a head, which is the measurement from the knee to the great
trochanter, you get 3-3/4. I’ve told you that the entire figure is 7-1/2; 7-1/2 divided
by 2 is 3-3/4. This line is the midway point of the figure. Half the figure is below and
half the figure is above. That’s one reason why I like to highlight that. I also like
to highlight because that point is visible no matter where you are in relation to the
figure. If you’re in the front you can see the pubic bone. If you’re at the side you
can see the great trochanter. If you’re behind you can see the buttocks. That measurement
is visible from all of those locations.
Number 4, the pubic bone, which again is in line with the line through the great trochanter,
from there to the navel or the belly button is ¾ of a head. Obviously, that’s only
visible from the front. Number 5, from the navel to the nipple, and I usually also mark
that because that is only really true in a male figure. In a female figure the size of
the breast would sometimes change the position of the nipple, meaning larger breasts. The
nipple would be lower down. Smaller breasts, higher up. It will never go beyond one head.
In terms of this vertical distance. In this lesson we’re going to be using a female
model, and so I will show you how to figure out where the nipple is on a female model
because there is no one measurement. That can vary.
From the nipple to what’s known as the suprasternal notch, which is the pit of the neck where
the sternum meets the clavicles or the collarbones is a half a head. That would be to this point.
If you add three quarters plus one plus a half you get the two and a quarter total distance
from the pit of the neck to the pubic bone. Then from the suprasternal notch here to the
jaw line is a half a head. The jaw line is essentially an imaginary line coming through
the jaw and forming a plane right here. I used to give that measurement as from the
pit of the neck to the chin, but as you can see, I can make that measurement go to zero
if I touch my chin to my chest or way up if I lift my head. If I hold my hand here as
I do that movement, I don’t lose very much distance. And so now I use the jaw line as
my point of measurement.
Now I’ve given you all of these vertical measurements. The ones that are not on this
list are in the armature here. From the shoulder to the elbow is 1-1/4 heads. From the elbow
to the wrist is one head. The length of the extended hand is ¾. From the center to the
center of the humerus, the bone of the upper arm is 5/8. From the center of the—an imaginary
center point where the femur would continue if it went through the center of the leg,
I measured it as a half. Those two measurements really diverge from the armature for a particular
reason that I want to explain a little bit. The placement of the armature relative to
the clay that you’re going to put over it does not correspond to the placement of the
skeleton within the figure. The idea when you’re placing your armature is to have
it as close to the center of every form as you can possibly get it. The reason for that,
and that differs from the skeleton.
If you feel on your back you can feel the bone of your spine right on the surface of
the center of your back, whereas you’d have to push your figure 4 or 5 inches into your
gut to feel your spine. Your spine is shifted way toward the back. Your femur is shifted
toward the outside of your leg as it comes up toward your head. On the inside is all
muscle. Ideally, in your armature you’d want an equal amount of clay on the outside
of that as you’d want on the inside. The thinking that the more centered your armature
is, both side to side and front to back, the more room you have to change things as you
go along. No matter how precise you are in your building of the armature. Not matter
how accurate you are in your sculpting, there are going to be things that change during
the process. You want to have a lot of room to move your clay back and forth in and out
without hitting the armature. If this armature were made to replicate the skeleton and that
bone or that piece of wire were right on the surface. If you decided you wanted to get
a little more shadow in there suddenly you’d be hitting the wire. Ideally, you’d want
that to be really right in the middle of the clay. You don’t have to go too crazy about
getting it exactly perfectly centered, but you certainly don’t want it coming right
out to the edge. Again, same idea here. You don’t want your armature out at the furthest
area out of the shoulder. You’d like it sort of right in the center of the pivot point
so you have plenty of room to add volume out and move it in and out.
The one other measurement that I think is really helpful that I’m going to add to
the list as number 8 is A-S-I-S-2-A-S-I-S. So, ASIS stands for anterior superior iliac
spine. That’s the point of your hip which is between the navel and the pubic bone. On
various models it’ll be closer to the navel or closer to the pubic bone, depending on
their particular build. I don’t give a fixed point up and down because I find that it really
helps indicate the physiognomy of the model to leave that a little bit more fluid. Number
one there is no armature point for it. You know, it’s going to be completely built
out of clay. Number 2, because it is a very, very changeable model to model I don’t have
a fixed height for it. But I do have a fixed width for it which is one head. It’s very
helpful to have that one head measurement in clay in between the hips and the shoulders,
and it helps you get an idea for the ultimate width of the figure. That’s the bone point.
If you have a very heavy model, you’ll have lots of fat and muscle coming over that. On
a very skinny model you’ll have very little going beyond that. It’s a good beginning
point. If your model is thin you’re not going to come a lot further. If they’re
heavy you may come a lot further. You know you can’t come any narrower. I find that
to be one of the only real width measurements that I use because in terms of height, you
know, your lifestyle doesn’t indicate your height other than proper nutrition will allow
you to grow to your full potential height. Your width is going to vary pretty widely.
Some people are much wider, much heavier. Some people are much narrower or thinner.
The same person can change like a yo-yo throughout their life, getting heavier or lighter. These
vertical measurements don’t tend to change during an adult person’s light. You’re
going to have these markers, the bottom of your kneecap and the bottom of your heel,
your collarbone. Those are going to remain fixed as you gain and lose weight. Your width
is not going to remain static. And so I don’t use a lot of width measurements.
Having these measurements primarily serves as a starting point to frame your observations.
If you know that the pubic bone is here, and you know that the navel is here, you’re
going to see a certain amount of information in between those two points. That will allow
you visually to say, you know, I think that little fold is a little closer to the pubic
bone, or I think that little projection is a little closer to the navel. This is not
intended to be a blueprint to allow you to finish a figure. It’s intended to be a framework
for you to begin looking at the model and figuring out where things are
and how they’re moving.
That pretty much sums up the main section of the proportions. There is one section of
this armature that’s missing that I’m going to draw for you, and then I’ll get
into explaining it a little bit more as I build the armature, and that is the neck and
head, which you see is missing from this. Generally, I’m going to use an L-shaped
piece of wire for that. The top of the L is going to be 4 to 5 heads in length, and the
bottom of the L is going to be variable length, depending on how big the board that I’m
sculpting on is, how long this section of pipe is. The difference between 4 to 5 heads
is that sometimes I will curl the wire at the top. The longer I make that vertical piece
of wire, the more I can curl it. That will depend on where my figure sculpture is going
to articulate with the steel structure that I’m working on.
I had our model Leah come in a little bit earlier, and she and I went over a few poses,
and the pose we selected is going to allow me to have this armature emerge from the hip.
I want this point essentially around 11 inches because I’m doing a 22-inch overall height
figure. As I explained earlier, this is about halfway. Half of 22 would be 11. It’s going
to be a little above 11 because I have a quarter of a head of base at the bottom. Right now,
from the wood, the top of the pipe is just under 11-1/2 inches, and that’s pretty good.
When I have the pipe coming into the side of the figure like that, I want it in line
with the trochanter. But as I mentioned before, that’s the center of the buttocks. If I
wanted this pipe to come into the back of the figure that would not be a very good place
to have it come in because that vertical deep line would have this big piece of pipe splitting
it in half. Typically, when I go into the back of the figure I’ll raise this up and
have it go in roughly opposite the naval, maybe slightly lower than the navel. If I
have this coming in a little lower than the navel, you can imagine this point which now
I have in line with the hips would be up here making that point higher, so I might use a
smaller length of wire here, 4 heads. If I come down to here I might use 5 heads.
On this I think I’m going to use a 5-head measurement for this vertical piece, and then
this X is determined by this piece of wire. How far out do I want to have the figure?
That obviously will be determined partly by the board. I can’t have it out here because
I don’t have any room. Generally, I don’t want it too close to the pipe because that
will make getting in and sculpting here more difficult. The further out I have it the more
flex I’m going to get. It’s always a balance between getting something far enough away
where I have room to move around it and having it nice and solid.
out of wire. As I mentioned, I’m going to start at the bottom here. I’m going to go
through one side, cut off the excess, and then begin the other side. I have a roll of
quarter inch armature wire. I have the scale that I made on the board here, and I have
a pen. I’m going to keep the wire on the roll as I make it, and I’m going to straighten
out a little section of wire as I go. The ideal armature is as straight as I can have
it in between the bends and as clear as I can make it at the bends. The first thing
I’m going to do is look at the first number which is one and a half. Lay down my wire
so that the end of the wire is at the 1-1/2 head measurement, and just make a mark on
the wire at my starting point. And then to make a nice, tight bend I’m going to fold
the wire in half and then come back to a 90-degree bend. Okay, so you can see I’ve got a pretty
nice, tight 90-degree angle there. Next I’m going to take the bottom of that and go to
the next number which is 2-1/4, put the bottom of that wire at 2-1/4 and mark again that
starting point so I have exactly 2-1/4. Then I’m going to look at the direction of the
bend, which is out in the same direction as that first bend, and I’m going to make a
pretty clean bend at that point. It’s not a sharp right angle bend, but you can see
it’s very clear. This bend is pretty straight here.
My next bend, I’m going to put that first mark—or not that first mark, the mark I
just made for the knee. I’m going to put it 1-3/4 and then once again mark the starting
point, and now from here this bend is going to have to go back in that direction for the
hip. This is one of the more difficult bends to make because the hip is pretty narrow.
Here I want to make sure I’m really tight, and this is going to be beyond a 90-degree
bend. Now I have this coming over, and this is kind of the trickiest bend. I’m not super
happy with that. I think I can go a little bit tighter. If you can see—I don’t know
if you can—there is a little pen mark where my measurement is. I’m going to try and
keep that right in the middle of the bend as I tighten it. You can see I can really
tighten it again and again, open it. The wire will not lose any strength. Okay, that’s
a little bit better.
Now, from that point I’m going to measure a half a head, and this one I think I may
use this pair of pliers for. I’d prefer not to but it’s such a tight bend that I
need. I’m trying to be very careful not to mar the wire because I don’t want it
to break there. There, just get it a little more vertical. Next, from that point, I’m
going to measure 2-1/4 heads. I’ll lay that on there, 2-1/4 right there. Then mark. This
will be the pit of the neck. Now I’m going to bend it back in that direction, the same
direction as the hip. As I bend it, I’m looking at that mark and making sure it remains
right in the middle of the bend. I bend it all the way across and then come back to get
a nice clean angle.
I’m almost there with this hat. Now the trick to this next measurement because if
I try and bend at 5/8 back in that direction I’m going to start hitting this wire. This
bend, instead of bending down, I’m going to bend outward. The first thing to do is
measure it, 5/8. I’ve got my measurement and if I just kind of try to bend it straight
down I’d be bending it back into this wire. Once again since this is a narrow measurement
I’m going to use these pliers to hold it in place. I’m going to bend it forward.
Then I’m going to combine 1-1/4 and 1-3/4. If I take all those measurements together
they add up to 3 heads. I’m just going to go from the shoulder and measure
three heads and then cut the wire. Then I can take that measurement and bend it down.
Now I have completed half to the armature.
Now, rather than redoing that same process and measuring it against my scale, I’m going
to take the wire and copy what I did at first, meaning I’m going to trace this half. If
there are any discrepancies, and I was relatively careful as I was building it that all the
measurements are right, but they may be like a 1/16 off here or there or a 1/32 off. I
would rather have two halves that are both 1/32 off in the same spot than have one that’s
a 1/32 off and one that’s perfect because I can always cheat up or down with the clay,
but if the shoulders in the wire and hips in the wire and the knees in the wire are
not level with one another, it’s going to be very difficult to get the full value out
of the armature. I’ll be making lots of corrections with the clay on top of the armature
which is possible but not really ideal. I lay that down. I’m going to begin just by
comparing my wire to that one. Make a mark. Bend it. Straighten it. Then I’m going to
compare the angle that I have everything bent to to make it as close a match as I can. That’s
pretty good. I want those two angles lined up as well as I can get them and then transfer
my mark at the knee.
Bend that.
Once again, I line them up and get them as close a I can to matching.
I’ve made hundreds and hundreds of these over the years.
Generally the first time people make them they take
a long time and they’re quite frustrating. Ultimately, even the second one goes much,
much quicker than the first one did. It’s well worth your time to be careful when you’re
making them and make any corrections as you go.
It's never fun to be in the middle of sculpting that’s going really, really well and then
suddenly hit your armature and have to decide how you’re going to deal with a big piece
of wire that’s sticking out in the exact spot that you don’t want it to. Here where
I bent the hip is just a little bit low so I’m going to change the position just slightly.
I don’t know if this is going to show up well on camera, but if you can see I have
a mark here that now is off center because I initially bent it so that mark was centered.
It was a little bit short so I changed the bend to make the mark a little bit off center.
Now I’m going to open up the angle like that and recheck the bend is, and right now
the bend is almost perfectly in line with the previous piece so that’s pretty good.
The main things I’m concerned with as I’m doing this are that the bottom anchor piece
lines up, the knee lines up, the hip lines up. As long as all of those are in alignment
I should be in pretty good shape. Now I’ve made the bend of the hip which in general
is the toughest one because it’s the smallest bend. This will line up pretty well. Moving
up into the shoulder. This ¼ inch wire is generally sold in 10 foot rolls. One 10 foot
roll is the perfect amount for a 22 to 26-inch figure. You shouldn’t need more than that
until you get into bigger sizes.
I might take this opportunity to talk about wrapping wire. If you’ve seen these armatures
made before, you may have seen a very small gauge, thin wire, wrapped around the larger
wire. That’s called surprisingly enough, wrapping wire. The wrapping wire primarily—perfect.
That one is perfect. The wrapping wire is primarily used with water based clay to prevent
the clay from sliding down the wire. This wire is very smooth. Water-based clay does
not stick very well at all, and so over time that water-based clay will start to sag down.
There are also artists who will use it on oil-based clay. That’s really much more
of a personal preference. The clay that I’m going to be using, this Chavant, it’s called
Le Beau Touche. It’s sticky. I’ve never had a problem with it sticking to the armature,
so I don’t use wrapping wire, especially for a small figure like this.
One of the reasons I don’t use it for a small figure is because things like the wrist
and the ankles are going to be quite small when I’m finished. If the wire ends up staying
perfectly, perfectly centered in the middle of the form, I can probably get away with
using the wrapping wire and having it not interfere. But if I do end up—there you
can see the two halves. I’m going to adjust that middle section so that these two pieces
lie flat against one another. If I do use the wrapping wire and I miscalculate a little
bit, and let’s say for the sake of argument that the leg, the armature for the leg ends
up a little bit too far forward within the mass of the clay. It’s feasible that I might
start running into that wrapping wire that’s sticking out beyond the edge of that core
wire. You can go in and take wire cutters and cut off section that stick out but I tend
to just like to avoid it altogether on a small piece like this.
So, pretty good. Those two pieces line up in the knee and the hips and the shoulders,
so those two pieces are finished. I have one more section to do which is going to be this
section. Now I could have, if I were thinking ahead a little bit, I could have put 5 heads
down on my scale, but instead I only put down 4. If I were using the 4—in other words,
if my wire were coming out the back I could just lay down my wire, mark off foreheads
and be done with it. But instead, what I’m going to have to do is lay it down to 4, make
a mark and slide it to add one more head, which is
not the end of the world. I have my mark. I’m just going to bend a nice right angle
into it like that. Now is where the X comes in. I’m going to hold up half my armature
and just figure out exactly where I want this to go in. I have the option of going all the
way to here and having that piece of pipe enter the figure. If the other half is here
it’ll go right into the figure. I can have it just end right at the figure. That’s
probably what I’m going to do. Right about there is where I want it to be.
Hold it just for a moment. Mark the length and then cut off the extra. You can see this
was a 22-inch figure. I probably have 20 inches maybe, maybe 22 inches of wire left.
You'd always rather have a little extra than run out. I’m going to take this and just put
it back here for the moment.
Now I have all my components bent and cut.
I’ve got two sections of the figure.
I’ve got the headpiece and this piece that is going to anchor onto
the pipe. The next thing that I need are these hose clamps, and I’ve got four; 2 that are
small and 2 that are slightly bigger. The easiest way that I find to put this together
is to take this headpiece, lay it down onto this piece of pipe. Don’t worry too much
about keeping it in position. This ultimately will be the correct position. Until I get
the hose clamps kind of aligned and tightened up, it’s fine to leave it down. I’ll take—you
want to make sure that this is nice and tight. I’m going to turn it. That’s pretty good.
I already tightened it this way. Make sure this is tight and this is tight. Those really
need to be very, very stiff.
If this is loose, as you add weight to it it’s going to start to rotate. Then you
take your two clamps, weigh them onto the pipe. I have this socket driver which looks
like a screwdriver but it’s got a little socket in the end that fits perfectly over
this little screw head and makes it easier to tighten. You can use a screwdriver but
frequently it’ll slide out of the holes as you’re tightening. Ultimately, I want
this wire to end up on the top of the pipe, but for now I’m not going to pay much attention
to that. I’m just going to lay it into the wire or into the hose clamps like that and
begin to tighten the clamp. As I turn the socket driver, the clamp will get smaller
and smaller. I’ll try and move my hands so it’s a little easier to see. Maybe I
can turn so you can see it from the side. You should see it getting tighter. I don’t
want to go too far without doing the other one.
You can also put a socket into a drill and use a drill to do this. If you do that you’ll
want to be careful because it’ll go so quickly that’ll be easy to pinch your hand. Right
now I’m kind of holding it. My thumb is getting pinched a little bit, but because
I’m doing it so slowly and manually I can move before I really get my skin pinched too
badly with a power drill. That can happen pretty quickly. Now they’re getting kind
of close to being, to really grabbing onto the wire. The wire is still pretty moveable,
and so this is the point at which I’m going to make my adjustment. You can see as I turn
that to face the camera you can see that there is a little bit of play. It moves a little
bit but it’s not so tight that I can’t adjust it.
Now is a good time to orient it the way I want it, which is, as I said, on top like
that. I always want one clamp as far out as I can get this way and one as far in as I
can get. The only issue with this particular setup is I don’t want this, I want this
clamp either to be completely inside the figure for far enough away from the figure that it
doesn’t interfere with my sculpting. If I were to make this the head and the core
of the figure, you can see that that clamp would be right by the hip and really interfere
with it. I’m going to move it a little further out.
Before I finish tightening.
And that's probably okay.
Then, again, make sure it’s right where I want it.
Lighten that one.
Tighten this one.
The further away the clamps are from one another,
the tighter they’ll hold the piece.
If the two clamps are right next to one another that whole piece
can pivot because it’ll be almost as if it’s being held only by one point.
This isn’t really ideal, having this clamp in, because as you can see, I can bend it up and
it’ll start to lift away from that pipe. I’m going to have to be a little bit more
careful when I start positioning the armature with the model. Right now, I’m really tightening
these clamps down pretty hard. You have to careful not to go crazy because you can strip
the clamp. These now are really, really nice and tight.
Next, I’m going to take and turn this so you can see it a little bit better. I’m
going to take these two pieces of armature, lay them one on top of the other, and take
the two smaller clamps and thread them on. You can start either at the leg or up the
arm. I’m just going to slide it down around the bend and onto essentially what will be
the torso of the figure. Now I have the two clamps loosely held in the middle. Now I can
drop the entire thing over that centerpiece,
and that’s how I can finish tightening everything up.
Again, one clamp I’m going to go as high as I can. It’ll be up here. One clamp as
low as I can which is going to be at the bottom. I want to make sure that the hips are aligned
and that the shoulders are aligned, but right now all that’s really important is that
things aren’t overlapping too much, which I feel like they are. I want to get these
pieces. There we go. Side by side so I get the full width. Now I’m going to take that
clamp, pull it to the top. Get into a position where I can—and it’s moving around a little
bit on me, but that’s fine until I get my clamp to begin to grab. When it begins to
grab it’ll stay where I leave it, and now I can make my adjustments without constantly
holding everything together. You can see it’s still pretty loose. I might give it another
quarter of a turn where I want it. Now I’m going to make a couple of final adjustments.
A couple of things that I’m not happy with: I don’t like that this wire is overlapping
this pipe. I’m going to loosen these clamps just enough to allow me to pull everything
out a little bit. That’s one of the nice things about the hose clamps. You can get
them all tightened up, and then end up making a mistake. All you need to do is loosen them.
Make your adjustment and then re-tighten them. That, I think, is a huge advantage. There
are sculptors who use epoxy for this to put the pieces together. They will wrap the armature
with wrapping wire and then put epoxy over it so it’s really solid. That will make
it really, really tight. But if you make any mistake, it’s almost impossible to correct.
You can’t really undo epoxy.
Okay, so now I’m going to tighten up this bottom clamp. This bottom clamp that I have
is a little bit oversized. I had one small one which is good for the top of the armature.
This one is a little bit big and that’s why when I tighten it all the way it’s got
this flat. I can either cut it off or I can just bend it in, and it will eventually be
completely covered up by the clay. This I’m going to—I’m going to make a little adjustment.
You can see the shoulders are slightly out of alignment and the hips are just slightly
out of alignment. I’m going to loosen the armature just a hair. Change that alignment
and then retighten. That’s much better. That way at the top—and by putting that
at the top when I start opening the arms or raising the shoulders or making any adjustments
up there, there is no way that those can pull apart. If this clamp were down lower, as I
started moving the armature this point could start to widen. So it’s a good idea to have.
Same thing down at the bottom. You don’t want those hips to spread apart because that
would defeat the point of having that measured very accurately.
Okay, so now that I have everything set, the one thing remaining is going to be to bend
the head. I’m going to go and grab a pair of calipers. I’ve actually got 3 different
pairs. I know, based on the measurements that I’ve written here, that the neck from the
suprasternal notch which is here, to the jawline is a half a head. Obviously, the head is one
head. I’m going to set my calipers at 1-1/2 which would give me the neck and the head.
From this point, I want the very top to end here. Generally, I’ll go just a tiny bit
below that in case the model either has their hair pulled back so there is very little on
top or some male models might be bald. I don’t want to get that too close to the very top.
I’ll bend it over.
That’s pretty, that’s probably too close for me. That’s actually hitting.
I want to come down a little bit more. That’s pretty good. That gives me
maybe between 1/8 and a 1/4 inch of clearance on top. I’m going to check. smaller
These are smaller calipers.
They’re actually called dividers because they are straight-edged as opposed to curved.
I’ll explain as I go. Why you would use on versus the other.
I want to make sure I have room for that neck, which I don’t.
That wire is protruding a little too low so I’m just going to cut off the bottom.
Now I have room for the neck and the head.
There is the completed armature.
We’re going to take a short break, and then when we come back I’m going to have the
model set up and go over some procedures such as the correct height of your sculpture stand
relative to the model. I’ll talk a little bit about setting up the pose.
and the first thing that I want to talk about
is the correct height for the stand,
relative to my height and relative to the height of the
model. So there is
an idea called sight's eyes where
there's essentially a cone of light coming from the top of the
model to my eye and from the bottom of the model to my
eye. And I want my work piece, my armature
to fit within the cone. And to accomplish that,
the first thing I'm gonna do is I'm gonna walk close to the model and figure out
roughly where my eye would hit her. The further away I
am from the model, the more difficult it's gonna be to be
accurate about that. If I'm, you know, a hundred feet away, I might think
that I'm looking her in the eye and as I walk closer and closer I realize I'm more,
you know, around her ribcage. So I'll
walk up and I feel like
I'm sort of just above, between her shoulder and her elbow.
So I'm going to come back
to my sculpture and I want my eye to hit my
armature roughly between the shoulder and the elbow.
So right about here. So I'm probably just a hair too high.
So I'm going to lower the stand a little bit.
That's about right.
That way I don't have to squat down
to get the proper view. Okay. So now
I have my armature set up on my stand, I have my stand at the right height.
The next thing I want to discuss, briefly, is
this rectangle, or more like a square if we take away
this pipe, that the armature
is over. And I also have Leah on a square
piece of wood. And I've done that purposely
and oriented her so that her pelvis, or her hips, are
facing one side and that way I can orient the entire
sculpture to match that square.
And so as I move around, when I
move to a corner where I'm looking directly at the corner of the wood,
I can turn the sculpture so I'm looking at the corner, here,
and I should be able to see the same thing. Meaning,
her shoulders are rotated toward me
so these would have to come this way. Her hips
are rotated away, almost in line with that front.
So it helps, particularly in a rotated pose,
to see the different planes of the body
against a straight line, as opposed to having her oriented
randomly on that square. So the first thing
I'm going to do, is get to a position where I'm looking flat
at the side of that square
and I'm going to rotate my sculpture so I'm looking flat
at the side of the square. And you can notice that this square and
that square are not in alignment with one another. You know, that would be
like that. That's aligned with that.
The problem with that is I'm looking right at the side of that
and I'm looking at the corner of this. So rather than do it this way,
I'm going to rotate this until
I can see the side view. And now I'm
beginning to look at the armature in relation to
her. The first bend that I make in this
armature is always going to be the bend of the pelvis because everything
is springing from there
and because my pipe is right here, it's the one thing
I can't really change. A good
indication of the angle that I want this to be bent to
is the angle of her
abdomen from just below the naval to the pubic bone.
So I'm gonna take a straight edge, in this case an X-Acto knife,
and I'm going to lay it right along
the line of the lower abdomen, which if I transfer it
is the same line front and back.
So I'm gonna get that angle and make sure that
I rotate the entire armature
to that angle. And with
bending and posing this
armature, it's always easiest and most
effective to do one thing at a time, do it as well
as you can do it and then do the next
thing. That angle's just about perfect.
The next thing I want to do is bend the
ribcage. And so I'm going to take
the center of her
abdomen essentially, up here above the naval
and the center of her neck, front to back.
And find that angle, which should be about here.
Now I'm gonna take
three quarters of a head from my measurements
and find
three quarters of a head on my armature.
And that's essentially where I want it bending from.
So this is probably the
hardest bend because I have to bend a whole bunch of wire to accomplish that.
So now I've bent that back, now I'm gonna check both
angles. In doing that I rotated
that slightly so I'm gonna put it back.
And now that is
pretty good. Okay so I have
this to this bent more or less
correctly. Now I'm gonna go from the trochanter, which is
this point, I'm just gonna point it out on her.
Her trochanter is right here. From that point
to the center of the knee, front to back,
so back of the knee, front of the knee. I'm just gonna
go right into the middle of that. And I want to figure out
what that angle is. It's moving slightly
backward. Right now, on mine, it's moving
pretty severely backward. So without changing those upper
measurements, I'm just going to rotate -
that point
probably went a little too far forward -
until it matches.
It can go a little bit farther back, because she
is double jointed in her knee.
Meaning, her
femur's moving backward and her tibia's moving
forward.
(adjusting)
So that angle is just about right.
Now I'm gonna do the angle of the lower leg. And from
the center of her knee to the center of her ankle, the
lower leg is moving forward.
From that point that I bent for the knee -
this might be a tiny
bit too much.
(measuring)
Perfect.
Now I'm gonna deal with her neck, which is
coming forward.
And then the head
is both turning and tilting.
Perfect. Good.
Next I'm gonna rotate her arm.
(measuring)
And I know
that I'm only really being accurate in one
dimension. If this were a drawing I'd be in pretty good shape.
But because it's a sculpture, the minute I turn it
all my angles will be incorrect.
So I'm gonna have to rotate
Leah
a little bit and then
check all of the angles.
That
is good. That is good.
In fact I'm not even bothering with the far leg and the far
arm because I know once I get to that side, I'll be able to
see it much more clearly. So I'm pretty
happy with where things are here. So I'm going to turn
my sculpture and -
you okay? I'm gonna turn Leah
to face forward.
And what I'm looking at
is this line of wood,
making sure it's gonna face me
and now I'm turning this so this faces me.
So now
I'm going to check the line from the pubic bone to the pit of her neck.
And it's almost perfectly vertical. Which
is what I have. So I don't need to change that.
Now I'm gonna look at the line from the trochanter to her knee
on her right side, on my left.
And mine has to go in just a tiny bit.
(adjusting)
So it hasn't changed much. What's gonna change more
is her lower leg from the knee to the ankle's moving pretty
significantly inward. So
that is a big difference.
(adjusting)
Okay that's
a little too much.
(adjusting)
Okay so that's good.
I haven't really dealt with her
left leg so I'll leave it for the moment
and rotate her right arm,
the arm on my left. I have the angle
this way correct but not this way.
So I'm gonna pull that out.
(measuring)
It's a little bit too much.
(adjusting)
Good. And then
the other is coming inward, slightly
more. And I'm gonna check the position
or the length.
Her wrist
should begin here.
And I'm probably gonna cut some of that wire
because her hand is resting
on her body, so I don't need the support of the wire.
Now I'll check the neck
which should come just a hair
over. And then her head, which is going to tilt
a tiny bit to that side.
Not even that much.
And then I'm going to
check the length of the other arm. The
upper arm here. Let's mark that.
And put in
(adjusting)
that bend.
So first that arm
is bending inward.
(adjusting)
Good and then the forearm
is going slightly further
down.
And then we'll come in and measure
the length of the forearm
and once again I'll
probably end up cutting
the wire in the hand.
So
I'm going to
also raise this shoulder up slightly.
Create a little bit of an angle
through the shoulders.
And now I can see this
shoulder, her left shoulder's significantly closer to me,
so I'm going to rotate, holding the hips in place,
rotate the shoulders a little bit. And in doing that
I'm gonna make sure I check the angle of the other arm.
Which this forearm can move
in a little bit. Okay, now I'm going to turn
to the other side view.
And again
I'm gonna stop right when the
line of the wood is facing me.
(adjusting)
Okay so now
this angle should be the same.
And it is. But obviously that
leg is gonna have to come way
forward.
So I'm gonna swing that.
And you can see the whole thing
moved a little bit. I'm just gonna make sure I adjust it back
to the right position.
And now
I went a little bit too far forward with that leg.
So come back.
And that's probably maybe a degree
off.
Just a tiny bit.
(adjusting)
That's good.
And now her lower leg.
So I'm gonna bend it right from where I had measured
initially.
(adjusting)
It looks good.
And that looks good.
Now I'm going to check
this upper arm
which needs to come forward.
(measuring)
I think I went a little bit too far.
(adjusting)
That's about right.
And the arm is actually - this forearm
should be out further, like it's almost a straight
line going away from me.
(measuring)
One thing I think - this whole thing might
need to come back just a tiny bit.
That looks good.
And now I'm
gonna turn her to the back
view. Essentially everything should
be very close to accurate now.
And what I'm doing
is checking
that things haven't moved,
making sure I refine - also I didn't really get
the angles inward of the
left
leg. That's right.
That could go just
a tiny, tiny bit in.
But mainly it's the lower leg
that can pivot just a hair inward.
(measuring)
Shoulder
angle looks good. The head I think can tilt
a hair downward.
That angle for that arm
I think can come back just
a hair.
That's
all looking pretty good.
(measuring)
I'm just gonna move the whole upper
body over just a tiny bit.
Because I'm looking at the nape of her neck
which is just a hair to the left
of center. So that helps.
I'm gonna turn her back
to the other profile.
(turning)
And
(measuring)
the angle can come down
just slightly.
Good.
Good.
And I was going through the
angles, checking them,
I feel like this
can come just
a hair more extreme.
That's good.
(measuring)
And I'm gonna turn her to the front to finish up
this set up.
So I've gone around a few
times and each time I go around, the adjustments
I'm making are smaller and smaller.
And there may be
a slight shift that I
didn't have.
(adjusting)
That's good.
(measuring)
Come in a little bit.
There.
(measuring)
Okay, so the one other
alteration is going to be
right here. So there's one more thing I wanna address.
Which is right here, you can see
that that wire is
levitating above the ground. I don't want that
because that's going to be kind of
problematic in two ways. One, this wire sticking out here is gonna be
a problem. Number two there's nothing supporting it. So I'm gonna change
the bend from here to being down
here. I'll just lengthen the wire and rebend it
so that this piece sits on the ground and add
a little distance to there. And that way I'll
just build up the block that she's standing on with clay
and then I won't have this issue here.
So unfortunately the best way
to do this is to undo a little bit of
what I just did. And when I figure out how much
more I need - I need that much more. And then without changing anything
else I'm just gonna rotate the leg up
from
there.
Put a mark. I'll unbend it
(adjusting)
And then
rebend it
that far down.
(adjusting)
So, two and a
quarter is what it was.
(adjusting)
One and three quarters.
So the knee is slightly
high.
(adjusting)
There we go. So these little
extra bends end up adding up.
So I'm gonna rotate her
so I can see that profile.
That.
Turn my sculpture so I can see it.
And I'll just make sure that my angle
is matching
(adjusting)
It's gonna be quite a bit
more.
bent.
There we go.
(measuring)
(adjusting)
That's good.
That's good.
(measuring)
Okay now I'm gonna turn her back to the front.
Check.
Yeah, like two minutes then I'm done.
(measuring)
Gonna tilt this angle just a tiny
bit inward.
(measuring)
And that's
pretty good for my set up. All of my angles
appear to be matching. These are both
very slightly off the ground. I'm going to probably put a
screw and a washer in each one, just to lock it down because
there's a little bit of spring here. It's gonna keep wanting to come up.
But this is
essentially my finished armature pose
and ready to begin adding clay. So the next thing I'm gonna be doing
is beginning to add volume
first in the pelvis, then moving up to the ribcage and down to the left.
And I'll begin to mass out the figure next.
Reference Files (2)
Free to try
-
1. Lesson Overview
1m 5sNow playing...
Watch the whole lesson with a subscription
-
2. Proportional Systems
24m 40s -
3. Anatomical Measurements
19m 43s -
4. Creating the Armature
37m 56s -
5. Matching the Armature to the Pose
29m 2s
CONNECT
New Masters Academy
16182 Gothard St
Huntington Beach, CA 92647
Contact US