- Lesson Details
- Transcript
- References
- Instructor
- Steve Huston
- Subjects
- Drawing
- Topics
- Anatomy, Head & Portrait
- Mediums
- Colored Pencil
- Duration
- 1h 17m 4s
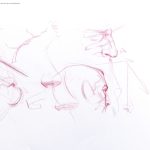
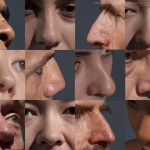
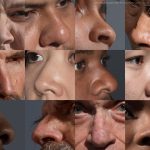
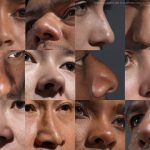
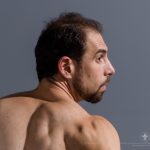
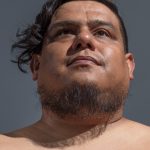
In week four, instructor Steve Huston will show you how to construct the three major parts of the nose, including the ball of the nose, the left, and the right wings of the nostrils. You will learn to properly place the nose on the face and draw it from different perspectives.
Throughout this course, you’ll have access to the NMA community for feedback and critiques to improve your work as you progress.
Beginner Friendly
1641 views
5 likes
Choose one video.
AUTO SCROLL
Transcription not available.
AUTO SCROLL
Alright, so let’s do some of the main ideas of the nose. Now if I look at a profile I’m
going to see that—there is my little eye socket.
I'm going to see that the nose...
let’s do that so understand where we’re at.
I'm going to understand that the nose pokes out. The plane of the
face, the gesture of the face goes down. The gesture of the nose goes out. So that means
as you’re looking at me here is the face in flat perspective. There is the nose in
foreshortened perspective. That’s going to have a big effect. We’re going to get
it longer when the head goes down. We’re going to find it’s much shorter when the
head goes up. So we have to pay attention to that. It has its own structure, its own
perspective in a way. It’s tracking it, of course, and attached, so if the head tilts
it tilts. But it is not in the same plane as the face. It pokes out. So that creates
particular problems for us to get it to come out.
If it’s in a profile then it’s just drawing the silhouette in some form or another.
But once the nose gets mainly or all inside the cheek structure, now you’ve got a fight
on your hands to show that off. So let’s take a look here real quick.
We'll just do this for the eyes, just kind of placeholders for the general open eye position. Cheeks
would be way out here. Cheeks would be way out here. And then we’ve got that center
line you should have in there. And the little wedge with its character and it will vary
in character and shape, depending on who you’re drawing.
Eyebrows come up, drop down in some manner generally like so.
Then we’re going to come right back to this wedge, and we’re going to come right down here now.
The simplest possible thing to do and still give it structure is just make a snout, and that’s where we
had left it in our basic structures before. Just do that. Notice what I’m doing though.
I’m coming, I’m drawing kind of this beveled shape. It looked like we’re on top of it.
So if you have a nose that hook down at all then you can play that game and get on top
of it. This is actually just an accident of construction, but you can lay in this nose.
Then that’s a little more satisfying.
When you get on top of the nose like this then just boxing it out, then you’re showing
the end of the nose, the tip of the nose and then the wings of the nose back to the wings
covering the nostrils with the mouth and cheek construction. So it works great. But if the
nose tips up at all, a little bit of a turned up nose this way. Then when you’re looking
straight on that nose is going back. We’re going to see underneath it. Notice most of
the time the nose is going back in this view. So that means unless it pulls down sharply
you’re going to probably see some of that bottom plane just like when you have a full
digastric plane here like our model we’ve been using does. It swells out so even when
you’re looking straight on you oftentimes see some of that plane. That’s where it
becomes a problem because then we’ve got our wedge shape here. We come down here, and
then we simplify it like this. It looks really clunky. It looks actually like they had a
broken nose and it got bandaged. It’s a real crude, simple, overly simplified and
not particularly characteristic form when you’re underneath it.
So there is more work to be done there.
But our main objective is to find the end of that and then move on for our basic structure like so.
Then if you can do more, do more. You get this here. All the years teaching
I’ve never mastered the idea of getting it in perspective this way. Alright, so what
our main quest here is to understand that the eye socket, eyeball, and frankly you could
use an eyeball and come right off it like that and not worry about the little bits of
socket and such, but we want to understand the architecture so that we can understand
why the cheeks and brow do that. But you can just do the ball in there. But in any case
we want to feel the side plane. The fact is, the side plane does get very fat and does
bevel out so we see both sides just like we do with the brow here. Like so. Like so.
Then if you can… Bring it down here on the tip and do that so we’re looking at this
area. If you can draw the end of the nose, and it can be a ball or it can be chiseled.
The early illustrators, Charles Dana Gibson, Liondecker, Gruber, Dean Cornwell, these kinds
of guys would draw this real kind of chiseled diamond-type shape like that. That’s the
tip of the nose we’re drawing. And then what we’re going to find is there is three
major parts. There is the tip of the nose, and you have to be careful when you say tip
of the nose because sometimes that suggests just the front plane. It’s going to have
a front and side and top and bottom. So let’s call it the ball of the nose even though it
might be not bulbous ball. Then we’re going to have the two wings, two and three. What
we’ll find here, and so we end up having this kind of idea in a way. If we do that
it’s going to look kind of silly, though. So we have to be gentle in our description.
But this is in front, and these are receding on the side.
What we’re going to find now is know is notice the nostrils in here, those nostrils
are created by a very specific set of forms coming together or not coming together very
well. And so we have the barrel of the mouth with the lips over it going up and in. Then
we have the nose sticking out. And so as the barrel of the mouth goes up and in the bridge
comes down and with the septum, which is the bone that ends the—it splits down. It looks
like a little guitar pick actually on end, going back in. It comes down and attaches.
The septum there. Then we have the wings flying over. And so the wings are actually bridge
forms that go over the barrel of the mouth, and the barrel of the mouth goes up over the
teeth and then back into the nasal cavity. And so the whole, if I try and pick my nose
this way I can’t do it. I have to go up and in. That’s a crude way of thinking of
it, but that’s the best visual I can come up with. It goes up and in that way.
And so the nostrils we never want to draw the nostrils unless we’re doing a cartoon
stylization. We never want to do this for the nostrils. It’s just going to flatten
that nose out. It’s going to destroy that, and it’s going to look like you did this
with little or no nose.
AUTO SCROLL
Got to come out. So what we want then is the wings doing this
and the barrel of the mouth doing this.
And so the ball of the nose, the wing of the nose as it bridges over the mouth and attaches back in.
Ball of the nose, wing of the nose over the mouth, in that case some
of the cheek and such. Like that.
The septum right here. Then the nasal cavity is right in there.
Now it may shade and fill in darker, but the hole where you can actually go in
is right there. This is all plane of the mouth going under. So very specific, subtle idea.
And you can actually feel on a lot of the people where the barrel of the mouth is in
front of bulging out from and overlapping that interior.
There is that bridge there like that.
Then if we get the nose from angles then it’s going to vary in proportion because
of the foreshortening. So here is the eyes in here. Here is the nose coming down here.
And whatever this construction is doing, the tip of the nose give or take its roundness
will track and go back. This side you may or may not be able to see any of. This will
go back in here, go up in there as we talked about the upper lid but will be fairly flat
in that case. The lower lid will tuck in. We’ll feel the eyeball hitting the cheek.
All that kind of stuff. But it sits like that fairly easily. You still would need to practice it.
The real trick to getting that nose in from these top front, front, three-quarter profiles
are a little bit different animal is getting a good connection off this, making sure that
you have enough room for its side plane, that the eye doesn’t crowd it. If I put the eye
here, for example, it’d feel like it’s crowding and look cross-eyed. He’s got to
come out away from it way out here.
And then making sure you get a step back from the ball
end of the nose along the wing of the nose, and then that takes you on to the cheek like so.
But that’s that.
And then if we get under the nose…
that’s in there. If we get under the nose notice
that whistle notch analogy again.
Notice that this and that are the same. Same curvature.
Come over the perspective in. Go down the side, tuck under the perspective bottom just
like this curves under. Just like this curves under so does the whistle notch. The cheek
blocks it rather than cutting all the way. The nose is going to do the same thing. If
the nose is here you’ll see underneath that nose just like you would see underneath the chin.
Same idea. Same idea. Make sure the nostril is well inside that bottom plane and
not defining the bottom plane. What I mean by that is here is the nose coming down. Don’t
say we’re underneath like this or underneath it like that. I’m going to put the nostril
right here or put the nostril right here. That’s going to destroy your structure.
Wherever the nostril is and however you draw it, make sure that this construction contains it.
Okay, sits in there like so.
And then if we get way underneath it then we’re going to feel—
we’ll save the, well, I brought it up so let’s do it this way. Here is the eyebrow.
There is the bridge of the nose.
If we’re underneath this greatly, remember that foreshortening. Tilt up just
a little bit. So look at the tip of the nose, whatever landmark you want highlight or shadow
or something, how close does that get to the eyeline? Notice it can overlap the eyeline.
So do we barely see any nose or do we see quite a bit,
or do we see none at all on top, the bridge part?
So wherever the eyeline is...
I want to see where the end of the nose is.
So you can do a little snout shape, kind of the reversal of this. That would be all bottom plane. That
would be this chunk in here. This chunk in here.
Then what it is is the ball of the nose,
notice how the ball of the nose does not set on top of it or underneath it. It expands it.
That ball has a top and a bottom to it because it’s a ball.
It sits in here.
Then we’ve got the wing and the nostril. It might come down. Actually, it would come down a
little bit farther here. And because the barrel of the mouth—we’ll see better why when
we get to mouths. That barreling out mouth is a bulge.
It’s going to pull in here.
We’ll see this, and I’ll darken it just so you can see it. It can get dark, but just
conceive of it as ball, whatever little septum you can see. This would be the filtrum which
is that little divot in here and the bridge. And so notice, maybe you can’t notice because
it’s kind of a messy drawing. Notice the stepping down and out kind of like wings unfolding.
We don’t want to do the ball of the nose and then the wings like this. We want to have
the ball of the nose stepping out and down.
That kind of thing, kind of exaggerated out and down.
Okay, so that is that.
And then we’ll deal with some of the trickier conceptions when
we do a full construction of it. We are still missing some secondary details,
but those are the main structures.
AUTO SCROLL
Alright, so we’ve got our Holbein here, and you can see in this case if we look from
a profile we’d see that that nose we could still see a little bit of the bottom plane
there. That is right here. You can also see how that bottom plane then flows into what’s
called the filtrum, the little divot there. It’s a little crater shape. We’ll see
that more clearly when we get to the mouth. But that kind of ties the nose down into the
mouth. They kind of flow together. You can also see how the nostrils are created by the
span of the bridge—the wings of the nose, I should say. Let me knock this off here darker.
So it’s spanning across. You can see that really sensitive line. Let me take this away
again to show you. Look at how sensitive this line is for the nostril there. So it’s a
careful spanning. Notice how it goes from thick to thin. It does that and it’s showing
us how it’s going this way and then slowly coming out towards the tip. By doing that
we’re losing, let me do it this way. We’re losing the bottom plane as it comes out to
the tip of the nose if I exaggerate all that. If we see that bottom plane with the nostril
in it, that’s why that little mark is thicker there, and then it swings out towards us in
ever deeper perspective and fuller form and covers it over.
So very sensitive marks there, and they’re beautiful.
You can see similar sensitivity in the line of the mouth. It’s not just a line. That
would be a mistake. So there is a similar strategy there that we’ll figure out later.
As always, we feel the root—well, the base, the beginning of the bridge of the nose is
really the root of the nose down here. It builds off that nice broad area. This is a
very distinctive shape. It’s going to vary quite a bit from person to person. It’s
a chance to show the character. In this case she’s very broad, clean featured. Of course,
the artist edited any imperfections to make her clean featured, and that was his style.
Smooth, stylized, idealized. But that broadness with the side planes and that has to be the
beginning so that we can sense the side plane, especially something as sensitive as this
where we don’t have strong shadow shapes like a Rembrandt. We need to, where we can,
show that it has volume, that it’s coming off the paper in effect. Then up in here you
can see how it fades back around. We’ll see this more clearly in the advanced section
on this stuff. But you can see how that nose doesn’t just drop down here. It flows back
around, and it’s moving back around that zygomatic arch, that donut idea like this.
It’s picking up that.
Notice how it gets darker in between those moments. It goes here. You can see it here.
You can see how you can find great designed shapes there, that kind of Chevron shape in
effect is a very cool shape. That can be the basis of a stylization. In fact, someone like
a Liondecker, an early American illustrator, would play up something like that big time.
But notice that transition, this dark section here is the forehead going back into the bottom
plane and being interrupted by the nose thrusting out in its own direction. And so those things
become really critical. There is that Chevron shape. And it flows from a slight down plane
into an inside plane that is the brow tucking down into that eye socket and eyeball business.
So interesting stuff and important things that we want to pay attention. So when we
put the lesson on that maybe is when you put down a tone, and we’ll talk about that in
our advanced section. When you put down a tone it’s got to be descriptive. It’s
going to get darker when it turns down most of the time. In this case every plane that
turns down gets darker. Everything that turns to the right turns to the right, gets darker
too. Down and to the right gets darker because the light is up and to the left. The ear turns
down, gets darker. The ball of the face, let’s just simplify it, turns down and gets darker.
The mouth turns to the right, turns down, gets darker. The stairsteps to the lips.
Turn down to the right, get darker. The hair tucks under. You can see how the contours suggest
what the values should do. Because as the contour curves under or steps under then the
values are going to track that movement in those moments. Then the only exception to
that would be where a subject is having another object block it from receiving light. Then
it might have turned up but loses light because of an interruption.
Alright, so here is our Piazzetta. Let me pull that nose out a little bit. Notice how the
nose becomes important. These features play off each other, of course. They play off the
greater structure of the head, of course. And so in this case we want to desperately
know that the eye is in front of the nose. So we have this overlapping affair going on so the eye is
in front of the nose. And for that matter the cheek is in front of the eye. So we’ve
got cheek, step off that eye. Eye, step off that nose. Nose, step off that background.
And so we have the series of layer that are critical to get right. You want to know what’s
in front of what even if it’s subtly so.
And so notice these—let me dust these back here. Notice these undulating forms or undulating
tones, I should say. I’m going to play them up a little stronger. That’s showing me
that we have this wash going cheek, eyeball, nose, background or background way back if we were
looking down on top of this like this. It’s going way back in. So I hope that makes sense.
We need to get that sense of overlap there. That’s key with each of our features. What
is in front of what? Those overlaps, those wave actions. We want to know if they’re
like a corrugated roof right in line, or if one is interrupting on top of another one
as we stare at it. Alright, so that’s that.
Then notice what he did. He almost did a no-no, but he’s Piazzetta, so I don’t know that
he is actually capable of a mistake. So notice that the nostril is right here. Notice that
that nostril is right there, and that is actually a no-no. That’s a screw-up. That’s a bad
thing. Can you remember why? I’ll give you a pause for a second. You can even pause the
recording. Why is that nose, the way I drew it, bad? It’s because the nostril, the way
I’ve drawn it, is doing the work to describe the bottom plane. You’ve got the nostril
right on the bottom plane. The fact is, though, when details blasts out sometimes it will
just look like that. It isn’t often that though. And Piazzetta actually didn’t draw
it like that. I did, but he didn’t, if we look carefully. So he is a good artist. He
put a little line, and I’m going to exaggerate it. He put a little line over the top of it.
See those two little lines there? I’ll blow it up. There is the There is the nostril.
There is the little line over it. That is the plane of the nose, and then the nostril
is underneath it in there.
Notice also what he did, which I did do, and this fades out in his drawing, but I’m going
to continue it off, on. Notice that he tucked that tip of the nose underneath so that we
get the limits of that bottom plane there before we go into the mouth. So this is all
background like so. Notice the other thing he did very subtly, he put an edge there.
That’s giving the, that’s very sliver edge of the front plane we’ve got underneath
that and saw a little front plane there. We’re all on the side but he gives us a sliver
front plane so he gave us that highlight there to suggest that that whole plane is
catching the light as it would be, like so.
So really sophisticated stuff there, beautiful stuff.
AUTO SCROLL
Alright, so here is our Raphael. Glorious thing. Look at it—at first glance we look
at that tip of the nose and it just does that. That’s a huge mistake. You don’t want
to start out with a concept of front and side and corner planes and all that kind of stuff
and have the contour do that and completely ignore that. So you have to be a little more
sensitive than that. He’s Raphael so of course he’s more sensitive than that. So
we look more carefully and we can see right here it comes right in line. This is the line
we’re looking for because that’s the front plane. Notice the lips and the mustache.
The lower lip. The chin. Even the little curls of the end of that goatee all give us that
construction idea. He picks that up other places too. So he’s very, very faithful.
Even the hair goes across that. Very faithful to that, as he should be.
So make sure if you’re going to draw a really curved shape you give a little flatter
moment to honor that constructed direction.
Or you give slightly squarer transition points so we pick up the sense of that. It can just
be for a moment. But do it, and do it as often as you can. If you can come back here and
do it again as you step back to the nostril, do it. He didn’t do it as strong as I did
it, but he suggested it there. So really important stuff. I’ll do that every place I can get it.
Even things like that.
For just a moment I’ll come back to that construction.
It can get kind of overwrought and obvious, and so you can just do this. Just pick it up for
a moment. It does this, but overall it’s wobbling more or less along that. It’s tracking
that way. So that’s that. Here is that inner eye socket area, inner eye socket area coming
down to the right side. You can see clearly here even though it’s a strong three-quarter
you get to see both sides of the nose because if you look up from underneath the nose it
bevels out that way. In fact, we saw from that strong underneath angle it’s doing
this. It looks like an old-style house with a huge chimney in it. You can go through two
doors, I guess. Just going to keep the analogy going. Anyway, that is sublime Raphael.
Alright, so sweet little baby here. You can see the construction lines somewhere along
here. Every once in awhile you’ll see this not infrequently. This is going this way.
There it is. There it is. There it is. But actually the tip of the nose does this. It
never does pause. It never pauses to show this. It bumps around. But what you might
find is that if you tracked along the kind of smudged tone rather than the contour it
would. There you go. Even things like this, I’ll play it way up. You can have that.
And if it’s slightly off we can live with that because these things are organic forms
and so they can vary. This is a three-quarter form. We never get to see where the other side is on that
because it’s around the other side. So we’re being slightly foiled in our symmetry because
we don’t see the same point on the other side while the center points are actually
a little bit smudged. All this is pretty murky tones. We don’t get a lot of satisfaction
there. We have to find the stuff when we can. He’s got things like the swollen lower lip
that again bulges out just like this did. It never really tracks. It tracks up here
but it doesn’t track here. Even tracks up here and here and her more or less. It can
even start to tuck. Even if it never quite makes it, that jowl area, you can start to
tuck that up toward the construction line to reinforce that.
Alright, our terrific Normal Rockwell. Now, he would use very soft light so that the silhouettes
of each object stood out. So you can notice very clearly on the shirt, the shirt, the
chair, or the red wallpaper or wall color, whatever it is, he really lets the detail—and
it’s mostly evident in that shirt—detail fade away so you get that strong silhouette,
strong graphic. He was a pantomimest. Not by trade, but by sensitivity. So the posture
was absolutely crucial for him. He used to get kids in his studio and he’d have a pile
of pennies. Every time the kid took a pose and did what he was supposed to do he’d
slide one penny across the line for the kid. Of course, this was depression era kids or
World War II kids, and so a penny was a lot back then.
So getting just the right attitude, he’d do a lot of photography to get it. So the
silhouettes became the postures. Feeling this as he’s intruding in, staring eye to eye.
He’s going to bump him in the forehead with his glasses. He’s intruding on his space
here with his hands. So all that is really strong. He doesn’t have a real strong light
and shadow. He’ll put in enough light and shadow so it’ll turn the forms or enough
halftone. So it’s really more cloudy day interior. We don’t turn on a strong lamp.
There is not a strong north light coming through like a Zorn watercolor portrait maybe. And
it’s certainly not sunshine blasting out. He’s usually not about that. So very, very
subtle. That means the structure is going to be very subtle.
If your light source is going to be subtle throughout then in any particular area you
have to be even more subtle. Look at our nose here on our little boy. There is not much
going on here in terms of great turning of light and shadow. So the contour of it is key.
Notice how there is a slight bump down to the tip of the nose so we can feel that thrust forward of the tip
and the kick back of the wing. Notice a slight tone here right there that separates that
ball of the nose from the wing of the nose and the rest. So he’s being very careful
and the nostril fits there. You can see on our gentleman here, the principal or whatever
the story is. I don’t know what the story is. You know, it’s so subtle that yeah,
pretty much, the nostril is not a whole, but the nostril creates the bottom plane of that
nose. To be safe what you do is you say is, well, I just need to simplify it out shorthanded.
But at least let me soften the edge of it so that it isn’t just a graphic black line
but it at least rolls under a little bit. That’s what he’s doing there. Really beautiful.
Notice, again, the kid wants to get out of there clearly. He’s looking at him but he’s
not facing him. He’s got his hands up in a rope-a-dope basically, in a guard position
to block the blows emotionally. He’s got the hands protecting. This hand is pushing
him away. He’s trying to make him face the hand and not himself. So the hand is in there
and is pressing over, and this is kind of dragging out. You can see the great sensitivity
again to the staging, how this hand steps out this way. This hand is trying to follow
it that way. What that does is it throws the features out of whack. So if I’m going to
do a center line, construction line, center line for that head I’m going to have it
fade away. That’s what’s happens with the nose. You can see, if you go back to that
first portrait of the woman staring right at us, the Hans Holbein, Holbein does the
same thing. It creates a very graphic style, and you can see how Rockwell was most certainly
influenced by Holbein. You can see the nose actually twists this way a little bit.
Alright, now look at the incredible economy of Manet. I really love this painting. You
look at it. You think back on it after seeing it, and all of this just looks like flat.
You don’t really even see that there is a lot of subtle detail in there. It really
has this great graphic quality which appeals to me especially like in the neck. It’s
the same yellow-white until it bumps into the digastric plane and the face, jaw line,
and such. Really beautifully done, and yet we look in there and there are these subtle
tones that are actually very descriptive of things. We talked about how this stuff in
here is really showing the inside of the eyeball. This is showing the outside of the eyeball.
Let me get the right one here. I can do it.
Hang on. There we go.
And so that really has a strong structure.
a strong structure. Same with this pinching shadow here, great structure.
Look at the incredible economy now. One of the problems we have is to get the front plane
of the nose to go out to the wings of the nose. And so what did he do? What did he do?
Let me do this first. Ruin his sublime work here for a second. You can see how I’ve
destroyed a lot of his subtle structure, and it doesn’t hurt the piece that much, does
it? It’s so beautifully staged and designed and plotted out. But what he did is he swung
out on both sides and did this. And so just kind of a diamond shape, and this goes on
into the bridge. This comes down towards the tip. He breaks the line a lot. But he’s
really just picking out one side and the other in this flaring diamond, and that is a shorthand
for showing us the tip and the wings together. Really great little invention there that is
incredibly suggestive and incredibly appropriate and really economical, which is almost always
a good thing. Let’s see. So I’ll make it slightly stronger here for you. But you
can see how the structure is in there, but it’s a stylized move. For a guy like me
who loves zigzags, I couldn’t feed my family if there were so such thing as a zigzag.
I'm so dependent on them. That’s a nice little zigzag action from the end of the nose up
into the eye socket area. Really nicely done.
AUTO SCROLL
Transcription not available.
AUTO SCROLL
Alright, now let’s do a little assignment.
You’re going to work from timed poses.
I want you take the reference and go ahead and draw
some of those basic ideas on the nose down on the paper. See how it works for you.
Go ahead and give that a shot, and I’ll see you on the other side.
You’re going to work from timed poses.
I want you take the reference and go ahead and draw
some of those basic ideas on the nose down on the paper. See how it works for you.
Go ahead and give that a shot, and I’ll see you on the other side.
AUTO SCROLL
Now it’s my turn to try and draw from those poses, so here we go. Alright, so as we work
on the basics of the nose here let’s look at the end of the nose or model here. And
we can see that despite the real strong shape of the nose we’re still seeing underneath
it a little bit. And so here is what we have to watch for. We have to watch for the tip
of the nose, the end of the nose, the ball of the nose. Let me look past the glare on
my fellow there. Then we need to step back to the wings of the nose in here. And so it’s
important in some way that you show that this side structure is behind the center structure.
And then that side structure is on top of the mouth structure here. So we have this
hierarchy. Of course, the shading will help, but we’re not using shading yet. We’re
just analyzing the stuff here.
And if in your drawings if you want to put in a little shading I’ll never know, and
you’ll never have to tell me. That’s okay. Then we feel the plane of the mouth in here
very strongly pulling in, dropping down like so and like so. And so we want to make sure
that this is a bridge structure so what I’m seeing in effect, or what I’m imagining
is the wing of the nose having a bridge structure and the mouth and nostril area goes up under
that. So this comes back around, attaches to the mouth structure and moves on in there.
And then this goes on up here and does whatever it does there in there. Let me just knock
that down since it’s so messy so you can see it. It’s important to see those clear
differences, clear differences all the way through and all the way back. Alright, I’m
going to start the next one here. This takes off this way and drops down. And the end of
the nose, we can kind of track the ball of the nose. If we look carefully at it we can
kind of break it into more of a chiseled version of itself. Sometimes it does that for us.
Oftentimes we have to pick it up. There’s going to be some kind of end or some kind
of end, and then there is going to be a point where that—when I say in I should really
say front, goes into the bottom. And that front goes into the top.
We want to be aware of where that is.
Here, let’s say we’re slightly underneath this nose. Everything down here is bottom plane.
And we’ve got to respect that and build off that. When we look then at the wing of the nose. There is some
type of front plane moment, and then there is going to be more of a top plane where it
swings up. There is going to be, again, a bottom plane and we need to feel that. So
what I’m looking for, then, if I just do this. Let’s do this kind of a like a cartoonist,
a comic book artist would do. We’ll have something like that, and this will go on down
into the mouth. What I need to be thinking of is how these line up and how this is going
to be the bottom plane, or how these line up this way and we’ll be a little bit farther
under the bottom plane. Even if I’m going to keep it a simple drawing and I need to
feel that, so that’s what we have here.
So the nostril is sits in here, and we need this to be able to, this tail to come around.
So when you do that nostril make sure you don’t crowd it and destroy the tip of the
nose. We have to have a full structured tip in here, and make sure you don’t come back
here and destroy the thickness of that wing. We need to be able to have that wrapped back
around here like that. In a way we’re thinking like this although with thickness. We’re
thinking that wrapping back under. I’m actually going to shade this in this case so you can feel that...
and feel how that little bit catches light again because it’s coming back around.
Notice how we can just make it this line, this line, and this line, and yet we want
to have thought of all of this—intuitive or be well aware of it so that
you get credibility of that nose.
but I just have one thing to say about this. We’re
on top of that. We can see this here. Notice how in the reference—look at the reference
carefully. Notice how I’m going to stylize it so it creates a little plane. Notice how
the nostril shows up thicker out here and then tapers down. Think of a little ribbon
that’s turning over kind of thing, rotating out. We’re getting that plane diminishing
under the tip. The tip cuts off that ribbon that way, and then we see it again this way.
If you’re a comic book illustrator or a real stylist or just want to get a quick notation
with an oil painting brush, a little quick sketch, those kind of nuances are key because
that’s going to turn that form. What it’s saying is you’re seeing more of it and now
it’s rolling over and showing less. Anytime you can get forms to roll over, like the muscles
here are going to strap across here. When you can get those kind of movements over that
rotation is more a dynamic and more sophisticated and more alive because it’s showing what
nature tends to do with the body. Things rotate in and out of position to be in and out of
the function. This comes up here. You can see how cleanly and simply you can design
something if you have in mind the right idea. You can also see how by real shorthand, and
you’ll see this kind of thing a ton in comic book illustrators. They’ll do this for the
end of it. That’s showing in a shorthand all this stuff. That gives us the sense that
that ball of the nose—I said I wasn’t going to spend very much time; now I’m spending
a lot of time. That ball of the nose is in front. So we’re constantly aware of positions
of the biggest possible structure. This whole thing can be one big wedge. Then the secondary
structures that we may or may not show we want to be aware of.
Alright, this is a good example of how strongly the nose goes off in its own direction. And
so look at how much time I spent at the connecting point. I actually did quite a bit of rendering
and contour just to make sure. Not because I want to render this and render that and
render that, but I want to really be sure of how and where my important structure begins.
Now the face goes off this way, but the nose goes off that way. If I were going to screw
up I’m going to make it go off a little more than I think. Then it’s just going
to be a more dramatic structure and be just fine. But if I happen to underguess before,
then overguessing is going to be just about right. Oddly enough, it’s just about right.
So it’s always good to push it. We don’t believe things are off axis the way they are
sometimes. There is our front plane pulling down here. This is all front plane, side plane,
or side plane going off into the cheek. Then in here you can see how beautifully the tones,
the shadows, and we’ll see this when we get into our advanced level with the eyes
and nose relationships.
But you can see—I’m going to go ahead and shade this just so you can see it. You
can see how that is the root of the base connection there. Then we come out here and you can see
how that nose doesn’t break away but rolls off into the cheek. Here it’s going around
the eye socket, rolling off into the cheek and over and then rolling off here and over.
Only when we get to the wing of the nose does it create a real strong separation, a real
stairstep. All of this stuff is much more of a lazy ski slope down. Then always look
over to see if you can see any bit of the other side. In this case we can’t, but look
for that. But we can see it stepping up at the tip. It’s suggesting that move towards
the other wing that we cannot see, and then we come way back under to reestablish the
mouth so that we’re, you know, pushing that nose off in its own direction.
Okay, we have this fantastic eye socket there. Let’s pick that up again.
Notice that as I’m more interested in showing these
major changes to subtle forms I’m picking out
more male subjects because you’re seeing that bigger architectural change.
Just on average, in general.
So here is the eye in here, that eye socket. That’s that whistle notch idea. Here is
the brow coming back over this way and then all this kind of stuff in here. Then the nose
is behind that. So let’s go ahead and get a little bit stronger cheek. This pulls here.
We can actually feel it move back here. That’s going to be an interesting thing and very
useful. That’s used a lot by dramatic artists looking for great drama or heroic design.
You can see how once you get things simply done you can create wobbly variations of that
so I’m going to wobble that closer to the contour I see. I don’t have to understand
structurally. I’ll teach you about that structurally. But you don’t have to understand
that. If you get the big major stuff—the little stuff you can just sketch in or you
can edit out or render in, you know, design in. You don’t have to analyze it to death.
Just get the major stuff so that you can have good control over it.
I’m going to switch pencils since I chipped that tip there. So that cheek comes down.
I’m going to darken it so we can see it. Now here is the hallmark of these kind of
beyond the profile positions where it’s starting to turn towards the back view.
You really want—I know I’ve said it before but it’s so important. I really want to
show the cheek in front of the eye and then the eye structure in front of the nose.
So we’re going to pull this here. Notice what happens in this view. One of the reasons I
picked it is notice that the wing is in front of the tip. I’m going to play it up more
strongly so we can see that. Notice that we have the wing structure in front of overlapping
the tip structure. Then the mouth goes right up into that nostril again, the plane of the
mouth into the nostril. Then all this jowl and dimple area, all that stuff is on top
of thing to the right. It’s really important to show that sense of overlap.
Alright, so let’s…
When I’m sketching I actually like to draw over other drawings
because then it kind of composes the page. It can really get in the way. But this is
oddly enough looking like the eye socket now, the structure of the eye socket. That might
give you fits or it might be kind of a cool thing. It might even suggest some kind of
new design that you hadn’t thought of for the eye. So we’re not interested in those
eyes, though, so we’ll just leave that. I’m just going to dust that back just for
clarity’s sake since I’m drawing over another drawing. I want you to be able to
see what I’m looking at.
Here is the cheekbone here. We haven’t dealt with that yet and won’t, but what we’re
looking at here is that tip of the nose that we’re underneath. We’re underneath this head this way. That’s why
the brow comes up and the ear drops down. So we have, if we turn the top into a box
we feel this kind of thing. See that darker so you can see it. So it’s important to
kind of feel that. Quite often I’ll come in and I’ll square things out because it
really helps me understand the architecture, these corner, side, front planes. You can
break it into as many facets as you want. But really seeing that in space is extremely
helpful and really is a great teaching tool. So this is pulling in here.
Now, our main thing is just feeling that bottom plane. I’ll show you some shortcut stuff
once we’ve done all of our hard work of rendering. But one of them is using strong
shadow shapes. If you can just get a strong shadow shape there is a lot you don’t have
to put in. Look to Rembrandt. Look to Sargent. Any of the Brown School painters, Van Dyck.
You’ll see that. They simplify the shadows, and then they don’t have to do much in there.
But you still have to understand it. You have to understand the bottom plane and how the
nostril sits in there. You have to understand the wing structure as it tucks under, the
tip structure as it tucks under and how the far wing is behind that and the nostril is
a sliver of space between it, and the mouth plane goes up into it. You can see the cheek
pulling down here. And so all those things have to be there. You can’t just hide them
and ignore them. You have to simplify them but with a clear understanding of exactly
what’s there. That’s the ideal. The fact is that sometimes you’ll get in trouble
with something, and you’ll rearrange the pose or you can hide the problem through some
shading and such. But we don’t want to depend on that.
Alright, that’s our nose lesson. I hope you got something out of it. Noses are easy
in some ways because they’re big and simple, and they’re difficult, as we’ve just talked
about, in other ways. There is a mix of information to work with, and I want you to try and practice
that on your own in your sketchbook. Come back to the lesson a few times and see it
again. Make sure you’re picking up on everything. I can almost guarantee there will be new points
that will pop up and become important to you that you kind of passed over the first time.
So revisit it. Soak it in. Then I will see you in our next lesson. That’s on the mouth.
There is plenty to worry about on that one, but we’ll save that for next time.
Reference Images (30)


Hans Holbein the Younger, An Unidentified Woman, 1532 - 1543.

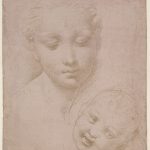
Raphael Sanzio, Heads of the Virgin and Child, 1509 - 1511.

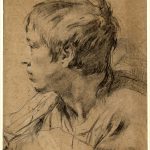
Giovanni Battista Piazzetta, Youth Profile, 1715 - 1718.

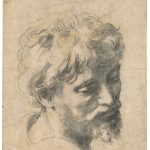
Raphael Sanzio, Head of a Young Apostle, 1520.

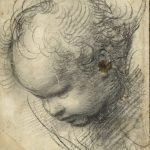
Raphael Sanzio, Head of a Cherub, 1509.

Norman Rockwell, Facts of Life, 1952.

Édouard Manet, Portrait of Suzanne Manet, 1870.


Free to try
-
1. Learning Recommendation
24sNow playing... -
1. Construction of the Nose
9m 55sNow playing...
Watch the whole lesson with a subscription
-
2. The Nose in Perspective
9m 18s -
3. Old Masters’ Analysis; Holbein, Raphael, Piazzetta
11m 56s -
4. Old Masters' Analysis; Raphael, Rockwell, Manet
14m 44s -
5. Assignment
24s -
6. Timed Poses
11m 14s -
7. Assignment Demo
19m 9s
CONNECT
New Masters Academy
16182 Gothard St
Huntington Beach, CA 92647
Contact US