- Lesson Details
- Transcript
- References
- Instructor
- Glenn Vilppu
- Subjects
- Drawing
- Topics
- Anatomy, Head & Portrait
- Mediums
- Colored Pencil, Watercolor
- Duration
- 1h 35m 48s
- Series
- Constructive Head Drawing
We are pleased to share with you a 10 week-long class brought to you by Art Mentors! In this class, Master draftsman, Glenn Vilppu teaches Constructive Head Drawing. The class will focus on the anatomical structures of the skull and face, and how to draw realistic features and expressions. In this first lesson, Glenn gives an introduction to his head drawing approach. Glenn will emphasize the importance of drawing from your knowledge of skull structure, and how to analyze the model, rather than copy. He will also go over basic proportions, and how to tackle various angles of the head.
Materials
- Caran D’ache Supracolor II Watercolor Pencil – Bunrt Sienna
- Pentel Water Brush
- Winsor & Newton Watercolor (in Homemade Altoids Tin Palette)
Beginner Friendly
12011 views
78 likes
Discuss this video in the forums!
DiscussChoose one video.
AUTO SCROLL
(intro music playing)
We are pleased to share with you a
ten week long class, brought to you by Art Mentors. In this
class master draftsman Glenn Vilppu teaches
constructive head drawing. The emphasis is on the actual skull,
what the thing is like for real, rather than a
schematic approach to taking and drawing the head. The class will focus on
the anatomical structures of the skull and face and how to draw realistic
features and expressions. In this first lesson, Glenn gives a
introduction to his head drawing approach. Glenn will emphasize the importance
of drawing from your knowledge of skull structure and how to analyze the model
rather than copying.
AUTO SCROLL
Okay I'm Glenn Vilppu, I've been teaching
for well over 50 years.
And today's - this class is head drawing. Now
I take and teach
a head drawing class quite different -
well I dunno if it's that different - but the emphasis is on the
actual skull, what the thing is like for real,
rather than a schematic approach to taking and drawing the head.
I know - I'm not an illustrator, I'm a painter.
And I don't take -
and I work teaching 20 years before I
got into animation. I worked in animation for 20 some years.
Still teaching in animation.
I'll be 80 in a few weeks, so I've been doing this for a
long, long time. One of the things
I've done over the years is
to take and
focus, focus on the real thing.
Rather than a formulized approach to taking and dealing
with the head. And to me that's the key.
And if you look at the drawings by Da Vinci
or the Michelangelo, they really base their drawings
on the real thing. They weren't taking and using
artistic conventions or illustrator's approaches to taking and dealing with the
head. It's the read head. So we're gonna be focusing
on step by step approach to
taking and drawing the head.
And so today's class is focusing
on how do you start a drawing? What are the
elements? At the same time I'm gonna be bringing out certain
points that we're always looking for and
no matter how long the pose I have
I always start the drawings pretty much the same way.
Whether it's a ten hour pose or
a two minute pose or just a quick sketch or drawing from the
imagination. What allows you to take and
draw actually from imagination is
to have a very, very strong sense of
the structure of the head. And
many years ago I worked doing comic books.
I've done all kinds of stuff and what
allowed me to go from one thing to the next
is to take and have a very, very strong foundation
in the fundamentals. And I decided
many, many years ago that my focus on what I
taught was gonna be on fundamentals.
And so the first thing that we go through is the point is
we never copy the model. We're not copying the model,
we're analyzing the model. And
if you approach your drawing
as every drawing that you do is you're analyzing
which means you're studying.
So every drawing is you're acquiring
knowledge. And so the process
is one then of constant studying. I'm still studying. Every
drawing I do I'm analyzing, I'm learning and I'm
trying to take and develop my understanding of the forms that I'm
drawing. And so that's the process
we're gonna go through. So anyways, let's get started. I wanna take
and do some, a little bit of diagramming first and then
we'll go from there.
(drawing)
AUTO SCROLL
Let's go through the first, basic fundamentals.
First, we need to have a very clear
clear sense of the basic proportions.
You may already know
this, but when -
sort of the hallmarks of my teaching is I assume you know nothing.
So I start from scratch.
So, the beginning with - let's just
take and - we have to have a
reference point that we take
and work from. Start with -
I take and
begin always with
certain fundamentals that
are the starting point. First -
now this is already where I
deviate from the more illustrative
instructors - is that the eyes are
exactly in the center.
From the top of the head to the bottom of the chin
the eyes are in the center. Now we take the brow line -
now this will vary a bit
with one individual to another, so we just need to learn
a basic relationship. Now, first of all
the brow is not a straight line. The head -
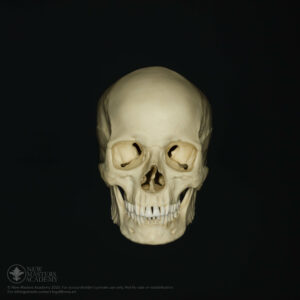
if we would take and look at the skull,
you can see very, very clearly
that the head is very, very curved. Forehead is very, very
curved surface. So we're taking this. Okay
that's the beginning point. Now from the brow - so we're taking
sort of the general point there. From the brow to the bottom of the
nose is halfway.
So again,
it's one half.
Okay. The next proportion is the bottom of the lower lip.
Not the mouth opening, but the lower lip,
is one
half. The opening is above that.
The ears tend to line up with the
brow and the bottom of the nose.
The corner of the jaw
works roughly to the opening of the mouth.
(drawing)
The eyes are one eye distance apart.
(drawing)
Okay now
you can see very clearly that the front is a lot
narrower than the back. So what we get
from that - the difference between the front, and we're talking about
the corners of the eye socket, to the back of the head, is
one eye length. So
we get a break from here - so this goes back
at an angle. Now,
so this gives us our basic proportions there. Now let's look at
and do the same thing, but now - oh there's one other proportion we want to take and
deal with all at the same time. We're drawing the head
to also take in the neck. So the
distance from the bottom of the nose
to the top of the head is equal to the distance
of the pit of the neck. And the neck is
higher in the back, so what we have is an
ellipse with the opening of the neck, or the head and the
neck - which also corresponds to the opening of the ribcage.
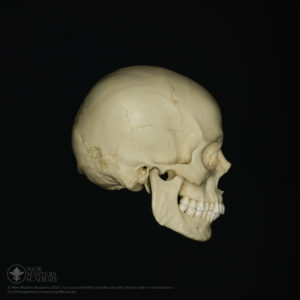
Now, in profile,
we take same -
through...
(drawing)
The eyes are in the center. Now
when you're talking about the top of the head - we're talking about the top of the head,
not the top of the face. A lot of people
use a face proportions of one third. We're talking about the
full head. Okay. Come down.
Okay so that brow line,
bottom of the nose -
okay as we come down - now as we
will see that
skulls vary quite a bit actually in look
and shape. But the
essential halfway point is
the ear. The front of the ear.
In other words, our balance point is actually
the cochlears of the ear. So that's actually right in the center.
So we take and visualize this - now as you can visualize
this almost like a square here. And
we would see if we did that, we would be getting
point right here. So the halfway - lining up with the eye -
coming through, the jaw comes in front
of ear. Now remember we got the
opening of the mouth. This will tend to line up with the
corner of the jaw, coming through.
The pit of the neck is gonna be here
to here. The neck tilts
going back, it's actually wider at the top
than it is at the base.
Okay, now, here's where we start to see some
deviations and stuff. Now when you look at the skull
here. Now this is a female,
European. Notice and - it doesn't make any difference
we're all pretty much the same. You can see the curvature
of the mouth here. So
this is a shape now that is gonna be out here, but
we go back - I'm gonna take a step back here. The corner of the eye socket,
this point that I'm drawing here and here, is not
on the contour. Here's the corner of the eye socket, is down here.
So this point right here is the corner of the eye
socket. And so this will take and be down
someplace in here. And then we have
what we refer to as the pillars of the eye. A line taking and
coming down through this way and then we will start to pull out. The
cheekbone now is
a very, very much of a variable that the corners
of the cheek can be very tight or
they can be very broad. If you look at the skull,
what you see, there's a line right
here, this is the basically where your temple
muscle attaches. Coming across through here. So
if you can look at this arc and it pulls in behind the ear
and works with the mastoid process that we have going through here.
Mastoid process is that large bump right
behind the ear. So this line will take
and tend to go through this way. Now
if we continue that line, we will then
include then the line pulling into the cheekbone.
And we can see from there - and
now here's where I deviate quite a bit from a lot of
your basic books on how to take and draw the head.
In other words, I take this line here,
a circle coming around. Okay.
So, in other words, as we look at the way muscles
actually come down, you have these glands coming down,
the muscles come down - the corner of the jaw is back here.
This is the line that's actually felt and seen. So
this, rather than this circle thing going around,
I think that that's actually misleading.
If you look at this you can see now where we start to pull back, going through,
bottom of the nose. Now, what we get is
actually a plane that takes and comes down
this way. Again, these are variables that we will talk about.
Now. And as this whole plane of the eye socket goes
back in, we take and think of the muzzle
coming out and then we've got the chin
and the mandible coming out and then the nose fitting into that.
So this gives us our basic
proportional things that we're dealing with to start with.
Keep in mind now that
in the head, there's a bone
at the bottom of the chin, right here
The bottom of the mouth actually, is the hyoid bone.
And a lot of people don't even know that we have that bone here.
But this will be a demarcation point between
the underside of the chin and the top of the neck
in the front. The mastoid process in the back
here, okay, this is where the muscles
that take and come forward - the sternocleidomastoid muscles -
take and pull. And we'll talk more about these later on. But these are
points that we look for, we're always
focused on the anatomical parts. Now
as we look at the
skull here, this
shelf that comes through in here - in other words we can see
that the where - you have these condyles under here where
the neck fits into. It's pretty much in line -
we balance - the head balances here where we think of the
ear. This point coming through here. Now these
forms here you can see that this pretty much lines up
with the roof of the mouth. So we have
these forms that are coming through. The angle
now this ridge coming across the back - and this is again important, I'm gonna -
don't worry too much about all - about what I'm talking about too much -
well yeah you should worry about, but I'm just
gonna repeat a lot of this stuff. This is the nuclear ridge across the back of the
skull. And so this will be a variable again of the
angle, but we can visualize this whole plane that comes through here.
This being the roof of the mouth. And we can start to see
how all of this then takes and drops down. Okay.
So that gives you a - sort of a quick
tour. Now I'm gonna give you a
simple way - this is to start with - and this is gonna be
elaborated on. But I wanted to give you a very, very
simple way to conceptualize
the basic planes.
And so this is just a starting point.
Not really a
way of blocking it in, but just a way of
understanding how these planes work. If we start out -
if we take the idea of a watermelon.
We've got this
watermelon here
and I'm gonna take and look at this watermelon, sort of
three quarters, so the front of it would be over here.
Now, if I take a
slice of that watermelon, starting with the center,
I come through here and I slice this
watermelon. Now I've taken a slice out of that
watermelon. Okay.
Now, if I come through and I take, and we've got that.
Now if I come through and I take another slice
out of it this way.
So now, what we've got
started here is roughly the plane
of the eye socket. Now if I come through and
I take another slice of this watermelon
across the front and just sort of drop off this amount
here.
Okay. Now,
what you see here, here's the major differences
right now. When you look at the skull
you can see that this is a very much of a curved surface
across here. But the plane across
the cheekbone is quite straight. In other words,
we look at it this way, we can see that this line across here
of the cheekbone is fairly
straight line across here. And that this
is a really a curved surface. So, just by
taking and doing - making these slices, we're creating somewhat the same
feeling to that. Now if we take the point that we
got here, this corner here and if I take a slice of the watermelon off
this way,
now we start to get a
very, very rough assembly of
the basic planes of the head. Nothing
complicated or really aesthetic. And if we take
another slice off the top up here,
this way, now we've got a
some of the basic planes of the head. So if you can just visualize
this - this is what it is. A simple three
dimensional forms that we're working with. Now
let's take this a little bit farther now.
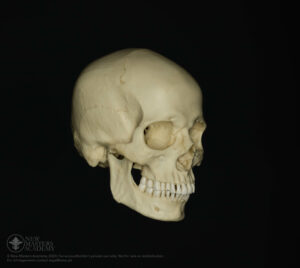
When you look at the skull, particularly if I
take and hold it down like this. Let's see if we can, okay
you're seeing that. Notice what you have here. You've got this shape
going from here to here.
Okay, now this is the form that is often
totally neglected. Okay. And I'm gonna take
and draw a little bit more now, focusing
on this area right here. Because it's really
critical part of the process that we're doing.
So, as I'm drawing this now,
starting out with the skull
and I'm doing a three quarter, like I was drawing there.
When you draw, when we were drawing the proportions
here, okay we're drawing the front of the head, we're drawing the oval
like this. The only time that really
functions is when you're looking at the person straight, front view.
The minute the head is turned, any mode at all, you have to
compensate, you have to compensate for the back of the head
which is larger. Okay.
So that takes - so what I'm doing here now is I'm
drawing this slightly three quarters. So I'm thinking of the front
is coming down, through here.
Okay, so now we
take and think of the corners of the eye socket, which are these points
right here. And I'm taking a slice off there.
So this is the corner of the eye socket. The corner of the eye
socket is over here. This point right here.
Okay so, from that point here
to, say, here. Now from there
the eye socket is going at a diagonal. Remember
this whole surface is a curved surface.
Okay. The eye socket
pulls out this way.
We'll know where it's coming out at a
corner like this. Okay, you can
see if you look at the skull how this takes and this
pulls out. This whole thing is just coming out and it's very clear
when you look at it this way. You can see that this surface
up here, this is taking and coming down
this way. So now, what we have then,
you have this section in the center here.
This is coming across
and fitting into here. So the eye socket now
fits into this form, coming through
in here. So we've got this very clear
volume. So what happens then is this, this
becomes the border, or the beginning point,
for the planes of the forehead.
Now, this will vary quite a bit.
Like on this one it's not that extreme. It's the female
so usually they're a lot subtler. But often
this can be very, very clear, clean, sharp corners.
Okay. So we got this plane that's coming down,
going down that way. Now, we can pull
down this way. So now,
I'm thinking now as I'm drawing this I'm going
here we started this as a vertical line, this
as a straight line. And if you look at
the head straight, front view
we will see that the eye sockets
are not parallel. This is
the angle that it's going. This way and that way.
So these are differences now that are
taking place at this point. We've got this now. I've added
this to this.
So very quickly, just by taking and focusing
on the anatomical structure, we're
creating a better understanding of
the planes themselves. So we build, we build
these forms, one on top of the other.
Now, when you have a three quarter view, this
the pillars of the eye, up here, parallel.
But they're not really. Okay. So
now we're taking this as the basic, overall plane and ignoring the
nose for the moment. Okay so that
taking and what we did over here with the watermelon now, we were talking about
this, this, to that, this,
going through.
And it's important that we recognize even when we're looking at the
model, that we recognize where these points are.
Okay, the cheekbone is gonna take - and for some
it'll be outside, not here, maybe it'll come out this way.
Others it can be really quite tight.
So that's a variable, but you start
with something and then you - one of the problems, one of the things that we do
is we start with sort of a standard and then we see
how do people vary from that standard. So
there's variables that you will take and see
and we'll talk more specifically about that as we go along
so we need to take and look. We start with something that's standard
then we take and see how the varies from our
superman. So now we got the cheekbones
gonna be out, out here. And that's at a diagonal, that's
going down. So you can see that the shape here.
Notice that the line, this line here to that line
are very similar. We get the same
breakdown, coming through, this is a line that Da Vinci
takes and does some drawing with. Actually you can see how that
on this skull here, it tends to line up with the corner,
the corner of the bone of the nose. So
these are all points that we take and look at.
Feel this, feel this. You're looking at the basic structure of the thing.
So now, what I wanna do is from here,
we're gonna take and start doing a series
of just very, very, very simple, quick
gesture drawings of the head. And
the biggest
difficulty I find with students and this
is that the first thing they wanna do is they wanna start drawing
eyes. Forget the eyes. You have to have
an eye socket first. You have to have the
planes of the eyes, forget about the eyes.
And they start looking at noses, well noses vary
a lot. They can be way down, or they can come out here, they can be straight,
There's no such thing, really, as a
long nose and a short nose. It's all about the angle.
Here I can make this into a short nose
or I can make it into a long nose.
It's the angle
that the nose is on that we're talking about.
So the placement, proportions, are all the same. Okay, this is
a starting point now. So what I want you to do
is to take and - first we have to establish
the orientation of the head. Okay. So in other words we
the beginning point is, just to look at the head and say is it
vertical, or is it tilted one way or the other?
Now, in the actual process of doing
the drawing, what I do is
I'm actually taking and establishing - I'll take and say okay,
this, then I'll move my pencil down to see
where the chin is, which is gonna take and create that
line. So then I come through and I say okay
we got that head, it's tilted. And I may come through and at the same
time try to establish where the pit of the neck is.
Now, to establish which way it's going
in space, it comes down to being very, very conscious of the fact
that the ears line up
with the bottom of the nose and the brow. So when the head
is perfectly straight, we're gonna find that
the line - looking at the model you will see
that these things line up. But the minute the model
tilts its head back
(drawing)
we see that - in other words - the minute the head is going back
this way.
We will see that the ears now will be taking and be down
in here. And in fact, what we do is
we look across at the ears to see the fact that
it is tilted. Now, we can do
this also at another point. It's the idea we're talking about these
forms in space, how they are.
One of the elements of - if you ever look at the Bridgman's books
one of the things that he brings out is the first line that
he talks about is drawing the line from the corner of the eye socket
looking at the angle of the brow and
going the angle down to the chin. Now he does
it pretty much as a straight.
But for all the things - so what we can see right away that when I do
that, that the head is on a different angle now.
So, we start to come through.
One of the things that Michelangelo did was he would be drawing a head
blocking in something very, very simple. He would use a T.
The T being the line of the brow
and the bottom of the nose.
It accomplishes the same thing. So we go through
all these sort of basic, simple steps to get
through. So, now, what we're gonna do then is
one of the things that
a
point of people think - well how do you draw that
lips when the head is tilted. How do you deal with that?
Now, I don't necessarily do this
because I just sort of feel it. But here's an intellectual
way of doing it. In other words if we start out with
the head.
(drawing)
Going through here
and okay - the head when it's perfectly straight,
an ellipse, it's a straight line.
But if the head is tilted
we still think of that tilt starting
at the center and then going up that way.
So then the question comes well
how far, how far. Now that's the line of the eyes. The brow would be above that.
This then would be coming a straight
eventually. Okay. But how far do we move the chin up? Well
you move the chin up the same amount of distance.
So that's - that gives you a rough idea.
Don't get too -
don't get too comfortable with being so technical.
Okay. You take and you really need to look
look at what the figure is doing. So
we take and we build. So what we're gonna do then is
a series of quick poses where we take
and block
it in. Now these should be no more than like three fingers
size. So you're feeling
the shape, we're taking and looking at
which was the head's going. Blocking in. Looking for where the
corners of the eye sockets are, blocking the nose,
mouth, neck, feeling the
twist, thinking the corners of the jaw, feel the corners of the jaw,
think of where we're coming down to the masseter muscles
in other words, again, those are the muscles that are coming
from the corner of the cheekbone, coming all the way down
to this point here. The corner of the jaw back here, pulling into here.
So that creates a plane on the side of the head.
Block the ear in
and draw the shape, shape of the hair.
Now
at the same time, I would like you to take
very, very simple,
drop a tone
for the eye socket, a tone for the
underside of the nose so that
right at the point it would be the equivalent of taking and
drawing in shadows of the head.
Now this should not take you any more
then a minute. Or maybe
make it two minutes. But that's even too long.
Okay. And what we're gonna do then
is we're gonna take and do this at all kinds of different angles. Tilting forward, going back
and turning the head. So we wanna
focus on - focus on how to start the drawing.
And this is what the key to begin with - and then we'll
expand on that. Most mistakes are made in the first
minute. So what we wanna try to do
is forestall that first minute mistake until
the fourth or the fifth minute. But if we get the drawing
started correctly, get your proportions, get the thing blocked
in, then we go from there. Now
be really rigorous about getting the eyes
in the center of the head. I find that
most people - I shouldn't say, but I would say not most
but at least in a large class say of 30 people
a good 15 of them will have
the eyes too high. You have to be very
mechanical about it. Just blocking it in and then we'll go from there.
Okay.
AUTO SCROLL
Okay, this - what we're doing right now,
what we're doing right now is really
if you do story boards, if you're doing comics or stuff like
that, how you're blocking it in, this is really bread and butter
stuff. This is where you begin.
I did
.comics by the way, back in 1961
Did Wagon Train,
Restless Gun, Maverick, Zorro, Underwater,
Dragnet, all realistic ones.
(drawing)
Okay let's make it two minutes, that's too
fast. Okay.
(drawing)
Now what you try to do is,
you're doing the drawing is to be very
mechanical at this stage. And try to
take and start every drawing exactly the same
so that this becomes a pattern and actually a
neural pattern so that you can take
and block these things in very, very quickly and this becomes
a beginning point
in doing the drawing. Now this'll be very useful
for taking and doing gesture drawings, quick sketches.
Blocking in
even larger compositions. It's just a
beginning point that we work with.
(drawing)
Notice that I'm taking and when I start getting
a little bit more of a profile, I'm adding that
sense of half orange for the mouth
on that front plane.
(drawing)
Now if you look at him in profile, see how
it's very obvious then, the shape
the more flatter shape to the back
of the head.
(drawing)
Now we're drilling the arc on the side of the head.
Very, very conscious of that. You're taking and seeing it as
pulling behind the ear to where the mastoid
process is.
(drawing)
Now when the head is tilted down like this
a very simp[le convention to
see that, just putting a dot on what would be considered the top of the head.
And that'll give you a
right away, a sense of where the
top of the head is.
(drawing)
Now I'd like to take and
just point out a few things. One,
that as we go
through and start looking more carefully
and this is something I've already commented on now,
is to really visualize that -
and I'm drawing this looking down now -
is to see - okay the back of the head
is very clearly larger
and as you come through the surfaces, this comes down
(drawing)
you can really see how
the corners of the eye socket stick out.
This takes and sticks out this way and
we're coming across at an angle, through here and we feel
this to this. So you can see this line
here, we can feel it coming across, we can see these forms
coming through in here and sticking out. Now what
happens? Now this is a part - when the head
is turned really
strong away from you, what we see then -
and this is a point that is gonna be
very difficult and just in terms of observation
now. Because we've been talking about the line
corners of the eye sockets and this arc here.
But when the head is turned this way -
I'm gonna do it up here where I can do this.
What happens is that we don't see the corner of the eye
socket. What we see here
is we get this line and then we get this center section
form going through here and so we get the corner over here.
That gets confused with the corner of the eye socket.
The corner of the eye socket is back down in here.
Because we're going around a corner. So that can be
really confusing. It can really
throw you off because the plane of the eye socket then continues on
down. And this would be going back down here.
So this point right there is not the corner of the eye socket.
That is the
corner of this central plane that's going
through in here. And that - you have to be
careful when you're looking at it that that doesn't -
that you don't see that - instead you don't think that that is that.
And then we would be going through in here, seeing this plane
going through. And you can see where this comes down, the nose then
taking and coming out and even if you
can't see the cheekbone, you try to think of it
drawing through to where it would be if you could see
it. So then we start to feel these planes.
Going down and coming through. And then
one of the things I've been doing is I've been drawing the muzzle, the
roundness of the mouth. So we visualize that
this plane here is coming down
this way. And the mouth is
curved surface on top of this.
Now, we were just
talking a little bit while we were having a coffee break here - or
five minute break - that one of the anatomy
books that is probably the best in taking and
clearly showing you all these basic planes is Peck's.
P-E-C-K.
Peck Atlas of Human Anatomy. And it was
originally published in the 1950s. And it's
sort of the anatomy book that I cut my teeth on.
So
this, that was it so now we can
see that this - and then you've got the mastoid process behind
the ear. That's where this arc is taking and going to.
And we're coming down, through here this way.
Ears in here. So you've got this plane
then the nose is fitting into this curved surface
So you can see that as this comes down, this is
fitting into where the mouth is taking and coming out.
So this is a point in here, this way,
and so all of this now - in this case
we can see that this is dropped down in our model tonight
is even dropped down farther.
But you're gonna find that we get - a lot of people,
the Greeks - think of some of the Greek, classical Greek things, there's
no set down at all, the nose is a continuation
of the line. Which is actually - people grow that way.
So you can see that quite often. So -
but you want to look at these basic, basic shapes now. What we
thinking. And if I start to render this, in other words, I would be seeing
as you look, in other words, if we're looking down here you can see the curve, you can
see how this cone is coming around here
and we can feel these forms sticking out. So actually here
in other words I'm coming down and starting to push the tone
down to take and feel as we come down we can feel
this is pulling out. This pulls out.
So we really feel that this is a - in a way
a way of thinking about this is that we can think
that this is like a super structure that is taking
and coming out. And coming out. This is in front
fitting in. The actual
point, the actual point where this takes place right here
is you can see, there's a superior orbital ridge
which is the top of the eye socket. And right at that point,
there's a notch in here, is where the
blood vessels and stuff, arteries and things that go into at that point.
And so you can see that that's a
very point - so this is like a speed bump. Another
point that makes it sort of interesting is
that this is where your eyebrow starts, on the lower side
of that plane and then comes across. So
that we take and we can feel the eyebrow starts in here
and then comes across and goes over. Or in most men will have theirs
taking and going right along the ridge. But the women pluck their
hair and so we get that light spot is
considerably lower. Okay. So now let's take and do some more
but go a little bit slower and look a little bit more carefully
in blocking this in. And then we'll take and -
I wanna take looking at each one of your drawings and going through those.
Another point that we can make
while we're waiting here is that even though we're
drawing things that has lines, in reality they're not
lines. They're forms that have corners like the
chin is not in line. It actually has the top
and then it goes underneath. So you have to start thinking these as
planes. So everything takes and we start drawing
eye socket, the way it pulls into the nose.
(drawing)
Now, another
little point here. One of the things, as he was taking and tilting his
head back, we take and
you need to be conscious of that the
corners - the corners of the jaw
create a line
this point, these corners
here so that when the head is tilted back.
(drawing)
Now we try to feel the skull, the base
this that you look for, you look
for the corners and you draw -
thinking across the corners of the jaw.
(drawing)
We're coming down,
feel the planes. So you can see how I'm doing it - I'm just thinking
of three dimensionally as we're going through the thing. So then the neck
fits into this, this is the cylinder
then that fits into that form. And we feel
the compression in the back of the neck as we start
going down and start pulling through. So again, different angles
we take and we look at these points, so we have
actually this large plane at the base of the neck,
and then we start to build from that point. Okay
let's take and make these actually five minute now.
(drawing)
Again, just take and think of a plane
of the eye socket, rather than the eyes themselves.
(drawing)
Same thing, get the head.
(drawing)
Now, as I'm drawing
this, the difficult area
is feeling where the eye socket goes
down and the cheekbone is coming out.
And we then try to see the plane, coming down to the jaw
and we can see the chin, the jaw behind,
and the plane coming down to the chin. And we feel this overlapping
surfaces. And on the other side
here, for instance, we can take and see this goes down, the cheekbone
is coming out. And we can feel all this stuff dropping
down. And we're going underneath the chin.
So I'm taking a little diversion here as I'm doing this,
feel the mouth is actually quite small in
side. And going through I think of the corner of the
eye socket here. Then we get this
shape. Now, I call it the
superciliary or the globule. I've had
doctors -
I asked them what do you call it and they said, "The bump."
The bump on the forehead. Okay.
Now -
(drawing)
I've had - now I'm
gonna take and think of the neck as we're coming through before we haven't
talked much about this. Think of where the pit of the neck is here,
this whole first seeing this as a
cylinder, taking and going through and he's bending
and the shoulder is pushed up high against
this. So in doing that, we have to keep in mind
that the clavicle has to take and go from here,
wraps around behind and it's gonna come up in there. So we're getting
a tremendous amount of compresion that's taking place
in here. The sternocleidomastoid would be coming across
through here, pinching at this point. On the other side
is the clavicle goes across and goes up and over
we can see the two head - there's two heads to the
sternocleidomastoid. There's the sternum
head, that's where the name comes from, and then the
clavicular head. So you got these two points
and - but we still focus on the cylinder first.
This is taking and coming through, coming down, feel
the pull and we can think of the thyroid
cartilage underneath, coming in, and then from behind
that, so there's a series of overlapping lines. We have first
the sternocleidomastoid, then would be the levator
of the scapula and then we would have the trapezius taking and
coming from behind that and going off out to the arm. And it
comes across and attaches to
the clavicle and we end up with this triangular shape in between
that's in there. So we build
again, it's all part of the anatomy that we take and
work with. Now, coming through to the cheekbone,
the overlapping shape here. And what we're getting at this point
here are the - this is skin, this is not muscle
at that point. Taking and pulling around
the pull from here is the
zygomatic major, which comes down to the
corner of the mouth.
And lips, we feel the chin coming up underneath that.
You know, we can feel the fullness of these forms as they go over that surface.
Okay.
But I'm just taking and carrying these things a bit farther.
(drawing)
Okay, now as I'm just
slowly taking and blocking it in.
(drawing)
I'm drawing with
a
color -
watercolor pencil. I'm gonna take and as
I'm going through I'll block in some of the forms with
wash.
Now it's interesting
now that I - for myself, I
often feel like I can draw much better
with a brush than I can with a pencil.
The brush can be much more precise.
(drawing)
When I'm traveling
I take and
do an awful lot of my drawing
with brush.
(drawing)
Also, notice how lightly I'm drawing.
(drawing)
Now I think you can -
when I started out
sorta my opening comments,
talk, was the fact that I approached
drawing the head from a
structural point of view, rather than some
kind of schematic approach to drawing the head
and I think you can see now what
I was talking about, that it's really built on
understanding, understanding the planes and structure
of the head.
And the more you understand
it, the more you will actually see.
(drawing)
Now I'm gonna start adding water
tone to this.
(drawing)
The - as you're observing the shape,
in other words, the
shapes are there, whether you're
drawing structure or not, the
but knowing the structure
allows you to take
and be more discriminate about the shapes and actually see
what's causing the shape.
And it will make your drawing more accurate. You can also
alter things then if you know it's the structure.
You can play with the shapes to get expression and add it
to that.
Often if you're stuck copying
it's difficult to take and alter what it is
that you're looking at.
So, now I -
also the shape is useful to help you
see where the forms are.
So looking at the shape is
becomes a tool and actually
a placement. So it
I don't ignore shape at all - I look at it -
it helps me to take and establish where things are
and of course, for any kind of
accuracy of character, you need to have the
shapes fairly
reasonable. Although,
in a book
I have by the artist
Thomas Sully, who was an American portrait painter, he took
and he knew a lot of
everybody. He was a friend of Sir Joshua Reynolds, etcetera.
Although really top luminaries of his day
and he commented on how
different artists felt that different
features were the things that really gave a likeness.
And they were all quite different.
They didn't necessarily agree. Some people thought it was the
eyes, some people thought it was just the complexion.
I was reading something recently talking about Rembrandt
where it was saying that he actually
wasn't very good at getting a likeness. But then
in his day, people really weren't interested in likenesses.
They were interested in flattering.
That hasn't changed.
But
I dunno, if you've ever done any portraits, the first things
take out - don't show all these lines.
Whatever. And you find that there's
people don't necessarily don't want
you to make it like there are.
(drawing)
Now, going back talking
about shape. As you're doing it,
you take and you try to see, see the
looking at the shape to see the differences
between forms.
It's all part of the same thing. You actually start to
taking as you work you start to be designing
a bit more.
(drawing)
And as
the semester goes, I'll try to take and
bring up different artists and how they took and
altered the shapes for compositional purposes.
(drawing)
So now as I'm doing this drawing, working with the wash, you can see where I'm
taking and actually working with the
shape of the shadows.
(drawing)
Okay thank you very much.
(drawing)
Free to try
-
1. Lesson Overview
1m 3sNow playing...
Watch the whole lesson with a subscription
-
2. Warm-Up Sketches
11m 56s -
3. Basic Proportions of the Skull
32m 0s -
4. The Brow Bone & 2, 5, and 10 Min. Poses
50m 49s
CONNECT
New Masters Academy
16182 Gothard St
Huntington Beach, CA 92647
Contact US